We’re excited to announce a significant update to how WPGraphQL is developed and released. The WPGraphQL repository has been restructured as a **monorepo**, and we’ve modernized our release process using **release-please**. Here’s what you need to know.
TL;DR
– For (most) users: Nothing changes! Install WPGraphQL the same way you always have.
– For contributors: PRs now target main (not develop).
– For the ecosystem: This paves the way for official extensions to join the monorepo, which should allow faster shipping and iteration
What Changed?
Monorepo Structure
The WPGraphQL plugin code has moved from the repository root into a `plugins/` directory:
wp-graphql/

├── plugins/

│ └── wp-graphql/ # The WPGraphQL plugin lives here now

├── docs/ # Contributor documentation

├── .wp-env.json # Shared development environment

├── package.json # Root workspace configuration

└── turbo.json # Build orchestration
Why? This structure allows us to host multiple official WPGraphQL plugins in a single repository, sharing CI/CD infrastructure, testing tools, and development workflows.
Simplified Git Workflow
We’ve moved from a develop / master branching model to a single main branch:
BEFORE
AFTER
Branch from master
Branch from main
PR Targets develop
PR Targets main
Releases triggered when developed merged to master
Releases created when release-please PR is merged to main
Automated Releases with release-please
We’ve replaced our custom changeset system with release-please, Google’s release automation tool. This means, much of the same automated release tooling we had will continue to function, but should be more stable using release-please instead of our bespoke scripts and workflows:
Automatic version bumps based on PR titles
Auto-generated changelogs from merged PRs
Release PRs accumulate changes until we’re ready to ship
## Changelog

**Bump Type:** minor

### ✨ New Features

* feat: add new field (#1234)

### 🐛 Bug Fixes

* fix: resolve issue (#1235)

### 👏 Contributors

Thanks to @contributor1, @contributor2
After (release-please):
## What's Changed

### Features

* add new field (#1234)

### Bug Fixes

* resolve issue (#1235)
The content is largely the same, it’s generated from the same PR titles, but the formatting is release-please’s default style. We may customize this over time, but the core information (what changed, which PRs, version bump) remains the same.
New Tag Format for Multiple Plugins
With multiple plugins in the monorepo, release tags will now include the plugin name:
Before (single plugin)
After (monorepo)
v2.7.0
wp-graphql/v2.7.0
–
wp-graphql-smart-cache/v1.5.0
Each plugin gets its own:
GitHub Release with its own changelog
Git tag prefixed with the plugin name
Zip artifact attached to the release
⚠️ Git Updater No Longer Supported
If you use Git Updater to update WPGraphQL directly from GitHub releases, you will need to migrate to a different installation method.
After consulting with the Git Updater maintainer, we’ve confirmed that Git Updater doesn’t work well with monorepo structures. With multiple plugins in a single repository, each with their own prefixed tags (e.g., wp-graphql/v2.7.0, wp-graphql-smart-cache/v1.5.0), as Git Updater currently cannot reliably determine which release corresponds to which plugin.
We have removed the Git Updater headers (GitHub Plugin URI and Release Asset) from the WPGraphQL plugin, and will do the same for any WPGraphQL plugins that are migrated into the new monorepo structure.
Manual download: Download the zip from GitHub Releases and upload to your site (requires manually doing this for each update)
We apologize for any inconvenience this causes Git Updater users. We believe that the benefits of the monorepo structure, such as shared CI/CD, coordinated testing, and streamlined releases across the WPGraphQL ecosystem, outweigh maintaining a specialized update mechanism that only a small subset of users relied upon.
The plugin works exactly the same way it always has.
⚠️ If You Use Local Symlinks
If you’re a contributor or power user who symlinks the WPGraphQL repo directly into a local WordPress installation, you’ll need to update your symlinks:
# Before

- /path/to/wp-graphql

# After

+ /path/to/wp-graphql/plugins/wp-graphql
For example, if your WordPress plugins directory previously linked to:
~/Developer/wp-graphql
It should now link to:
~/Developer/wp-graphql/plugins/wp-graphql
This would only affect developers that clone the repo and symlink it.
What This Means for Contributors
PR Titles (Still Matter!)
This isn’t completely new. Our previous system also used PR titles to generate changelogs and determine version bumps. That continues with our migration to release-please.
PR Title Prefix
What It Does
Version Bump
feat:
New Feature
Minor (1.x.0)
fix:
Bug fix
Patch (1.0.x)
feat!: or fix!: or perf!:
Breaking change
Major (x.0.0)
docs:, chore:, ci:, test:
Maintenance
No release
What’s different: The ! breaking change marker is now restricted to release-triggering prefixes (feat!:, fix!:, perf!:). Previously, something like ci!: might have been interpreted as a breaking change, but now it will be blocked by CI validation since ci: commits don’t trigger releases anyway.
Your individual commits within the PR don’t need to follow this format (although it might be helpful if they do) only the PR title matter for the release-please changelog generation and version bumping.
Version Placeholders in Code
When adding new features, we use version placeholders in docblocks that get automatically replaced during the release process. We’ve switched from custom placeholders to release-please’s native format:
Before
After
@since next-version
@since x-release-please-version
@next-version
x-release-please-version
For example, when adding a new function:
/**
 * My new function.
 *
 * @since x-release-please-version
 */
function my_new_function() { ... }
Release-please will automatically replace x-release-please-version with the actual version number (e.g., 2.7.0) when creating the release.
Updated File Paths
If you have an open PR, you’ll need to update your file paths:
We no longer use a develop branch. All PRs should target main directly.
Why We Made These Changes
More Time for What Matters
As a project with primarily one core maintainer, every hour spent debugging CI tooling or reinventing release automation is an hour not spent on bug fixes, new features, or helping the community.
Our previous release system used custom scripts totaling 1,000+ lines of JavaScript. The release-please action replaces most of that with a ~150-line workflow configuration. This isn’t just about fewer lines of code, it’s about adopting battle-tested tooling maintained by Google instead of maintaining bespoke scripts ourselves.
The bottom line: Less time on CI plumbing means more time for WPGraphQL’s core functionality and ecosystem.
Scalability for the Ecosystem
The monorepo structure allows us to bring official WPGraphQL extensions into the same repository:
WPGraphQL Smart Cache
WPGraphQL IDE
WPGraphQL for ACF
And more. . .including experimental plugins like WPGraphQL Subscriptions
Each plugin will have independent versioning and separate releases, but they’ll share:
CI/CD infrastructure
Testing environments
Development tooling
Release automation
Simpler Contributor Experience
Wit the transition to release-please we’re transitioning to a single-branch workflow. Contributors will now branch off of main and open Pull Requests back to main.
What’s Coming Next?
Phase 2: Migrate Extension Plugins, starting with WPGraphQL Smart Cache
We’re preparing to import extension plugins into the monorepo, and we will start with WPGraphQL Smart Cache
This will:
Validate our multi-plugin release workflow
Establish patterns for future extensions
Make it easier to test Smart Cache alongside core WPGraphQL
Make it easier to migrate functionality from Smart Cache into core WPGraphQL if/when we decide to pursue this path
Future Extensions
Once Smart Cache is integrated, we plan to bring in additional official plugins, such as WPGraphQL IDE, WPGraphQL for ACF and more, creating a more unified and streamlined development experience for the WPGraphQL ecosystem.
Getting Started with the New Structure
For Local Development
# Clone the repository

git clone git@github.com:wp-graphql/wp-graphql.git

cd wp-graphql

# Install dependencies

npm install

# Start the development environment

npm run wp-env start
The WordPress site will be available at http://localhost:8888.
For Contributing
Fork the repository
Create a feature branch from main
Make your changes
Open a PR, targeting main, with a conventional commit-style title
We’re excited about this new chapter for WPGraphQL and can’t wait to see what we build together!
NOTE: This change was tracked in [GitHub Issue #3469](https://github.com/wp-graphql/wp-graphql/issues/3469)and implemented in [PR #3470](https://github.com/wp-graphql/wp-graphql/pull/3470).
I’ve spent the better part of the last decade doing two things that, at first glance, couldn’t seem more different: maintaining WPGraphQL and coaching youth soccer.
One happens in front of a keyboard, the other on a field. One is about code, the other about kids. But over time, I’ve realized they’re surprisingly similar. Both are about people, systems, problem-solving, and patience.
And in both, I’ve wrestled with the same challenge: imposter syndrome.
On Imposter Syndrome
When I started coaching my son’s team nine years ago, the kids were four years old. Most had never played a sport before. My job was to explain the basics — which goal to score in, which color shirt was “our team,” and why running the wrong direction with the ball wasn’t ideal.
Fast-forward to now. I coach U13 soccer. 11v11, full field, tactics, and structure. The players are better than I’ve ever been. When the opportunity came to move up to coaching 11v11 (from 9v9), I was nervous. The field is twice the size, the stakes higher, and the emphasis starts to shift more from “teach the game” to “win the game.”
I told another coach I was worried I’d fail, that maybe I didn’t belong at this level. He said something that stuck with me:
“You’re a good problem solver, and that’s all these boys need.”
That hit home. These players don’t need a former pro athlete as their coach. They need someone who can identify problems and help them find solutions.
And honestly, that’s what building and maintaining WPGraphQL is too. Users don’t need me to be a perfect developer. They need a problem solver who listens, adapts, and helps them succeed.
On Belief and Empowerment
This past season, I set a personal goal for my U13 team: I wanted all 17 players on my roster, including both goalkeepers, to score at least one goal over the course of the season. While this felt ambitious, we achieved it!
That outcome didn’t happen by accident. I played kids in positions that weren’t their natural strengths, but gave them more because I believed they could handle it, and I told them I believed in them. That trust created confidence, and confidence created results.
One of my players scored his first competitive goal ever this season, in his fifth season playing competitive soccer. I’ll never forget the smile on his face.
It’s the same with WPGraphQL contributors. Many of them have submitted their first open-source pull request here. My job isn’t to do all the work myself, but to believe in them, guide them, and create a space where they can grow. When contributors see their code shipped to thousands of users, that same smile shows up, even if virtually.
On Failure and Learning
In both soccer and open-source software, I view failure as a First Attempt In Learning.
Failure is not only inevitable, it’s valuable.
When we lose a game, I don’t see it as the opposite of success. I see it as data.
Was our defensive shape off? Were we slow to transition? Did the other team simply execute better that day? Each answer gives us something to work on next week.
It’s the same mindset I use in WPGraphQL. A broken build, a regression, or a breaking bug isn’t a disaster, it’s feedback. It tells us where our assumptions were wrong.
The key in both cases is not to get emotional about failure, but to analyze it.
In soccer, I review match film.
In software, I review error logs.
In both, I ask the same questions: What went wrong? Why? And what can we do differently next time?
The worst kind of failure is the one you don’t learn from.
When players or contributors see that mistakes are just part of the process, they take more risks, they experiment, and that’s where real progress starts. Failure, handled well, builds confidence, not fear.
On Planning (and My Love–Hate Relationship With It)
Planning is one of those things I say I value, and in some areas of my life, I really do.
As a soccer coach, I’m almost obsessive about planning. Before every match, I build a spreadsheet with lineups, substitution rotations, and a log for goals and assists. It’s part data tracking, part fairness management.
If you made the team, you should get meaningful playing time. That’s my philosophy. I plan lineups carefully because I want the experience to feel fair for every player and parent. I want everyone to feel included and valued. Every player on my team has played the “9” at least once, for example.
But here’s the irony: when it comes to WPGraphQL, I’m not great at planning.
I’ve never been great at sticking to a roadmap. My brain tends to chase whatever’s loudest. If someone pings me on GitHub, Discord, or Slack saying, “Hey, I’m blocked and trying to ship this weekend,” that’s usually what gets my attention.
I’m a people pleaser in both worlds, but it manifests differently.
In soccer, that instinct helps me create a structured, fair environment for players.
In open source, it makes me a bit reactionary, chasing whatever community member needs help most, even if it means pausing the bigger plan.
I’m learning that planning and responsiveness don’t have to be opposites. The key is finding balance: leaving room for structure and spontaneity.
Some of my best coaching moments and best commits have come from unplanned situations, reacting thoughtfully when things don’t go according to the spreadsheet (or the roadmap).
On Feedback Loops
In WPGraphQL, feedback comes in many forms: GitHub issues, Slack messages, discussions, error reports, and even pull requests. They’re all signals that help improve the project.
In soccer, my data comes from a Veo camera. I rewatch matches, looking for moments that led to goals (for or against), or those “almost” moments.
One week, I noticed we conceded a goal because both center backs pushed forward after a throw-in, leaving no one to slow the counter-attack. We reviewed the footage, discussed it as a team, and adjusted our defensive shape. We didn’t concede another goal that way the rest of the season.
My take on version control for soccer: observe, analyze, patch, and release again.
On Leadership and Ownership
In both roles, I try to lead the same way: if we fail, that’s on me; if we succeed, that’s on them.
When the team struggles, I don’t point fingers. I ask myself what I could do differently to help them understand or execute. When we win, the credit goes to the players.
The same principle guides how I maintain WPGraphQL. If there’s a bug, I own it, even if the code came from a contributor’s pull request. The responsibility for quality and culture is mine. But when something great is shipped, I want contributors to feel proud of it.
Both Soccer and open-source rewards leaders who take responsibility and give credit away.
On What Really Matters
In open-source, we can measure adoption, stars, downloads, and traffic.
In Soccer, we can measure wins, goals and standings.
But my favorite metric in both, is joy.
A parent told me recently that his son, who usually burns out after the fall soccer season, wants to play indoor soccer this winter, the first time he’s ever wanted to keep playing. He said this season is the most fun his son has had playing soccer.
I want to create that joy in players. The love for the game.
That same feeling shows up when a developer tells me WPGraphQL helped them fall in love with WordPress again, or when someone new joins the community and says, “I finally understand how GraphQL fits into WordPress.”
That’s the kind of success that doesn’t show up on a scoreboard or a GitHub Insights graph.
Closing Reflection
After nearly a decode of coaching soccer and building WPGraphQL, I’ve learned that the two aren’t so different.
Both are about empowering others, whether they’re players learning to trust themselves or developers learning to build and contribute with confidence. Both require calmness under pressure, humility in leadership, and patience in progress.
And in both, the most rewarding part isn’t the goal or the release, it’s seeing people light up when it all comes together.
In soccer and in software, the real magic happens when people feel supported enough to take risks.
When they do, that’s when the beautiful game, and the beautiful code, come to life.
As WPGraphQL continues to power more decoupled WordPress applications — from startups to enterprise-scale projects — access control is becoming a more common topic of concern. One area that often prompts discussion is whether exposing users via the GraphQL API poses a security risk.
In this post, we’ll look at how WPGraphQL handles user visibility by default, why that behavior aligns with WordPress core, and how you can restrict access if your use case requires stricter control.
Public Authors in WordPress
WordPress core treats users that are authors of published content as public entities. Their names and profile links are exposed in various ways across a default WordPress site, including:
Author archive pages (e.g. /author/jdoe)
Post bylines with author links
Public REST API endpoints (e.g. /wp-json/wp/v2/users)
XML sitemaps (e.g. author-sitemap.xml)
This public exposure allows users to be attributed to the content they create. WPGraphQL follows this same model – users with published content are considered public and are queryable with WPGraphQL by default.
This approach is consistent with the underlying philosophy of WordPress, where content creators are visible unless there’s a reason to hide them.
When Public Access Isn’t Desirable
In some environments — particularly where WordPress is used as a headless CMS — exposing user data, even limited to names and slugs, may not be ideal.
Common reasons include:
Preventing user enumeration as part of security hardening
Compliance requirements that mandate stricter access to user data
Sites that don’t publicly associate content with authors at all
Even though WPGraphQL does not expose sensitive fields like usernames or email addresses by default, developers building secure, API-driven applications may still prefer to hide user data entirely from unauthenticated requests.
How to Restrict User Access in WPGraphQL
WPGraphQL includes filters that allow you to control who can access user data and under what conditions. Below are two common approaches.
Option 1: Hide All Users from Unauthenticated Requests
You can use the graphql_object_visibility filter to restrict access to all users unless the request is authenticated:
add_filter( 'graphql_object_visibility', function( $visibility, $model_name, $data, $owner, $current_user ) {

	// If the current wpgraphql request is not authenticated, and the model is a UserObject, make users private
	if ( ( ! isset( $current_user->ID ) || 0 === $current_user->ID ) && 'UserObject' === $model_name ) {
		$visibility = 'private';
	}

	return $visibility;

}, 10, 5 );
This ensures that no users will be returned from the GraphQL API unless the request is made by a logged-in user.
Option 2: Customize Visibility Rules Per User
If your use case requires more nuance — for example, only allowing users to be queried by authenticated users with a specific capability, or some other criteria you choose:
add_filter( 'graphql_object_visibility', function( $visibility, $model_name, $data, $owner, $current_user ) {

	// Ensure users are private unless the request is from a user with specific capabilities
	if ( ! current_user_can( 'do_something_specific' ) {
           return 'private';
        }

	return $visibility;

}, 10, 5 );
This can be extended to allow users to access only their own account, or to enforce custom logic based on metadata, capabilities, or authentication tokens (such as JWT claims). Whatever criteria you have for your specific application can be applied to meet your needs.
Tradeoffs to Consider
While restricting user access may be the right call for some decoupled applications, it’s important to consider the tradeoffs — especially if your site relies on author-related features.
Making all users private can interfere with:
Author archive pages (/author/slug)
Byline components that need display names or author slugs
Filters or dropdowns that allow visitors to browse by author
SEO plugins that include author pages in sitemaps
If your frontend or theme relies on any of these features, hiding users may break expected functionality. In some cases, it may be better to restrict specific fields (e.g. hiding email or username – something WPGraphQL does out of the box for non-authenticated requests) while still allowing name or slug to be visible.
Summary
WPGraphQL follows the same public access model that WordPress core uses — exposing users who have published content. This is consistent with how authors appear across WordPress sites in archives, bylines, sitemaps, and REST API endpoints.
That said, WPGraphQL gives you full control to restrict access to user data when needed. Whether you want to block access entirely, limit it by role, or apply fine-grained rules, you can do so using built-in filters.
If you’re building a public-facing site that relies on author pages, be sure to evaluate the tradeoffs before locking things down too tightly.
For those looking to expose more users — including users without published content — check out the following resources:
In part one of this series, we built a headless Gravity Forms integration with Nuxt/Vue by querying form fields via GraphQL interfaces and mapping each static type to its own Vue component—consolidating shared inputs into reusable InputField, DropdownField, and ChoiceListField components. While that approach gives you fine‑grained control and clear component boundaries, it also means maintaining a growing switch statement (and import list) whenever you add or customize a field type.
In this second part article, we’ll streamline our setup by leveraging the inputType property that WPGraphQL for Gravity Forms exposes on every field. Instead of manually importing and mapping each component, we’ll implement a single resolveFieldComponent(field) helper that dynamically loads the right Vue component.
This makes our form renderer more flexible, reduces boilerplate, and automatically adapts to new or custom Gravity Forms fields as they’re added.
In your components/form-fields directory, you can safely delete EmailField.vue. In the original article, we already consolidated TextField.vue, and WebsiteField.vue.
Now, we’ll add the email field to InputField.vue to handle all three field types (text, email, and website). Here’s the full code for InputField.vue that you can drop straight into your project:
I am not going to go over the entire code. Here are the bullet points on why this works:
Single responsibility: One component now handles text, email, and website inputs.
Dynamic <input> types: The computedInputType maps your GraphQL inputType (or fallback type) to email, url, or text.
Two‑way binding: Using v-model on a local internalValue ensures that parent components stay in sync without extra boilerplate.
Conditional label & required indicator: The <label> only renders if field.label is present, and the red asterisk appears when field.isRequired is true.
By consolidating these three nearly identical components into InputField.vue, you keep your code DRY (Don’t Repeat Yourself) and maintainable—any future tweaks to generic inputs (styling, validation attributes, accessibility features) happen in one place.
Why Some Fields Retain Custom Components
Even with our dynamic mapping in place, you will notice a handful of Gravity Forms fields that still warrant their own dedicated Vue components. These “composite” fields each have unique markup or behavior that goes beyond a simple single‑element input.
By keeping these specialized components, we preserve clarity and maintainability—each one encapsulates its own layout, validation rules, and third‑party widget integrations. All the other “simple” fields (text, email, URL, select, checkbox, radio, etc.) are routed through our generic InputField, DropdownField, or ChoiceListField.
The useFormFields.js File
Next, let’s look at how we dynamically map each Gravity Forms field to its Vue component using a single composable. Update your composables/useFormFields.js with the following:
import { defineAsyncComponent } from "vue";

// Cache to store component references keyed by field type.
const componentCache = {};

// Mapping from field type to component filename.
const typeToComponent = {
  ADDRESS: "AddressField",
  TEXT: "InputField",
  TEXTAREA: "InputField",
  EMAIL: "InputField",
  NAME: "NameField",
  PHONE: "PhoneField",
  SELECT: "DropdownField",
  MULTISELECT: "DropdownField",
  CHECKBOX: "ChoiceListField",
  RADIO: "ChoiceListField",
  DATE: "DateField",
  TIME: "TimeField",
  WEBSITE: "InputField",
};

export const useFormFields = () => {
  // For debugging purposes, you can track which types are processed.
  const loggedTypes = new Set();

  /**
   * Resolves the Vue component for a given field based on its inputType.
   * Uses a cache so that the same component reference is returned for a given type.
   * @param {Object} field - The Gravity Form field object.
   * @returns {Component|null} The async Vue component for this field.
   */
  const resolveFieldComponent = (field) => {
    const fieldType = field.inputType
      ? field.inputType.toUpperCase()
      : field.type.toUpperCase();

    // Add each field type once
    if (!loggedTypes.has(fieldType)) {
      console.log("Mapping field type:", fieldType);
      loggedTypes.add(fieldType);
    }

    // Return from cache if we’ve already loaded this component
    if (componentCache[fieldType]) {
      return componentCache[fieldType];
    }

    // Dynamically import the matching component
    const componentName = typeToComponent[fieldType];
    if (componentName) {
      const asyncComponent = defineAsyncComponent(() =>
        import(`~/components/form-fields/${componentName}.vue`)
      );
      componentCache[fieldType] = asyncComponent;
      return asyncComponent;
    }

    // Fallback if no mapping exists
    return null;
  };

  return {
    resolveFieldComponent,
  };
};
What is happening in this code block:
Dynamic Resolution
Instead of hard‑coding imports for every field type, we use the field’s inputType (or fallback to type) to look up the correct component in a simple map.
Lazy Loading
We wrap each import in defineAsyncComponent, so components are only fetched when they’re actually rendered—improving initial load times.
Component Caching
Once a component is resolved, we store the reference in componentCache. This ensures we don’t re‑import the same file multiple times, keeping render performance snappy.
DRY and Scalable
As new field types are added in Gravity Forms (or you build custom ones), you simply extend the typeToComponent map. No more boilerplate imports or switch statements cluttering your page component.
Debugging Insight
The loggedTypes set and console messages help you verify which field types are encountered at render time, making it easier to spot missing mappings.
By centralizing all your field‑component logic in useFormFields.js, you maintain a clean separation of concerns. Your page doesn’t need to know about every single component, and your mapping stays in one easy‑to‑update place.
The pages/questionnaire/index.vue File
Finally, let’s update our page component to use resolveFieldComponent instead of a static map. In pages/questionnaire/index.vue, replace all manual imports and the fieldComponents object with a single import of your composable:
Error: {{ error }}
Loading form…
In the part of the file we refactored, we now have a single source of truth. Instead of importing each individual field component and maintaining a fieldComponents object, we now call resolveFieldComponent(field) directly in a template.
Let’s go over the rest of the code block:
Cleaner Imports
We only import useFormFields (for dynamic mapping) and useGravityForm (for data). There are no longer dozens of component imports at the top.
Reactive Rendering
The <component :is="…"> syntax picks the right component at render time, based solely on each field’s inputType or type.
Simplified Maintenance
Adding support for new field types now only requires updating the typeToComponent map in useFormFields.js, not touching this page at all.
Consistent v-model
Leveraging v-model with each dynamically resolved component ensures two‑way binding of all field values without extra boilerplate.
By swapping out static maps for resolveFieldComponentyour index.vue becomes significantly more concise, and all field‑to‑component logic lives in one easy‑to‑update composable.
Conclusion
We hope this article helped you understand how to render dynamic fields in WPGraphQL for Gravity Forms in Nuxt.js!
As always, we’re super stoked to hear your feedback and learn about the headless projects you’re working on, so hit us up in the WPGraphQL Discord!
Gravity Forms is a WordPress plugin that allows you to create a variety of forms on your WordPress site. Its large selection of add-ons lets you send collected form data to various CRMs, process data, and more!
In this article, you’ll learn how you can query for Gravity Form data, render the form in a Nuxt.js app, perform field validation, and submit the form entries to your headless WordPress backend.
I’ll provide a Nuxt.js app repo that contains Vue components, Vue composables, and helper functions that you can use for your own projects and experiment with. Let’s dive in!
Import the questionnaire form. From the WordPress admin sidebar, go to Forms > Import/Export > Import Forms. Select the gravityforms-questionnaire-form.json inside the root of the Nuxt project folder and click the button to import it.
Create a .env.local file inside of the root of the Nuxt project. Open that file in a text editor and paste in: NUXT_PUBLIC_WORDPRESS_API_URL=http://wpgraphqlgravtyforms.local/graphql,replacing wpgraphqlgravtyforms.local with the domain for your WordPress site. This is the endpoint that Nuxt will use when it sends requests to your WordPress backend.
Run npm install to install the dependencies.
Run npm run dev to get the server running locally.
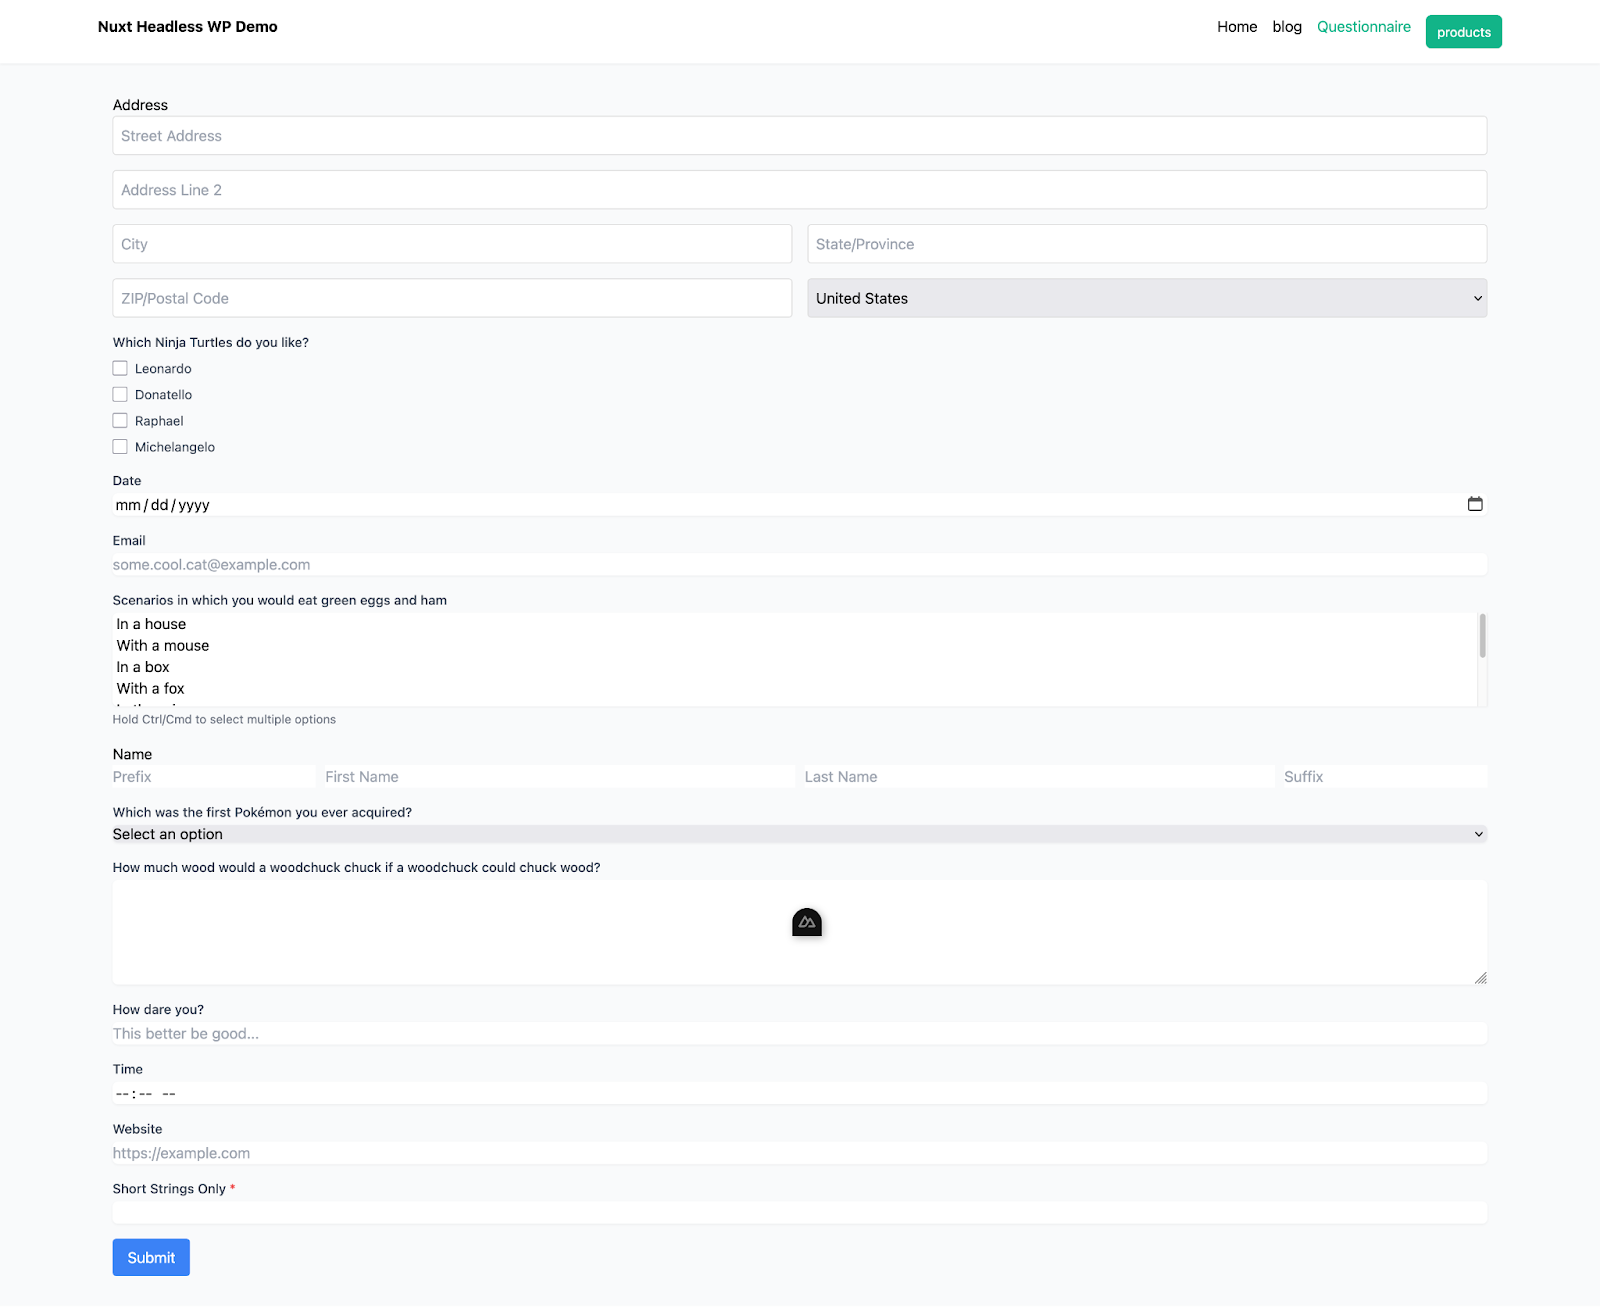
You should now be able to click the “Questionnaire” link in the header to go to the form at http://localhost:3000/questionnaire in a web browser and see it in all its glory:
WPGraphQL for Gravity Forms
The WPGraphQL for Gravity Forms plugin is a powerful extension for WPGraphQL that provides a comprehensive suite of features that allows developers to interact with Gravity Forms via GraphQL. Let’s start by querying for a form.
Querying for a Form
To query for a form, we have the `gfForm` query that we can use to query for data about our Gravity Forms. Here’s a simple example if you want to replace the existing query in the project, open up `composables/useGravityForm.js` and paste this query in replacement of the one currently there:
query getForm {
  gfForm(id: 1, idType: DATABASE_ID) {
    databaseId
    title
    description
    formFields(first: 500) {
      nodes {
        ... on TextField {
          id
          type
          label
        }
        ... on SelectField {
          id
          type
          label
          choices {
            text
            value
          }
        }
      }
    }
  }
}
In this query, we are asking for form data. The `gfForm` query retrieves a specific form by its database ID (id: 1).
For that form, the query fetches basic information like its title and description.
The query also fetches the formFields (up to ), and for each field, it checks whether it’s a TextField or SelectField. Depending on the type, it will fetch the appropriate data such as id, type, label, and for SelectField, it will also retrieve the choices (with their text and value).
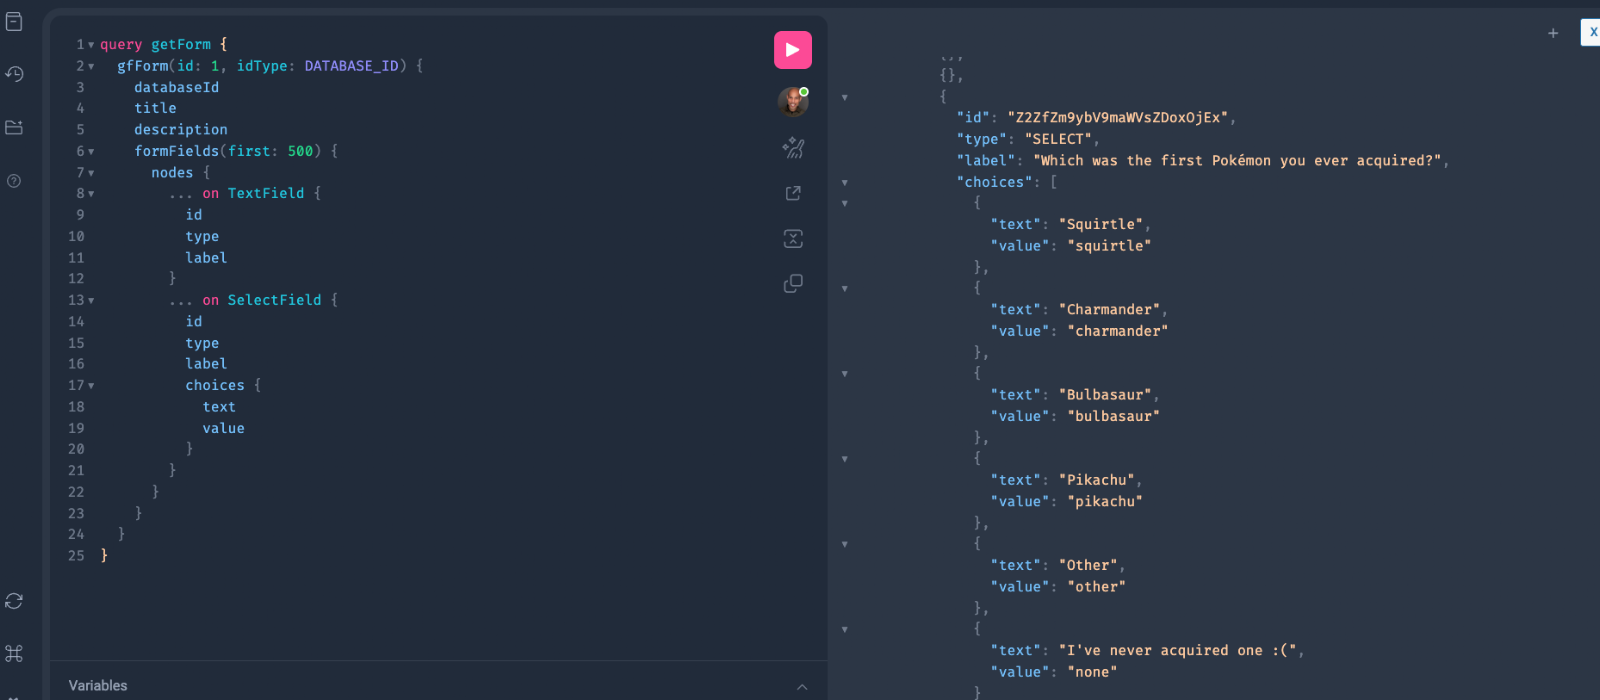
Go ahead and test out this query right from the WordPress admin by following these steps:
Go to GraphQL > GraphiQL IDE.
Paste the query above into the left column, replacing id: 1 with the ID of the imported form.
Click the ▶ button to execute the query.
See the results returned in the right column. You should see this:
Gravity Forms Field Support
Now, let’s highlight one of the latest features of WPGraphQL for Gravity Forms which we use in this project. This feature is Forms Field support with the FormField interface.
The interface approach leverages GraphQL interfaces to abstract shared properties among Gravity Forms fields, meaning you can query a common set of fields like “label” or “isRequired” across multiple field types.
This method allows you to write a more composable query that automatically includes any new field type that implements a given interface without needing to update your query.
In our project, we used inline fragments on interfaces such as GfFieldWithLabelSetting and GfFieldWithRulesSetting to fetch common properties like label and isRequired from each form field.
Our query retrieves both inputType and type values. The sample’s current component mapping relies on the static type property to determine which Vue component to render. For the scope of this article, the inputType is still included in the query output to point out the new support.
inputType Prop
For other use cases outside the scope of this article, you can leverage the inputType property instead of the static type to dynamically determine which component to render for each Gravity Forms field.
This dynamic approach allows a single form field to resolve into multiple input types—such as a Quiz Field that can be rendered as either a Checkbox or Radio Field—based on its configuration. Using the inputType allows your code to automatically map to the correct component, making it a bit more flexible and easier to maintain as new input variants are introduced. Stay tuned for a future article that focuses on this!
Check out the WPGraphQL for Gravity Forms readme for more documentation on gfForm , the FormField interface and other queries and mutations the plugin offers.
Querying for the form in Nuxt
Now that we know what a query for a form looks like and the FormField interface the types inherit let’s see how we can use it in our Nuxt app.
Open up the Nuxt app in your code editor and navigate to the composables/useGravityForm.js file.
This file is a Nuxt.js composable designed to interface with WPGraphQL for fetching Gravity Forms data. It imports the ref function from Vue and the runtime configuration using useRuntimeConfig from Nuxt’s #app alias. It defines a reactive variable called formFields that will hold the array of form field objects retrieved from the backend.
A multi-line GraphQL query named formQuery is declared to fetch a Gravity Form’s fields by its ID. The query leverages GraphQL interfaces to abstract common properties shared by multiple field types.
For more complex field configurations, inline fragments on GfFieldWithChoicesSetting fetch choices and input details, while GfFieldWithConditionalLogicSetting retrieves any conditional logic rules defined on the field:
const formQuery = `
  query GetGravityForm($formId: ID!) {
  gfForm(id: $formId, idType: DATABASE_ID) {
    formFields(first: 300) {
      nodes {
        id
        databaseId
        inputType
        type
        visibility
        ... on GfFieldWithLabelSetting {
          label
        }
        ... on GfFieldWithRulesSetting {
          isRequired
        }
        ... on GfFieldWithCssClassSetting {
          cssClass
        }
        ... on GfFieldWithDefaultValueSetting {
          defaultValue
        }
        ... on GfFieldWithSizeSetting {
          size
        }
        ... on GfFieldWithPlaceholderSetting {
          placeholder
        }
        ... on GfFieldWithMaxLengthSetting {
          maxLength
        }
        ... on GfFieldWithInputMaskSetting {
          inputMaskValue
        }
        ... on GfFieldWithChoicesSetting {
          choices {
            text
            value
          }
          inputs {
            id
            label
          }
        }
        ... on GfFieldWithConditionalLogicSetting {
          conditionalLogic {
            actionType
            logicType
            rules {
              fieldId
              operator
              value
            }
          }
        }
      }
    }
  }
}
The fetchForm function is defined to send a POST request to the WordPress GraphQL endpoint using Nuxt’s useFetchcomposable. It includes a request body that contains the query and variables, with a default formId of "1" to retrieve a specific form. In this line containing the body object, go ahead and replace the integer with your specific ID:
 body: JSON.stringify({
          query: formQuery,
          variables: { formId: "1" }, // Default formId (you can change this to what your id is)
        }),
The immediate flag shown below is set to false so that the fetch operation is not executed automatically, allowing for manual triggering via the execute function.
This is important because it provides better control over when data is fetched, optimizing performance and preventing unnecessary network requests. By waiting for a specific point in the component lifecycle—such as when a button is clicked or a user interacts with the page—we ensure that data is only fetched when needed. In this case, we trigger the fetch manually within the onMountedlifecycle hook, which ensures that the data is loaded once the Nuxt page component rendering the form is attached to the DOM:
immediate: false, // Prevent automatic execution
        transform: (res) => {
          if (res.errors) {
            console.error("GraphQL Errors:", res.errors);
            throw new Error(res.errors[0].message);
          }
          const fields = res.data?.gfForm?.formFields?.nodes;
          if (!Array.isArray(fields)) {
            console.error("Invalid fields data:", res.data);
            throw new Error("Invalid form fields data");
          }
          return fields;
        },
      }
    );

    // Return execute to manually trigger the fetch later
    return { data, status, fetchError, execute, refresh };
  };
Submitting the form in Nuxt
Staying in the useGravityForm.js file, we finish off the logic to allow the user to submit form data to our WordPress backend via Nuxt.
We do this with the submitForm function. This is an asynchronous function that accepts a form ID and field values, transforms these values using transformFieldValue, and then submits them via a GraphQL mutation.
This mutation sends the form ID and the transformed field values to the backend, which responds with either errors or confirmation details. Finally, the composable returns an object containing formFields, fetchForm, and submitForm so that other parts of the Nuxt application can fetch and submit Gravity Forms data:
Now that we know how the form data is being queried for and submitted, let’s check out where this logic is being used, how the state is being managed, and where the data is being rendered.
Navigate over to pages/headlesswp-gform/index.vue.
Take a look at the entire file in your code editor. Let’s break it down from top to bottom.
The script starts by importing Vue’s reactive functions (ref, reactive, onMounted, watch) and several form field components (e.g., InputField, EmailField –Don’t worry, we will discuss where these are coming from in the next section) to render the form.
It then imports the useGravityForm composable, which provides functions to fetch form metadata and submit form data from WPGraphQL:
import { ref, reactive, onMounted, watch } from "vue";

import {
  InputField,
  DropdownField,
  ChoiceListField,
  AddressField,
  DateField,
  TimeField,
  NameField,
  PhoneField,
} from "~/components/form-fields";

import EmailFieldComponent from "~/components/form-fields/EmailField.vue";

import useGravityForm from "~/composables/useGravityForm";
const { fetchForm, submitForm, formFields } = useGravityForm();
Following that, a reactive reference formValues is declared using ref({}) to store user input for each form field.
Then we establish a reactive error storage object for both address and email validations. It defines a validateAddress function that checks if each required component of an address is present and formatted correctly, updating error messages as needed.
Similarly, the validateEmail function uses a regular expression to confirm that the email address adheres to a valid format. If any validation fails, the corresponding error message is set and the function returns false. This client-side validation ensures that only complete and correctly formatted data is submitted, improving user experience and data integrity.
const formValues = ref({});
const error = ref(null);

const validationErrors = reactive({
  address: {
    street: null,
    city: null,
    state: null,
    zip: null,
    country: null,
  },
  email: null,
});

// Validate the entire address object and update errors per field.
const validateAddress = (address) => {
  let valid = true;
  if (!address.street) {
    validationErrors.address.street = "Street address is required.";
    valid = false;
  } else {
    validationErrors.address.street = null;
  }
  if (!address.city) {
    validationErrors.address.city = "City is required.";
    valid = false;
  } else {
    validationErrors.address.city = null;
  }
  if (!address.state) {
    validationErrors.address.state = "State is required.";
    valid = false;
  } else {
    validationErrors.address.state = null;
  }
  if (!address.zip || !/^\d{5}$/.test(address.zip)) {
    validationErrors.address.zip = "Please enter a valid 5-digit ZIP code.";
    valid = false;
  } else {
    validationErrors.address.zip = null;
  }
  if (!address.country) {
    validationErrors.address.country = "Country is required.";
    valid = false;
  } else {
    validationErrors.address.country = null;
  }
  return valid;
};

// Validate the email value and update the error.
const validateEmail = (email) => {
  const emailRegex = /^[a-zA-Z0-9._%+-]+@[a-zA-Z0-9.-]+\.[a-zA-Z]{2,}$/;
  if (!emailRegex.test(email)) {
    validationErrors.email = "Please enter a valid email address.";
    return false;
  }
  validationErrors.email = null;
  return true;
};
Next, The updateFieldValue function merges the current formValues with a new value for a given field ID, ensuring that changes to input fields update the reactive state.
Inside the onMounted lifecycle hook, the code calls fetchForm() to get the form metadata and immediately triggers the fetch using execute():
A watcher on the returned data initializes formFields and builds an initialValues object based on the field type, setting default values (e.g., an object for addresses, and an empty array for checkboxes).
For example, if a field is of type “ADDRESS,” the code sets its default value to an object with empty strings for street, lineTwo, city, state, zip, and a default country of “US.”
A separate watcher monitors fetchError and updates the local error reference with the error message if the fetch fails:
The handleSubmit function validates the email and address fields by checking their corresponding values in formValues and displays an alert if validation fails:
const handleSubmit = async () => {

  let isValid = true;

  // Validate email field before submission

  const emailField = formFields.value.find((field) => field.type === "EMAIL");

  if (emailField && formValues.value[emailField.databaseId]) {

    if (!validateEmail(formValues.value[emailField.databaseId])) {

      isValid = false;

    }

  }

  // Validate address field before submission

  const addressField = formFields.value.find(

    (field) => field.type === "ADDRESS"

  );

  if (addressField && formValues.value[addressField.databaseId]) {

    if (!validateAddress(formValues.value[addressField.databaseId])) {

      isValid = false;

    }

  }

  if (!isValid) {

    alert("Please fix the errors before submitting.");

    return;

  }
If validation passes, it calls submitForm with the current form values, transforming them as needed and handling the response for errors or confirmation.
On successful submission, the form is reset by building a new object (resetValues) with default values for each field, which is then assigned to formValues.value.
Finally, the template loops over formFields and dynamically renders the appropriate component for each field type (using the fieldComponentsmapping), binding each component’s value to formValues via v-model and providing a submit button to send the form data:
Now let’s discuss where those field component imports were coming from in the previous section. Navigate to components/field-forms. This folder contains all the component files for the fields.
In our project, we organized the form field components into groups based on shared behavior and UI patterns. We consolidated similar text-based inputs—like Text, Email, Website, and even Text Area—into a single InputField component.
For fields that use dropdowns, we combined Select and MultiSelect into a unified DropdownField component. For fields that involve multiple choice inputs, such as Checkbox and Radio fields, we created a consolidated ChoiceListField component.
Meanwhile, fields with unique layouts or behaviors (like AddressField, DateField, TimeField, and NameField) were kept as separate components.
To simplify importing these components into our main form, we created a barrel file (index.js) in the form-fields folder that re-exports all of them.
Since there are a few, let’s just break down the common patterns they follow:
Props Definition
All components define a consistent set of props:
field: An object containing field metadata (required)
Contains information like databaseId, label, isRequired, and field-specific properties
modelValue: The current value of the field
Type varies based on the field (string, array, object)
Includes appropriate default values
Event Handling
Each component emits events to update the parent component’s state:
All components use the update:modelValue or update:model-value event for two-way binding.
This follows Vue’s convention for custom v-model implementation
Field-Specific Validation
Many components include field-specific validation logic:
Simple fields may validate on input
Complex fields (like EmailField, AddressField) have dedicated validation functions
Error messages are stored in reactive variables and displayed in the template
Consistent Template Structure
All components follow a similar template structure:
A wrapper div with class field-wrapper
A label displaying the field name and required indicator if needed
Input element(s) with appropriate bindings:
:value bound to the model value
Event handlers to emit update events
Error message displayed when validation fails
Complex Field Handling
For complex fields (like Address, Name):
Data is structured as objects with multiple properties
Components use appropriate layout techniques (grid, flexbox) to organize multiple inputs
Updates maintain the overall object structure while changing specific properties
What’s the deal with Errors and Why do we handle them?
What is the deal, Jerry??? Well, the deal is that we handle two types of errors in this app. This would be a great question, the great comedian, Jerry Seinfeld could ask.
Request or Server Errors
These are errors that prevent the form entry from being saved. In our Nuxt implementation with Gravity Forms, we encounter several types of network-related errors:
Network connectivity issues when the user’s connection drops
WordPress backend errors (500 Internal Server Error)
Authentication or permission errors when submitting to protected forms
GraphQL syntax or schema errors
Our application handles these errors through the try/catch block in the form submission process. When using the submitForm function from our useGravityForm composable, we capture server errors and display them prominently to the user with an alert.
Inside the useGravityForm composable, we format GraphQL errors into a user-friendly message that tells the user that the submission failed on a popup in the browser.
You can test this error handling by disabling your network connection in DevTools and attempting to submit the form. The application will display an error message indicating the network failure.
Field Validation Errors
Our application implements a dual-layer validation approach:
Client-Side Validation: Implemented for specific field types to provide immediate feedback
Server-Side Validation: Handled by the WordPress Gravity Forms backend
When the server returns validation errors, they’re processed in the handleSubmit function of our index.vue component. The application checks response?.errors?.length to determine if validation errors exist and displays them accordingly.
For client-side validation, certain field types have built-in validation:
Email Field: Validates email format using a regex pattern
Address Field: Validates complete address information and proper postal code formats
Required Fields: All required fields are checked before submission
To test field validation, use the “Short Strings Only” field at the bottom of the form. This field is configured in the Gravity Forms admin to accept a maximum of 5 characters. If you enter more than 5 characters and submit the form, the server will reject the submission and return a validation error.
Unlike some fields that implement client-side validation (like email and address), this text field relies on server-side validation in Gravity Forms. The error message will display after the submission attempt, informing you about the 5-character limit constraint.
This demonstrates how our application strategically combines client-side validation for enhanced user experience with server-side validation for critical business rules and data integrity.
What is Not Included
You can drop these components, and composables and get up and running with Gravity Forms forms quickly in a Nuxt app, but there are features they don’t provide. Some examples:
Support for Gravity Forms’ Conditional Logic rules
Rendering an existing Gravity Forms entry and allowing the user to update its field values
Support for all field types
Conclusion
We hope this blog post helped you understand how to use forms in headless WordPress with Gravity Forms, WPGraphQL for Gravity Forms, and Nuxt!
As always, we’re super stoked to hear your feedback and learn about the headless projects you’re working on, so hit us up in the WPGraphQL Discord!
Special thanks to David Levine and Daniel Roe for helping me write this article and the code!
Publishing a new release for WPGraphQL has historically required several manual steps—updating changelogs, determining semantic version bumps, preparing upgrade notices, and ensuring that every piece of documentation reflects the correct information. While I had a process in place, it wasn’t as efficient as it could be, and the potential for human error was always there.
Over the past few weeks, I set out to automate as much of this as possible. This blog post walks through why I tackled this, how I iterated on different approaches before landing on the final implementation, and where I see this evolving in the future.
Why Automate the Release Process?
When it comes to maintaining an open-source project like WPGraphQL, consistency and accuracy in releases are crucial. I had been following a structured but manual process that involved:
Time-consuming: Even with a checklist, it required multiple steps every time a release was prepared.
Prone to human error: Forgetting a step or misclassifying a change could lead to inconsistencies.
Hard to scale: As WPGraphQL continues to grow, I needed a more robust and repeatable approach.
By automating these steps, I aimed to:
✅ Save time by reducing the manual overhead of preparing releases
✅ Reduce errors by ensuring that every PR gets documented correctly
✅ Improve visibility into what’s changing in WPGraphQL releases
✅ Ensure consistency across releases and documentation
How I Got Here: Iterating on the Solution
My goal was to create a workflow that would automatically track changes from pull requests and use those to generate release notes, changelog entries, and semantic version bumps.
Exploring Solutions
I initially considered using @changesets/cli, a tool commonly used in JavaScript monorepos for managing changelogs and versioning. However, since WPGraphQL is a WordPress plugin (not a monorepo) and follows a different release structure, I opted to implement a custom approach while borrowing the core concept: collecting markdown files per PR to document changes.
Prototyping with Test Repositories
At first, I worked on some GitHub Workflows locally, and tested using the GitHub Local Actions VS Code extension, and when I thought I had things working well, I merged some workflows into the WPGraphQL repo, thinking they were in a solid state.
But then… they didn’t run the same in GitHub as they were locally. 😤
I found myself pulling out my hair (or lack thereof) debugging. Instead of continuing to troubleshoot in the main repo, I took a step back and started experimenting in separate repositories to isolate issues and test more freely.
I created multiple test repositories to refine the approach:
1. Automation Tests – My first attempt at testing workflow concepts.
2. Workflow Tests – A fresh start after hitting roadblocks with the initial approach.
3. WPGraphQL Workflow Tests – A fork of WPGraphQL to see how these workflows behaved in a real-world repo structure.
Through trial and error, I was able to pinpoint issues, tweak the workflows, and ultimately get them running smoothly. You can see the results of these manual tests in the workflow test releases.
Once I was confident in the implementation, I merged them back into WPGraphQL, where they successfully generated v2.1.1.
How the Workflows Work
The final implementation consists of two GitHub Actions workflows:
Determines the correct version bump (major, minor, patch)
Updates readme.txt with upgrade notices
Publishes the release
Future Automation Plans
Now that the core release process is automated, I’m thinking about how to improve workflows for larger milestone features.
Handling Milestone-Based Feature Work
Some features, like custom scalar support, will require significant iteration before they’re ready to merge and release. My idea is to create a milestone tracking system where:
Open-source projects like WPGraphQL benefit tremendously from automation. The more we can reduce friction in the development and release process, the better we can focus on delivering new features, improving performance, and maintaining stability.
These workflows have already made releasing WPGraphQL easier, and I’m excited to continue refining them and exploring how we can automate more aspects of feature development and release tracking.
I also want to explore making some of these processes a bit more re-usable so we can easily implement them on some of the other repos, such as: WPGraphQL Smart Cache, WPGraphQL IDE, WPGraphQL for ACF and others.
Who knows, perhaps I may even explore a monorepo setup to see if that could help increase efficiencies for both maintainers and contributors?
If you have thoughts on this approach or ideas for improvements, feel free to reach out on Discord or GitHub! 🚀
🚀 WPGraphQL v2.0.0 has officially been released! This is a major update that includes breaking changes, so if you’re using WPGraphQL in production, please review the details below to ensure a smooth upgrade.
The primary motivation behind this release was upgrading WPGraphQL’s underlying GraphQL-PHP library. This upgrade unblocks us from shipping long-awaited features, such as the @oneOf directive, which will enable polymorphic input types. I’ve been talking about this since 2017 (GitHub comment here), and we’re finally in a position to make it happen!
Additionally, this release encourages users to keep their server stack updated (PHP, WordPress, and related dependencies), leading to better performance, security, and long-term supportability.
What’s Changed in WPGraphQL v2.0?
🚨 Breaking Changes
Dropped support for PHP below 7.4
Dropped support for WordPress below 6.0
Error handling changes due to updates in graphql-php (see full details in the technical update post)
🔥 New Features Over the Last Few Months
While v2.0 itself doesn’t introduce major new features, recent releases included several improvements, all of which are now part of v2.0:
🛠 New Extensions Page
🖥 New CLI arguments in wp graphql generate
📂 New fields on MediaItem for file and filePath
🚨 New SemVer update checker (warns about breaking changes before updating)
For many users, no immediate action is required. However, if you’re running an outdated version of PHP or WordPress, you’ll need to upgrade your stack before updating WPGraphQL.
Step 1: Check your PHP version (must be 7.4+) and WordPress version (must be 6.0+)
Step 2: Test your site and any WPGraphQL custom extensions in a staging environment
This release would not have been possible without the incredible contributions of our community, especially Dovid Levine (@justlevine), who put in countless late nights and weekends helping maintain WPGraphQL and grow the headless WordPress ecosystem. 🎉
What’s Next for WPGraphQL?
With v2.0 released, we’re excited to move forward on several highly requested features, including:
I’ll be at the Headless WordPress Community Event on Monday, Feb 24, where you can ask questions about WPGraphQL v2.0 and beyond. This is hosted by the Headless WP Discord community—join here!
🚀 We’re excited for the future of WPGraphQL, and we appreciate all of you who have helped make this possible.
We’re excited to announce that WPGraphQL v2.0 is coming soon! This release brings key improvements such as better performance, stricter validation, and more flexibility for developers.
This change introduces breaking changes that may affect your site or project.
We plan to release WPGraphQL v2.0 in the first week of February. This timing allows developers to prepare after the holiday and start-of-year rush.
We’ve already opened a Beta Pull Request for testing. If you’d like to get an early look, test your projects against the beta and let us know your feedback!
Breaking Changes
WPGraphQL v2.0 will require PHP 7.4 or newer. Please ensure your server is running PHP 7.4 or newer before installing the new version.
We’re upgrading WPGraphQL’s underlying GraphQL engine, graphql-php, from v14.11.10 to v15.8.1. This brings modern improvements but also introduces changes developers need to be aware of.
We’ve written up a more technical guide that gets into more detail about the changes.
What you should do
Check your PHP version: Ensure your site runs PHP 7.4+
Test in a staging environment: Test the update in a staging environment before applying it to your live site.
Check for compatibility: Ensure custom plugins or WPGraphQL extensions are compatible with v2.0.
Looking Ahead
While we work toward the final v2.0 release, we’ll continue adding new features and improvements. Some features currently in development include:
Extensions Page: An enhanced admin experience for managing WPGraphQL extensions.
Semantic Version Check: A system to reduce the risk of auto-updates causing breaking changes.
WPGraphQL v2.0 is coming soon, featuring an upgrade to its underlying GraphQL engine, graphql-php, from v14.11.10 to v15.8.1.
This upgrade brings better performance, stricter validation, and enhanced extensibility. However, it also introduces breaking changes that may impact developers extending WPGraphQL or maintaining custom plugins.
This guide highlights technical changes, developer recommendations, and actions needed to prepare your projects.
PHP Version Requirement:
WPGraphQL v2.0 will require PHP 7.4 or newer, raising the minimum requirement from PHP 7.1. This change follows the adoption of graphql-php v15+, which also requires PHP 7.4+. Ensure your hosting environment is updated before testing the beta or upgrading to v2.0.
By adopting the latest graphql-php, WPGraphQL inherits several breaking changes that may impact developers extending WPGraphQL. Below, we’ve highlighted the most important changes, though we also recommend reviewing the graphql-php release notes for more detail.
Key Breaking Changes:
Error Response Changes:
“category” field removal on errors: The “category” field has been removed from GraphQL error responses. If your application depends on this field, adjust your error-handling logic accordingly.
debug entries moved: graphql-php now places debug information under the extensions key of the error response. Ensure your application properly handles this structure.
serialization errors: Errors during leaf value serialization will now throw SerializationError, replacing previously thrown generic errors.
HTTP Status Code Change: For graphql requests made over HTTP using the POST method, if the request does not contain the Content-Type header specifying application/json, the response will have HTTP Status of 415 instead of 500. (see: https://github.com/wp-graphql/wp-graphql/pull/3291)
Schema and Type Management Updates:
Topological Schema Ordering: graphql-php now orders schema definitions based on type dependencies and user-defined types. Be aware that this could change the output of introspection queries, especially when dynamically generating types.
Standard Type Enforcement: Overriding built-in GraphQL Types in the schema is no longer supported. Consider using custom types instead of overriding built-in types directly.
Input and Enum Parsing Enhancements:
Lazy Loading for Input Objects and Enums: graphql-php now supports lazy-loading for input objects and enums. This can improve performance for schemas with complex, deeply nested types. Developers defining custom types should adjust type definitions if needed.
Server and HTTP Behavior Adjustments:
Request Validation: Requests with invalid JSON will now trigger a RequestError instead of a generic error. This makes debugging request payload issues easier by returning clear error messages early in the request lifecycle.
Recommended Actions:
Upgrade PHP: Ensure your environment runs PHP 7.4+ before updating WPGraphQL.
Review Error Handling: Update how your application handles GraphQL errors, including changes to the category field, the new location of debug entries and the HTTP Status Code change for invalid Content Type headers.
Test Plugin Compatibility: Test any custom plugins, WPGraphQL extensions, and GraphQL queries in a staging environment. Ensure compatibility before deploying to production.
Resources and Links:
Beta Pull Request: Test the upcoming release early and share feedback.
Last week at WASMCon 2024, I had the privilege of speaking about something I’m incredibly passionate about: using WordPress in non-traditional ways. My talk, “WordPress Meets WASM: Full Power of the CMS in Any App,” explored how WordPress, a platform many associate with traditional websites, can now be embedded and run virtually anywhere, thanks to technologies like WebAssembly (WASM).
Below is a recap for those who prefer reading over watching videos.
A Journey of Non-Traditional WordPress Use
I began by sharing a personal story from 2006, when I stumbled upon a Flash-based website for the marketing agency Leo Burnett that inspired me to learn Flash development.
(NOTE: You can view the 2006 version of the Leo Burnett website on Archive.org)
That curiosity eventually led me to WordPress when I needed a way to manage content in a Flash site without requiring the end user to know Flash. Back then, I discovered WordPress and its XML-RPC API that could be used to connect a Flash front end to a WordPress back end. While that project didn’t go far, it was my first step into the world of WordPress, and it changed the trajectory of my career.
Fast forward to 2016, I created WPGraphQL, a free, open-source plugin that allows developers to use WordPress as a GraphQL API. This opens up countless possibilities for building decoupled or headless front ends with frameworks like Next.js, Gatsby, and Astro, or even native mobile apps. The content lives in WordPress, but how it’s rendered is entirely up to the developer.
Enter WordPress Playground
While WPGraphQL has made headless WordPress more accessible, developers still face challenges in quickly setting up environments to test plugins or content workflows. Traditionally, this would require setting up a local server with PHP, MySQL, and Apache.
WordPress Playground changes everything.
WordPress Playground leverages WebAssembly to run WordPress entirely in the browser — no server required. PHP is compiled to WebAssembly (PHP-WASM), MySQL is replaced by SQLite, and server functionality is replaced by JavaScript APIs. This means anyone can instantly spin up a WordPress instance in their browser, making it easier than ever to demo plugins or test workflows.
Real-World Use Cases
I highlighted two practical use cases during my talk:
Plugin Demos and Live Previews
With WordPress Playground, plugin developers like me can offer live previews directly in the browser. For example, if you’re browsing the WordPress.org repository, a plugin could have a “Live Preview” button. Clicking it would launch a full WordPress instance with the plugin activated, allowing users to test it instantly—no setup required.
Markdown Documentation Editing
I use WordPress to manage my blog content, but I prefer keeping my documentation in Markdown files close to the codebase. WordPress Playground enables me to bridge the gap between these workflows. I can import Markdown files from a GitHub repository into WordPress running in the browser, make edits using a familiar CMS interface, and export the updated files back to GitHub as a pull request. This workflow combines the strengths of both traditional CMSs and modern version control systems.
Beyond the Browser
WordPress Playground isn’t limited to browser-based workflows. It can run in:
Terminal applications
Native mobile apps
Desktop environments
Embedded in web pages
Edge servers for near-instant content delivery
This versatility allows WordPress to adapt to countless use cases, redefining how and where it can be used.
A Call to Action
WordPress Playground is a free, open-source project that pushes the boundaries of what’s possible with WordPress. Whether you’re a long-time WordPress user or new to the platform, I encourage you to explore how this technology can power your projects or inspire you to build something new. For more information, visit WordPress Playground.
Thank you to everyone who attended my talk or watched it online. If you’d like to chat more, find me on X/Twitter at @jasonbahl.