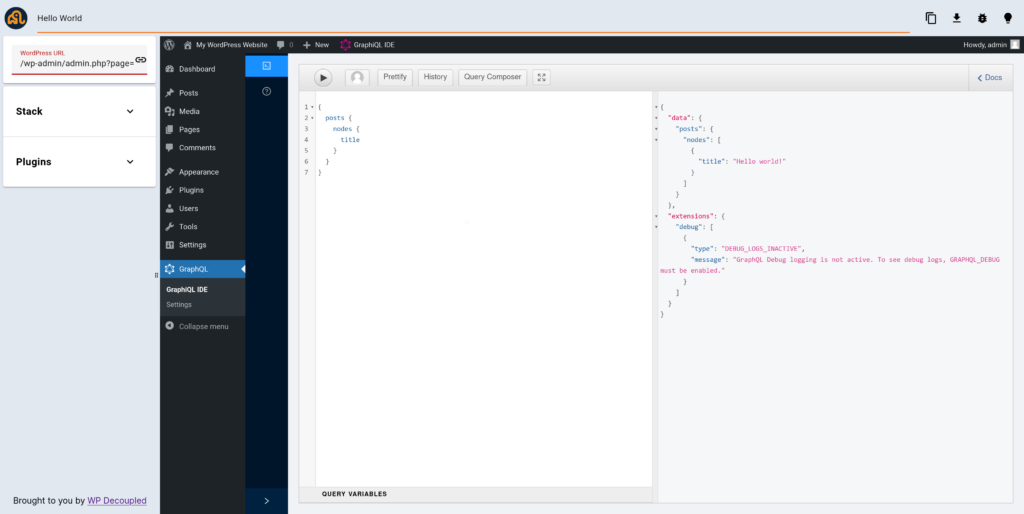
We’re excited to announce that WPGraphQL v1.29.2 now supports Live Preview functionality on WordPress.org, powered by WordPress Playground. This integration makes it easier than ever for developers to experience WPGraphQL firsthand without any installation or setup required.
Instant Access to GraphQL in WordPress
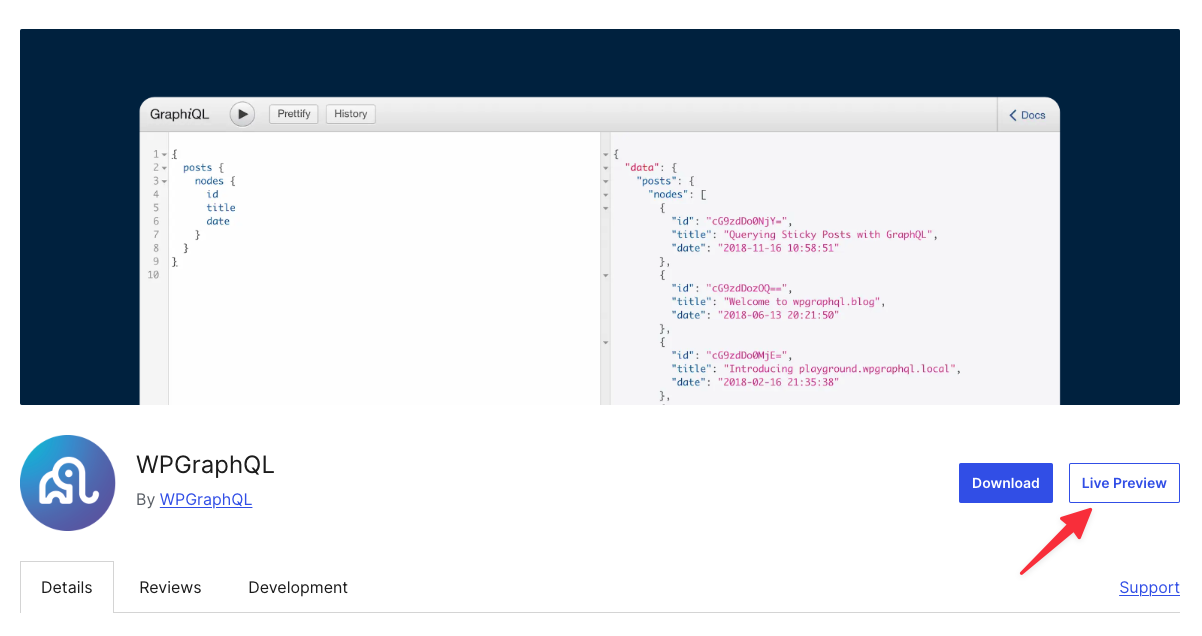
Starting with version 1.29.2, visitors to the WPGraphQL plugin page on WordPress.org can click the “Live Preview” link to instantly launch a fully functional WordPress environment in their browser.
This environment comes pre-loaded with WPGraphQL and provides immediate access to the GraphiQL IDE.
Zero Setup Required
Thanks to WordPress Playground, trying out WPGraphQL is now as simple as:
All you need is a web browser and an internet connection – no local development environment, no plugin installation, and no configuration required.
Perfect for Quick Evaluation
This new feature is particularly valuable for:
Developers evaluating WPGraphQL for their projects
Teams wanting to quickly demonstrate WPGraphQL capabilities
Learning and exploring GraphQL queries in a WordPress context
Testing compatibility with WordPress core features
What’s Next?
While the Live Preview feature provides a great way to explore WPGraphQL’s capabilities, remember that for production use, you’ll want to install WPGraphQL directly on your WordPress site. The Live Preview environment is perfect for testing and exploration, but it’s temporary and resets between sessions.
We’re excited to see how this new feature helps more developers discover and experiment with WPGraphQL. Give it a try and let us know what you think!
Have you tried the new Live Preview feature? We’d love to hear your feedback in the WPGraphQL Discord below or on GitHub.
If you’re using Headless WordPress with Next.js or any other frontend framework, you might have run into a small issue when displaying code snippets: the native WordPress code block doesn’t support syntax highlighting. This can be a problem for developer-focused sites or tutorials where reading and understanding code snippets is key.
This shortcoming of the native Code block often leads developers to look for other solutions that support code syntax highlighting. For a recent headless WordPress project our team worked on, we researched a few options, including the Syntax-highlighting Code Block (with Server-side Rendering) and Code Block Pro. We found Code Block Pro to offer the highest quality syntax highlighting, provide tons of features and customization options, and even support a number of popular VS Code themes to choose from, giving code snippets a nice, professional look.
In this guide, we’ll show you how to install and use Code Block Pro with a Headless WordPress setup, ensuring your code snippets are presented properly on the front end.
If you prefer the video format of this article, you can access it here:
To gain a basic understanding of Next.js, please review the Next.js docs.
Steps
Install and activate Code Block Pro
Steps to install and activate the Code Block Pro plugin:
Go to your WordPress admin dashboard.
Navigate to Plugins > Add New.
Search for “Code Block Pro“.
Click Install Now, then Activate.
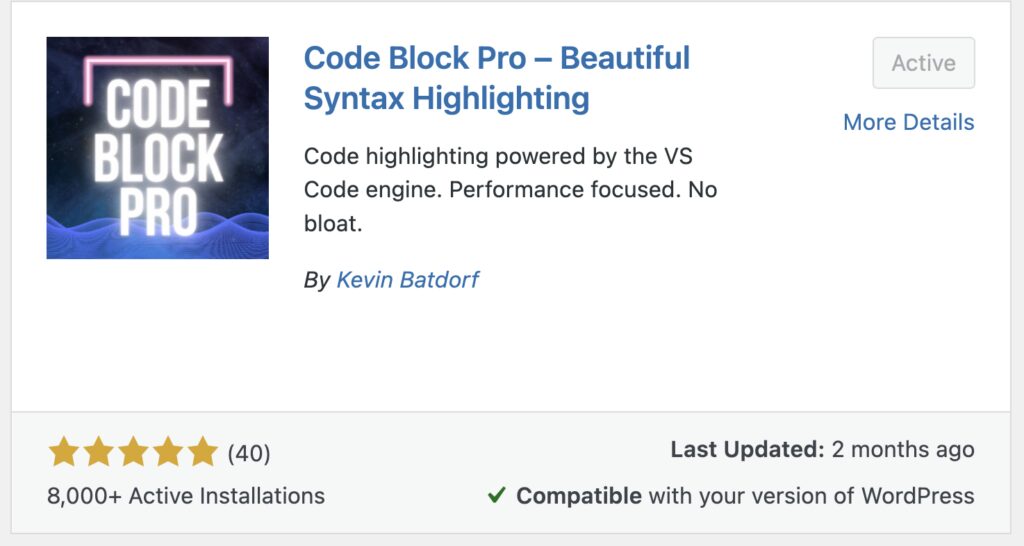
You should have this:
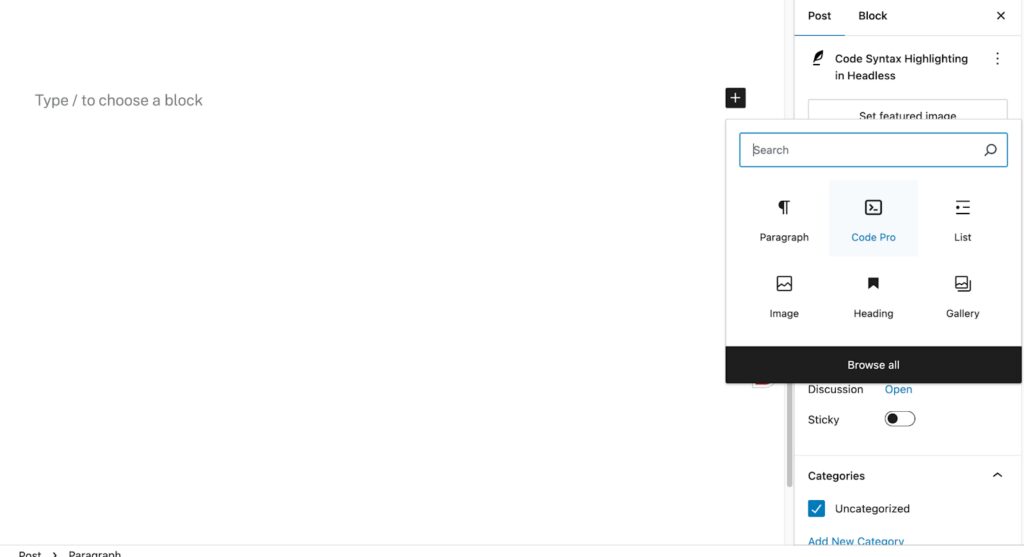
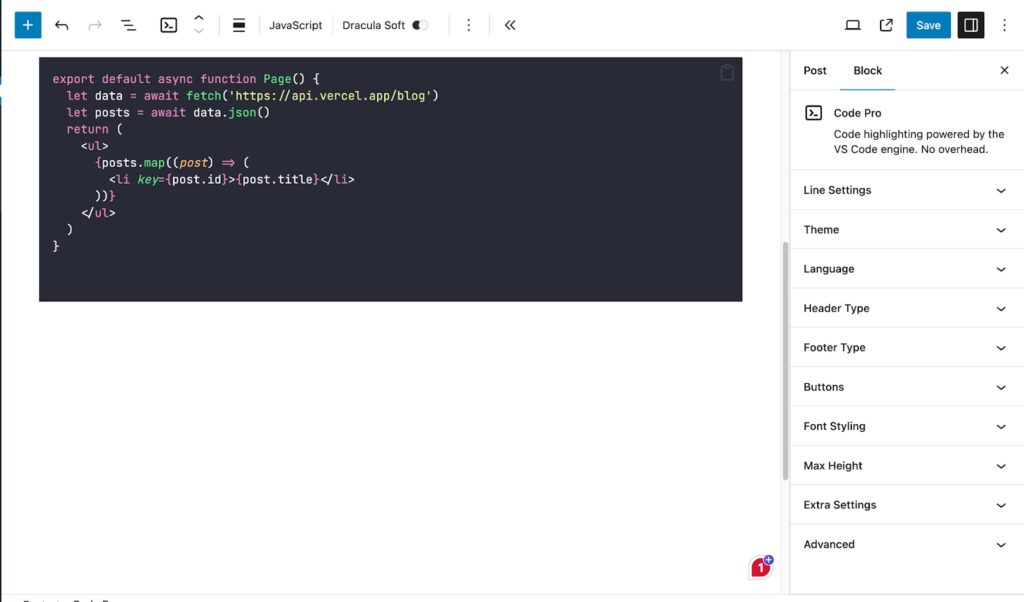
Now that it is activated, create a new post in WordPress. In the block editor, click the plus icon to insert a new block and select the Code Pro block. It looks like this:
When you select it, a syntax-highlighted code block will be added. Go ahead and paste whatever code you want in that block and then save the post. In this case, I am going to add some jsx that renders a page. Note that the panel on the right contains many configuration options.
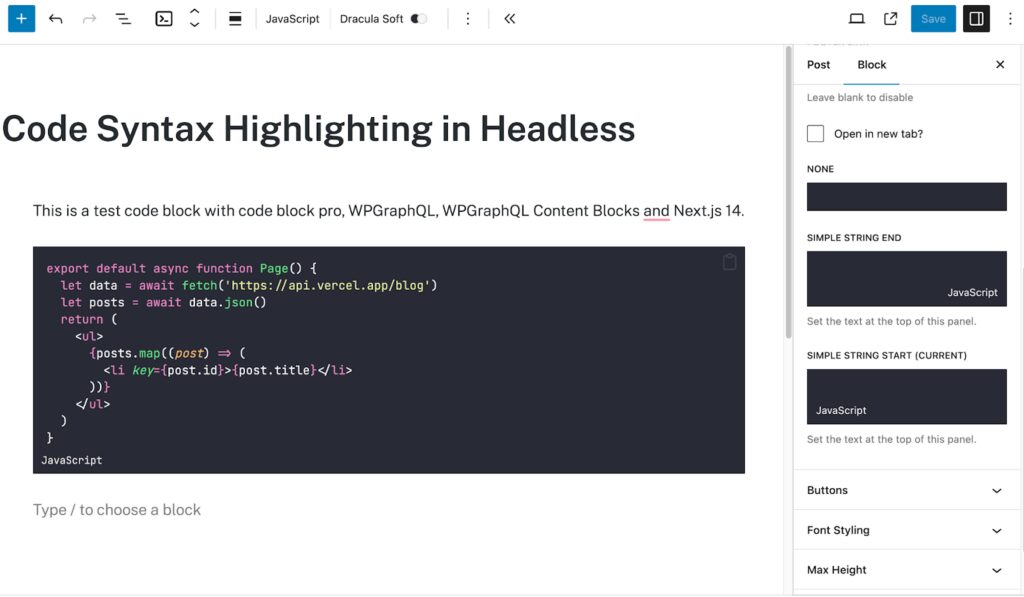
I chose the “Dracula Soft” theme for this article and the header type is set to “none” to achieve a blank header. The footer is set to “simple string start” which displays the kind of language the code is in at the bottom. I also highlighted lines 1 and 2 to show off the line-by-line highlight feature:
That is it! Stoked! This is what you have to do. If simple syntax highlighting and formatting are all you need, as well as displaying the programming language in your post, you are done. Now, let’s get this to render on your decoupled frontend.
Configure Next.js and App Router
In this article, we will use the App Router in Next.js 14. You should already have a boilerplate Next.js project spun up in the app router. Go ahead and open your Next.js project in your code editor. The first thing we need to do is add some code to our CSS. Navigate to your globals.css file in the app directory. Add this CSS:
This css will ensure that line highlighting is properly formatted, creating a more readable and accessible presentation for longer code blocks.
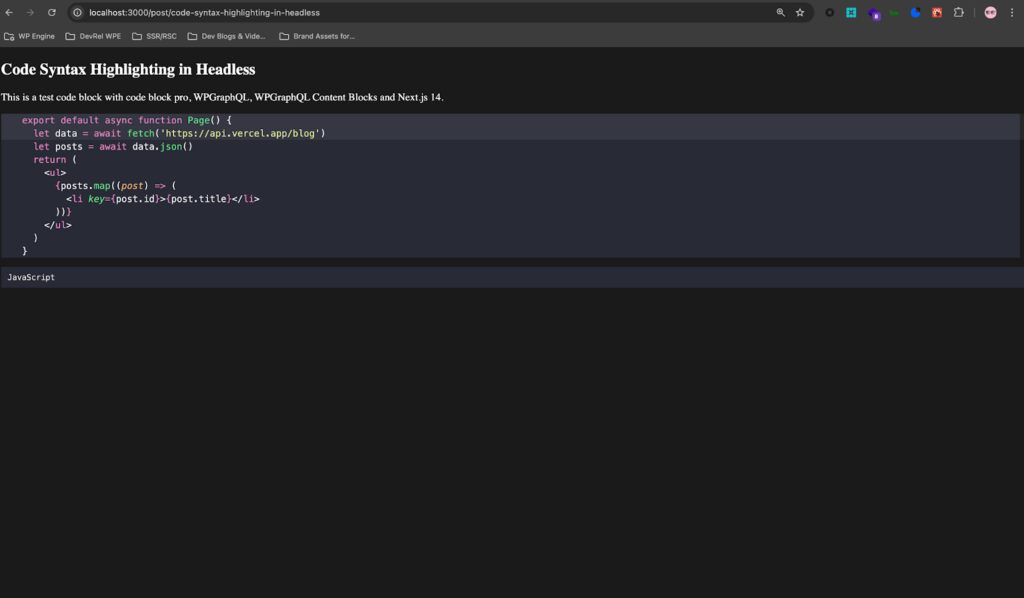
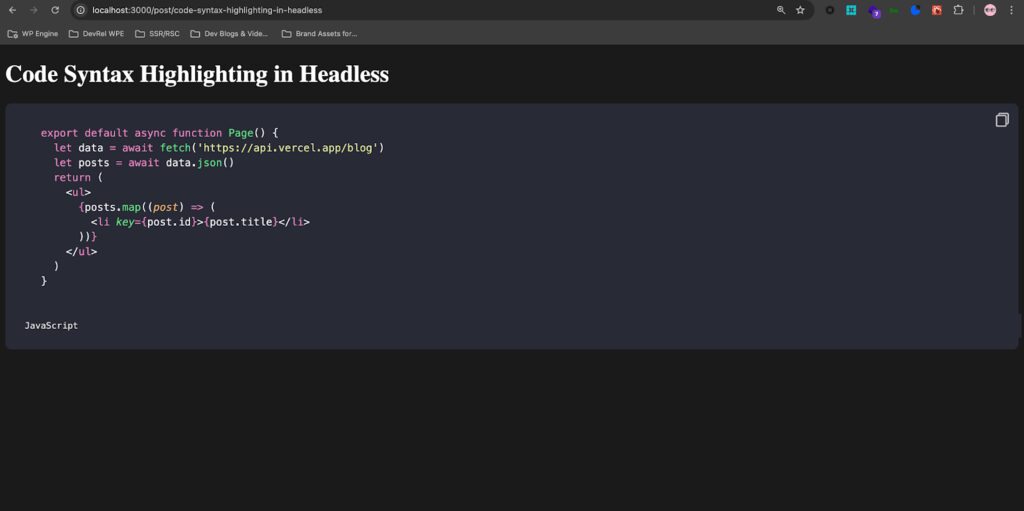
Save that and run npm run dev to spin up your dev server and visit the single post detail page where you added the code. You should have something like this:
Out of the box, the plugin with some css allows you to easily display code, highlighting, and the programming language in a nice, readable way.
Taking it a Step Further – WPGraphQL & WPGraphQL Content Blocks
You can stop at just installing the plugin and adding the css to your frontend application to get the formatting and highlighting. If you want to implement a copy-to-clipboard feature whereby users can click a button to copy the code within the code snippet to their clipboard, however, follow the additional steps below.
Install and activate WPGraphQL & WPGraphQL Content Blocks
WPGraphQL is a canonical WordPress plugin that provides an extendable GraphQL schema and API for any WordPress site.
WPGraphQL Content Blocks is a WordPress plugin that extends WPGraphQL to support querying (Gutenberg) block data. Let’s install both plugins.
Go to the plugins page in your WP admin and search for WPGraphQL. You can add and activate the plugin from there.
Navigate to your WP install and upload the plugin .zip to your WordPress site.
Once that is done, activate the plugin.
Create an editor block query to get Code Block Pro data
Next, let’s query for the Code Block Pro data. Head over to GraphQL IDE and paste in this query:
query GetPostsWithCodeBlocks {
  posts {
    nodes {
      title
      content
      editorBlocks {
        name
        ... on KevinbatdorfCodeBlockPro {
          attributes {
            language
            lineNumbers
            code
          }
          renderedHtml
        }
      }
    }
  }
}
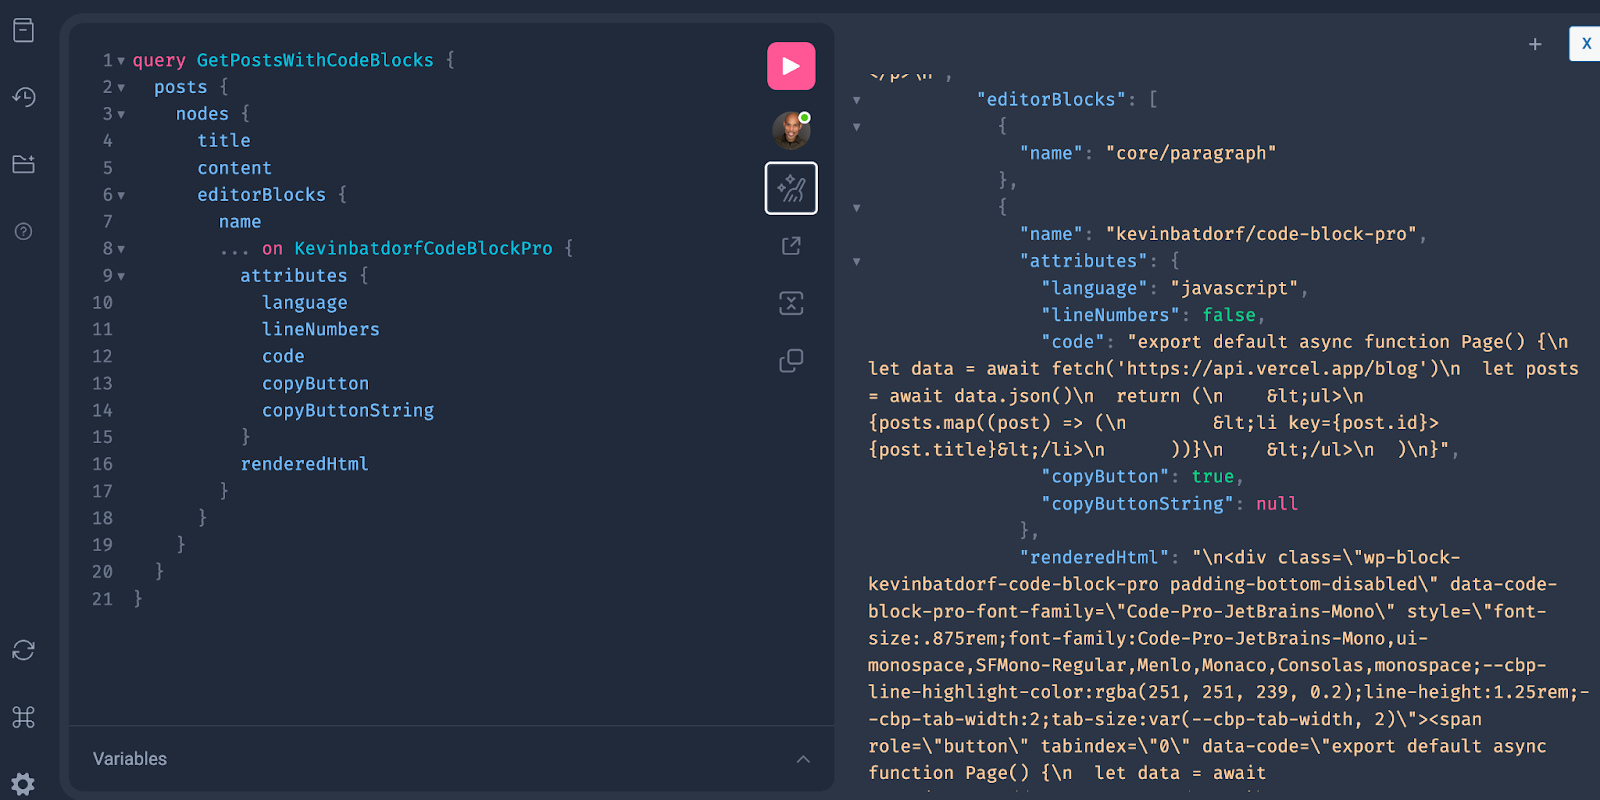
Now press play and you should get this response:
As shown in the IDE, this query returns all posts along with the Code Block Pro data, including the attributes we are asking for (programming language, HTML-rendered code snippet, code, line numbers, copy button, etc.).
Rendering the Code Block in Next.js
Now that we have the data, we need to render the code block in our Next.js frontend. Here’s how you can do it in Next.js 14.
Navigate to app/post/[uri]/page.jsx file. In this file, paste this code block in:
{/* Loop through the editor blocks to render CodeBlockPro if available */}
{post.editorBlocks.map((block, index) => {
if (block.name === "kevinbatdorf/code-block-pro") {
return (
);
}
return null;
})}
);
}
// CodeBlockDisplay inline function to display code block
function CodeBlockDisplay({ attributes, renderedHtml }) {
const [copied, setCopied] = useState(false);
// Handle copy button functionality
const handleCopy = async () => {
try {
if (navigator && navigator.clipboard) {
console.log("Copying the text:", attributes.code);
await navigator.clipboard.writeText(attributes.code);
setCopied(true);
setTimeout(() => setCopied(false), 3000); // Reset after 3 seconds
} else {
console.error("Clipboard API not available.");
}
} catch (err) {
console.error("Failed to copy: ", err);
}
};
return (
{/* Render the HTML of the code block */}
{/* Show the copy button */}
{attributes.copyButton && (
)}
{/* Show the language at the bottom */}
{attributes.language && (
{attributes.language}
{attributes.language}
)}
);
}
function CheckMarkIcon() {
return (
);
}
function CopyIcon() {
return (
);
}
This is a big code block, so let’s break it down into sections.
Starting at the top, we have our “use client” directive since we are importing and using the useState hook in React which needs to run on the client. Then we have our globals.css file for the styling:
"use client";
import { useState } from "react";
import "../../globals.css";
Following that, we have our WPGraphQL query to fetch the post and code block data:
This function defines a GraphQL query to fetch post data, specifically targeting the KevinbatdorfCodeBlockPro block that contains attributes such as language, code, and the copyButton.
The uri (Unique Resource Identifier) is passed into the GraphQL query to fetch the correct post.
The query is then sent to the GraphQL API using fetch, with headers defining the request as POST and the body as JSON. The response is parsed as JSON, and the post data is returned for rendering.
Next, we have our PostDetails component:
export default async function PostDetails({ params }) {
const post = await getPost(params.uri);
return (
The PostDetails component fetches the post data using the getPost function, passing the post uri as a parameter. Following that, the post title is displayed using a simple <h1> tag.
Then editorBlocks field is mapped over, and the function checks if the block name is "kevinbatdorf/code-block-pro". If it is, it renders the CodeBlockDisplay component, passing in the block’s attributes and HTML.
The next part is the CodeBlockDisplay component:
function CodeBlockDisplay({ attributes, renderedHtml }) {
const [copied, setCopied] = useState(false);
const handleCopy = async () => {
try {
if (navigator && navigator.clipboard) {
console.log("Copying the text:", attributes.code);
await navigator.clipboard.writeText(attributes.code);
setCopied(true);
setTimeout(() => setCopied(false), 3000);
} else {
console.error("Clipboard API not available.");
}
} catch (err) {
console.error("Failed to copy: ", err);
}
};
return (
The component uses useState to manage whether the copy button was clicked. This means that after the copy action is triggered, the "Copied!" message will be displayed for 3 seconds before resetting back to the original "Copy" button state.
After that,the handleCopy function uses the Clipboard API to copy the code (contained in attributes.code) to the user’s clipboard. It checks if the API is available and logs an error if not.
The rendered HTML of the code block is then injected into the DOM using dangerouslySetInnerHTML, which is necessary because the content comes from WordPress in HTML format. If the block has a copyButton attribute, the copy button is conditionally displayed. Additionally, the programming language is displayed at the bottom of the block if it’s available.
The last thing we need to do is include components for rendering the SVG icons:
function CheckMarkIcon() {
  return (


  );
}

function CopyIcon() {
  return (


  );
}
The CopyIcon here is displayed by default. After the user clicks on the button to copy the code, that SVG is hidden and swapped out with the CheckMarkIcon to indicate that the code snippet was successfully copied.
Update globals.css file
The last thing we need to do before testing our code block page is to update the css to collectively enhance the presentation of the code block by ensuring the elements are properly spaced, visually appealing, and interactive (with the copy button).
This setup compliments the functionality provided in the JavaScript code for copying code snippets. You can style it however you would like, but I chose to do it this way.
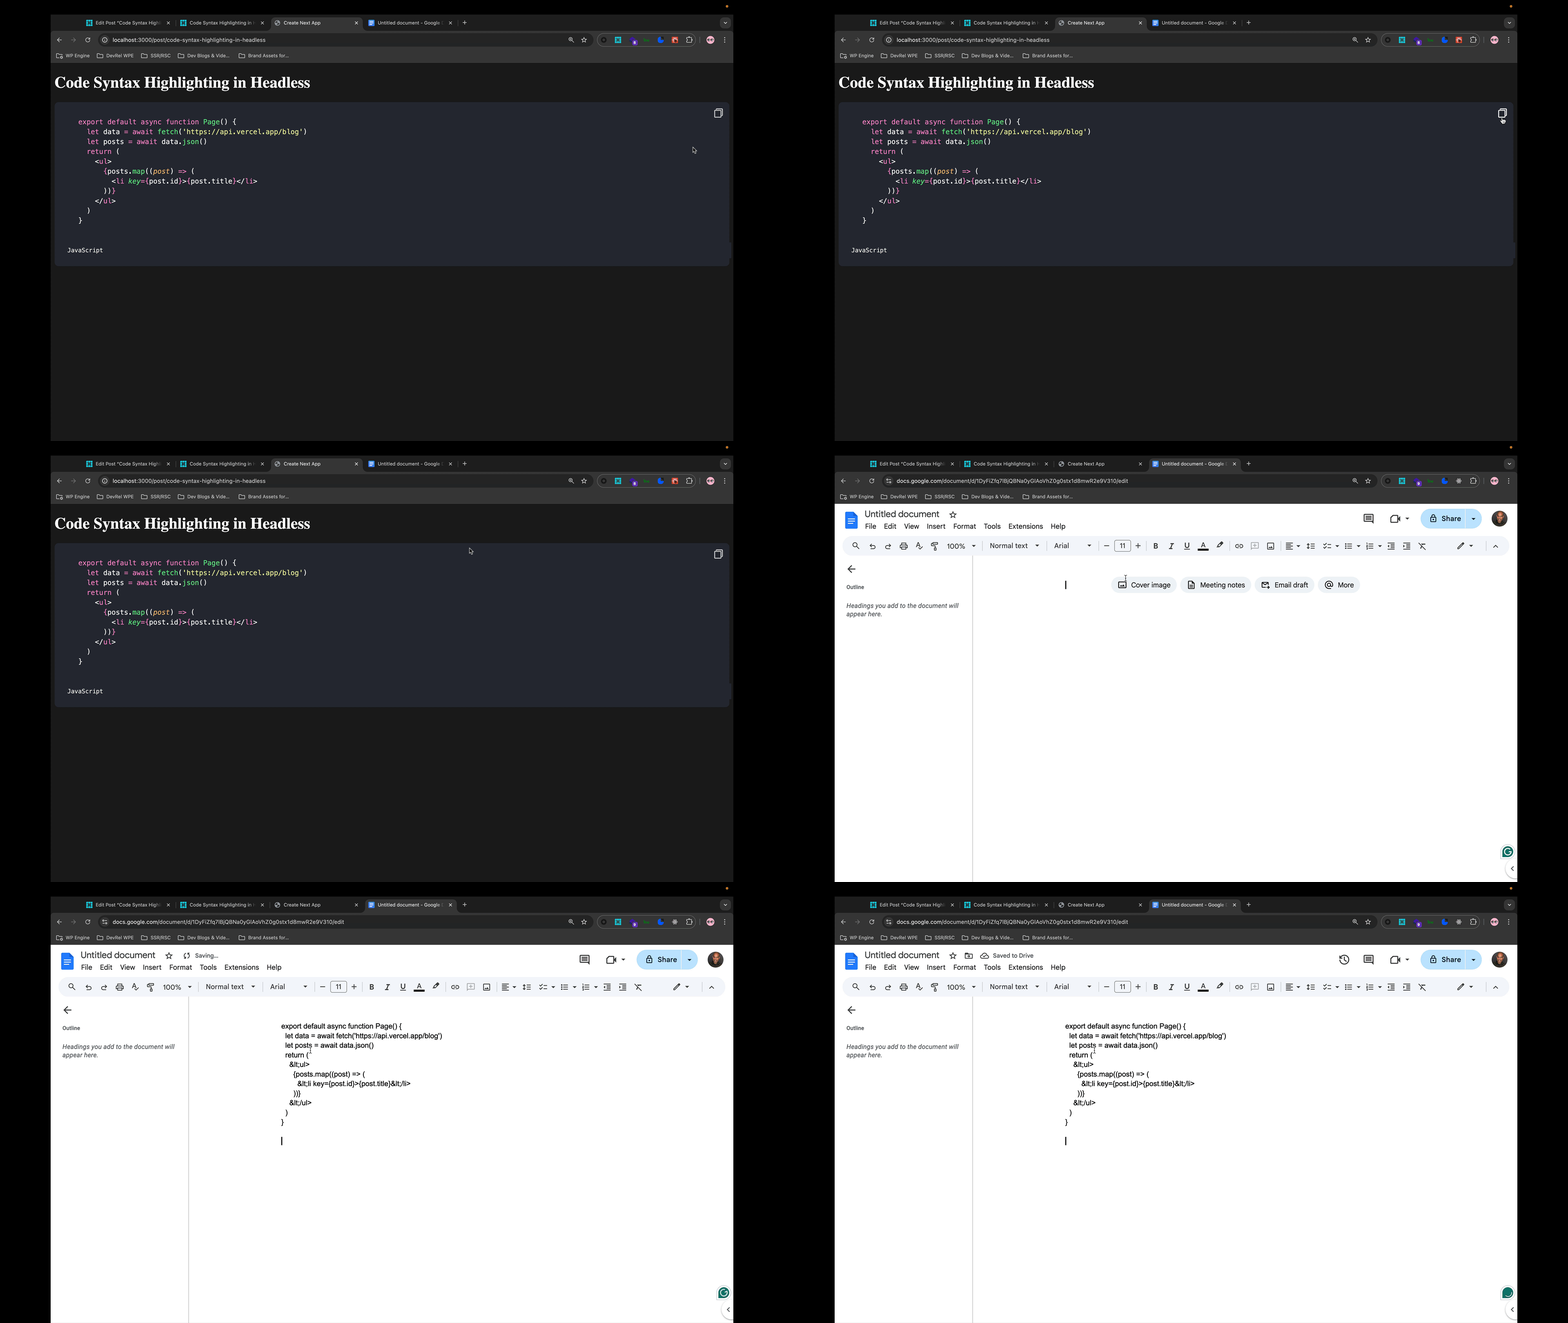
We are ready to test this page. Navigate to your WordPress admin and grab whatever slug is related to the post you embedded code with. When you visit that page, you should have something that looks like this:
Now, to test the copy functionality, click on the clipboard box icon and then paste it into a document to test that it works:
Stoked!! This works! Now let’s discuss more options and practices to use this feature.
Other Options
Here are two more options you can get stoked with in adding code syntax highlighting to your headless WordPress app.
Create A Separate Code Block Pro Component
Instead of embedding the entire code block logic directly into a single page file, it’s a good practice to create a separate component specifically for handling Code Block Pro blocks.
This approach enhances code readability, reusability, and maintainability by isolating the code block’s functionality. You can easily import this component into any page that requires the code block, such as your page.jsx file, without cluttering the page’s primary logic. For this example, our separate component would look like this:
"use client";
import { useState } from "react";
// This component renders the Code Block Pro block with copy-to-clipboard functionality
export default function KevinBatdorfCodeBlockPro({ attributes, renderedHtml }) {
const [copied, setCopied] = useState(false);
// Handle the copy functionality
const handleCopy = async () => {
try {
if (navigator && navigator.clipboard) {
await navigator.clipboard.writeText(attributes.code);
setCopied(true);
setTimeout(() => setCopied(false), 3000); // Reset after 3 seconds
} else {
console.error("Clipboard API not available.");
}
} catch (err) {
console.error("Failed to copy: ", err);
}
};
return (
{/* Render the HTML of the code block */}
{/* Show the copy button */}
{attributes.copyButton && (
)}
{/* Show the language at the bottom */}
{attributes.language && (
{attributes.language}
{attributes.language}
)}
);
}
// CheckMarkIcon component for when the text has been copied
function CheckMarkIcon() {
return (
);
}
// CopyIcon component for the default copy button
function CopyIcon() {
return (
);
}
Since I already explained the code’s function and logic in the previous section, you can go over what it does there.
Conclusion
Syntax highlighting and copy-to-clipboard functionality are valuable enhancements to the code snippets on your headless WordPress sites.
By leveraging the Code Block Pro plugin and WPGraphQL, we were able to query and render code blocks with ease. This approach improves readability and user experience, allowing visitors to easily copy code snippets directly from your posts. The combination of server-side rendering with client-side interactivity using Next.js, along with a clean, simple styling approach, ensures that you can maintain a visually appealing and functional code block display.
As always, we’re stoked to hear your feedback and see what headless projects you’re building! Hit us up in our Discord!
Before diving into the details of this announcement, I want to address something important. I am, like all of you, a human being. Given the current tensions in the WordPress ecosystem, my decision to move from WP Engine to Automattic might evoke strong feelings. Whether you agree or disagree with this decision, please recognize me as a human. Please treat me with respect, even if you strongly oppose my choices. The WordPress community is one I care deeply about, and we all benefit from respectful dialogue, no matter our differences.
With that said, I’m excited to announce that after 3.5 wonderful years at WP Engine, I’ve accepted an offer with Automattic to continue my work on WPGraphQL as it transitions into becoming a canonical community plugin on WordPress.org.
Reflecting on My Time at WP Engine
I’ve truly enjoyed my time at WP Engine. I’ve had the opportunity to publish over 100 releases of WPGraphQL, re-architect WPGraphQL for ACF, introduce WPGraphQL Smart Cache, and help countless users successfully deploy decoupled sites powered by WPGraphQL. I’ve made great friends at WP Engine and hope to continue collaborating with them in the open-source ecosystem for years.
That said, as someone deeply committed to Free Open Source Software (FOSS), the economics around open-source projects can take time to balance. While WP Engine has treated me well personally, the focus on open-source contributions from the organization has declined during my time there. My time was also reallocated away from WPGraphQL and community projects as internal initiatives took priority. Any company needs to focus on internal growth. Still, I believe there’s a conversation to be had about how that fits into the broader open-source community and whether it supports long-term success. Several other former colleagues and I tried to talk about how WP Engine could better participate in Open Source, but those conversations didn’t always gain traction. Hopefully, those conversations can begin again. I don’t have the answers, but I do know there is a problem.
Why Automattic? Why Now?
WPGraphQL has always been and will continue to be free open-source software. Automattic’s track record as a fantastic steward of open-source projects is well known, and I believe it’s the perfect home for WPGraphQL. This move will continue to keep WPGraphQL free and open source while bringing more visibility and contributions from the community.
There is so much untapped potential in the decoupled WordPress ecosystem. While WPGraphQL is already trusted to power thousands of sites, this move will allow us to make even more progress in helping teams build modern API-driven websites and applications with WordPress. Becoming a canonical community plugin will open up new opportunities for collaboration, growth, and innovation across the ecosystem.
On Matt Mullenweg’s Recent Actions
There will likely be assumptions that by joining Automattic, I’m fully endorsing every action Matt Mullenweg has taken recently. This is not the case. I’ve told Matt directly that I don’t agree with everything he’s done — and he has welcomed the disagreement. For example, I don’t think WordCamp US was the right time or place for his speech. I also do not agree with blocking WP Engine customers from WordPress.org without more notice. Should WordPress.org be required to remain a free service forever? Not necessarily. But should long-time users receive advance notice when significant changes are made? I think so.
I could probably list many other things that I don’t agree with Matt on but the reality is that I’ve never worked at a company where I’ve agreed with every single action their leaders have taken.
Leadership often involves making uncomfortable choices that others might not fully understand or agree with. His historical actions have led WordPress to its current success, and I believe that bold moves—though uncomfortable—are sometimes necessary to ensure the long-term future of WordPress. As a maintainer of open-source software, my livelihood depends on people like Matt, who are willing to keep WordPress relevant in the years to come.
WPGraphQL is becoming a canonical WordPress community plugin
Automattic has a long record of nurturing open-source projects used by millions. By becoming a canonical project—similar to WP-CLI, Gutenberg, or the WP REST API before it was merged into core—I anticipate a lot of support from Automattic and the wider community. I believe this move will bring tangible benefits not just to WPGraphQL users but also to the hosts and developers building decoupled WordPress experiences.
There’s much more to come, and I’m excited to continue building tools and features that help teams succeed with modern web development using WordPress and WPGraphQL. Together, we can achieve great things for the entire ecosystem!
Caching is important in optimizing performance for headless WordPress setups. The WPGraphQL Smart Cache plugin helps manage caching for GraphQL queries, ensuring faster response times. In this guide, we’ll walk you through setting up your WordPress environment, installing the necessary plugins, and customizing GraphQL cache keys to better suit your specific needs.
WPGraphQL Smart Cache automatically tags cached responses with keys derived from the GraphQL queries. These keys are linked to specific WordPress data (e.g., posts, pages, taxonomies). When relevant data is updated, the associated cache is invalidated.
For example, a query that retrieves posts with specific categories and tags will generate cache keys like list:post, list:category, and list:tag. If any of these categories or tags are updated, the entire cache is invalidated, ensuring the data stays current.
In addition to the list:$type_name keys, individual node IDs are also included.
These individual IDs are used to purge cache when updates or deletes happen.
The list:$type_name is used to purge when a new thing is published. For example list:post will be purged when a new post is published, but purge( "post:1" ) would be purged when post 1 is updated or deleted.
Let’s see this in action. Navigate to your WP admin, then open your WPGraphQL IDE. Copy and paste this query:
query GetPosts {
  posts {
    nodes {
      title
      uri
    }
  }
}
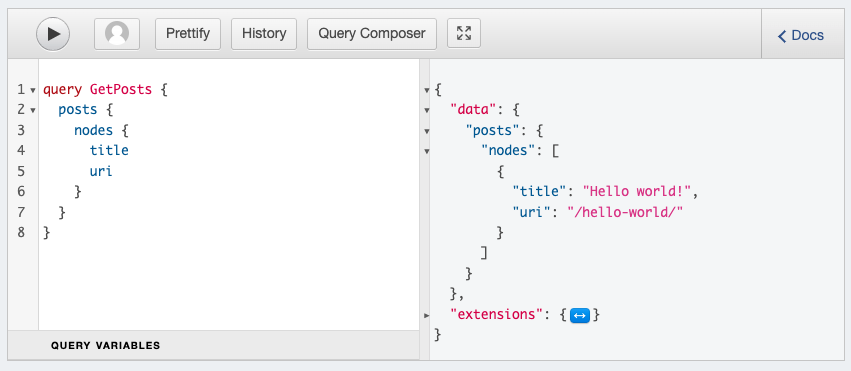
When you press play in your IDE, this will make a query to your site’s WPGraphQL endpoint.
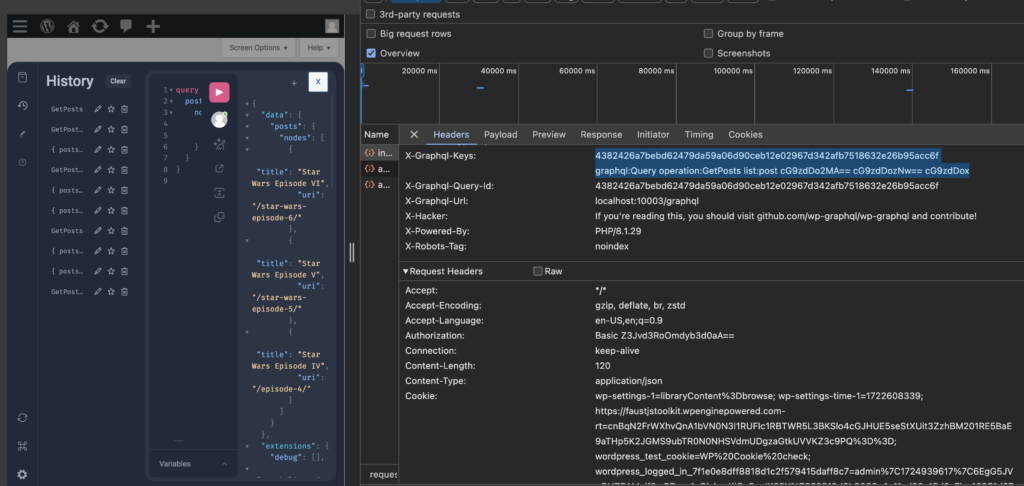
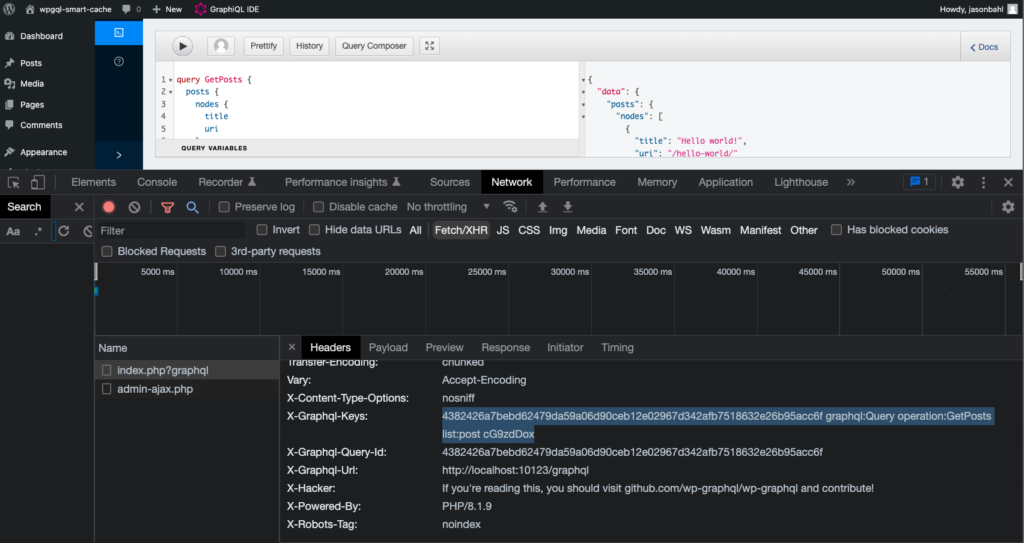
Then WPGraphQL will return headers that caching clients can use to tag the cached document. Next, Open your dev tools. In this case, I am using Google Chrome. When I open up the dev tools and inspect the response headers, you should see this:
Here, we see the X-GraphQL-Keys header with a list of keys. If this query were made via a GET request to a site hosted on a host that supports it, the response would be cached and “tagged” with these keys.
For this particular query, we see the following keys:
Hash of the Query: This is a unique identifier which is in this example
4382426a7bebd62479da59a06d90ceb12e02967d342afb7518632e26b95acc6f for the specific query made. It ensures that the exact same query returns the same cached response unless invalidated.
Operation Type (graphql:Query): Indicates that the operation is a GraphQL query, as opposed to a mutation or subscription
Operation Name (operation:GetPosts): Identifies the specifically named query, in this case, GetPosts, which helps in targeting this operation for caching or invalidation.
List Key(list:post): This key identifies that the query is fetching a list of posts. Any changes to the list of posts would trigger cache invalidation.
Node ID (cG9zdDox): This represents the specific node (e.g., a post) that was resolved in the query. Changes to this node will invalidate the cache for this query.
If a purge event for one of those tags is triggered, the document will be tagged with these keys and purged (deleted) from the cache.
Understanding Cache Invalidation with WPGraphQL Smart Cache
WPGraphQL Smart Cache optimizes caching by sending the keys in the headers, but the caching client (e.g., Varnish or Litespeed) needs to use those keys to tag the cache. WPGraphQL Smart Cache itself does not tag the cached document; it provides the caching client info (the keys) to tag the cached document with. A supported host like WP engine works with WPGraphQL Smart Cache out of the box.
Let’s discuss how invalidation works:
WPGraphQL Smart Cache listens to various events in WordPress, such as publishing, updating, or deleting content, and triggers cache invalidation (or “purge”) based on these events.
Detailed Key Breakdown:
Publish Events (purge('list:$type_name')): When a new post or content type is published, the cache for the entire list associated with that content type (e.g., all posts) is purged. This ensures that any queries fetching this list will be up-to-date.
Update Events (purge('$nodeId')): When an existing post or content type is updated, the cache for that specific node (e.g., a single post) is purged. This allows the updated content to be fetched without affecting the entire list.
Delete Events (purge('$nodeId')): Similarly, when a post or content type is deleted, the cache for that specific node is purged, ensuring that the deleted content is no longer served from the cache.
Why This Matters:
These targeted cache invalidations help maintain the balance between performance and data freshness. By only purging the cache when necessary and only for the relevant data, WPGraphQL Smart Cache ensures that users receive up-to-date content without unnecessary cache purges, which can negatively impact performance.
This invalidation strategy is crucial for optimizing the performance of headless WordPress setups using WPGraphQL, especially in dynamic environments where content changes frequently.
How Cache Invalidation and Cache Tags Work Together
Now that we’ve explored how cached documents are tagged and how cache invalidation works in WPGraphQL Smart Cache, let’s see how these concepts interact.
When a GraphQL query is executed, specific cache keys (tags) are associated with the cached response. These tags correspond to the data queried, such as posts, categories, or specific node IDs. The cache invalidation strategy then ensures that when relevant data changes occur in WordPress, the associated cached documents are purged based on these tags.
Example: Invalidation Scenarios for a GetPosts Query
Publishing a New Post (purge('list:post')):
When a new post is published, the entire list of posts in the cache (tagged with list:post) is invalidated. This ensures that the new post will appear in any subsequent queries that fetch this list.
Updating or Deleting a Specific Node (purge('$nodeId')):
If the “Hello World” post (with the ID cG9zdDox) is updated or deleted, the cache for that specific node is purged. This allows the updated or deleted content to be accurately reflected in any future queries.
Manually Purging Cache (purge('graphql:Query')):
Clicking “Purge Cache” in GraphQL > Settings > Cache page triggers a manual cache purge for all queries. This can be useful when you want to ensure that all cached data is refreshed, regardless of specific events.
Operation Name or Query Hash-Based Purge:
Custom purge events can be manually triggered based on the operation name (e.g., GetPosts) or the hash of the query. This level of control allows you to finely tune when and how caches are invalidated.
These strategies work together to ensure that the cache is only invalidated when necessary, providing up-to-date data without unnecessary performance overhead. For instance, when the “Hello World” post is updated, it’s reasonable to expect that the cache for the GetPosts query should be purged so that any queries return the most current data. This fine-grained control over cache invalidation ensures that your headless WordPress site remains performant while delivering fresh content.
Why Would You Need to Customize WPGraphQL Cache Keys?
In some scenarios, the default caching behavior might be too broad, leading to frequent cache invalidations. This is especially true for more complex queries.
For instance, if your query includes categories and tags, any update to these taxonomies will invalidate the cache, even if those changes don’t affect the specific posts you’re querying. Customizing cache keys allows you to fine-tune this behavior, ensuring that only relevant updates trigger cache invalidation, thereby improving performance.
For example, consider the following query:
{
  posts {
    nodes {
      id
      title
      tags {
        nodes {
          id
          name
        }
      }
    }
  }
  categories {
    nodes {
      id
      name
    }
  }
  tags {
    nodes {
      id
      name
    }
  }
}
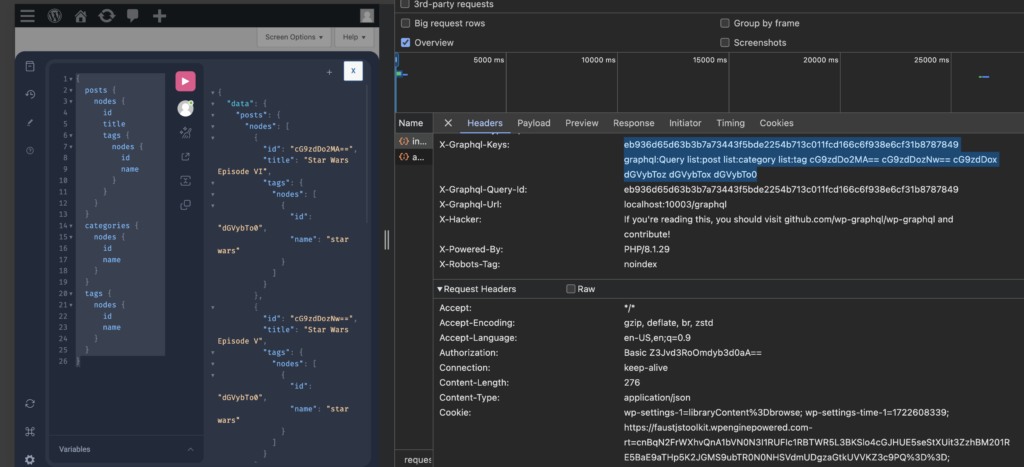
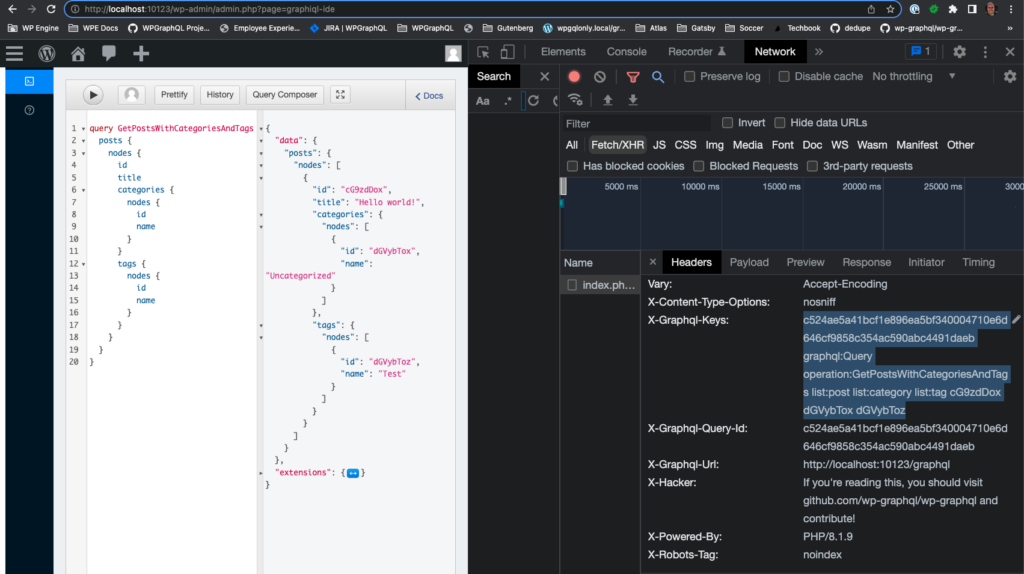
This query retrieves a list of posts, along with all categories and tags. When this query is executed, the response includes the posts, categories, and tags that match the query as shown here:
The X-GraphQL-Keys header shows that the cached document is tagged with list:post, list:category, and list:tag. This tagging means that the cache will be invalidated whenever there’s a change in any of these entities—whether it’s a new post, category, or tag.
While this behavior ensures that your cache is up-to-date, it can lead to excessive cache invalidation. For instance, if a new tag is created and assigned to a post not included in this query, it will still trigger a purge('list:tag'), invalidating the cache for this query.
This means the cache could be cleared more often than you want for your specific use case, which could negatively impact performance.
query GetPostsWithCategoriesAndTags {
  posts {
    nodes {
      id
      title
      categories {
        nodes {
          id
          name
        }
      }
      tags {
        nodes {
          id
          name
        }
      }
    }
  }
}
The WPGraphQL team changed things to only track list: types from the root. So, if you run this query, your list of categories won’t be tracked because it is not at the root.
The Problem
The problem is that the list:category and list:tag keys could cause this document to be purged more frequently than you might like. WPGraphQL tracks precisely, but it doesn’t know your specific intention and what you care about.
For example, you might simply not care if this particular query is “fresh” when terms change. OR you might ONLY care for this query to be fresh when terms change.
WPGraphQL doesn’t know the intent of the query, only what the query is.
Fortunately, you can customize the cache keys to better suit your specific needs, reducing unnecessary cache invalidations and improving performance.
Customizing Cache Keys
By customizing the cache keys, you can ensure that the cache is only invalidated when changes you believe are relevant to your use case occur. This involves fine-tuning the tags associated with your queries, allowing you to maintain optimal performance without sacrificing data accuracy.
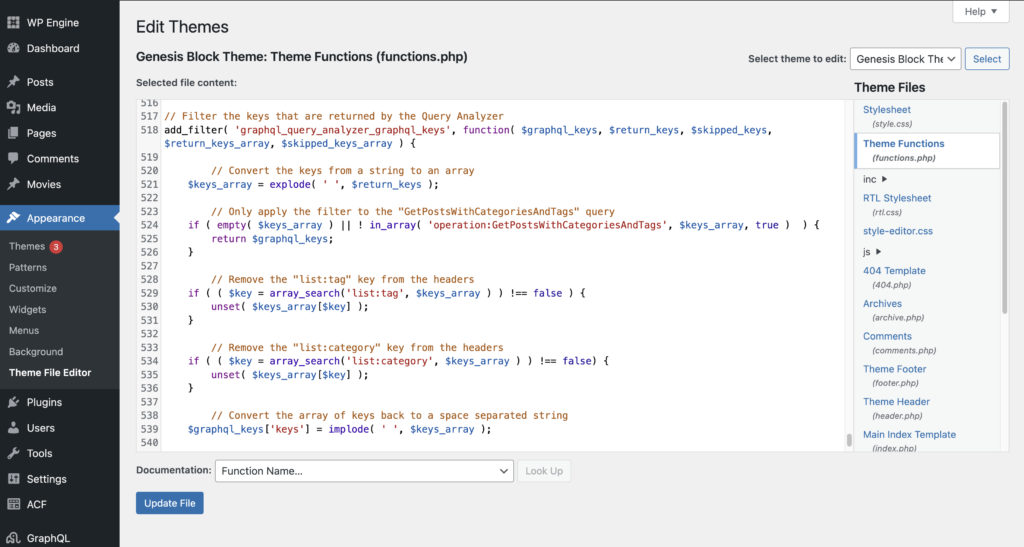
Let’s do this by navigating to our WP admin and modifying the functions.php file. Go to Appearance> Theme File Editor. Select the functions.php file from your active theme.
Insert this code snippet at the bottom of your functions.php file to customize the cache keys for a specific GraphQL operation. In this case, let’s add an operator name to the query we used in the section before. We are calling our operation GetPostWithCategoriesAndTags:
This snippet customizes the cache keys for the GetPostsWithCategoriesAndTags operation. It removes the list:tag and list:category keys from the cache, preventing their updates from invalidating the cache for this specific query. The array_diff() function is used to filter out the unwanted keys, and the modified keys are then reassembled into a string and returned.
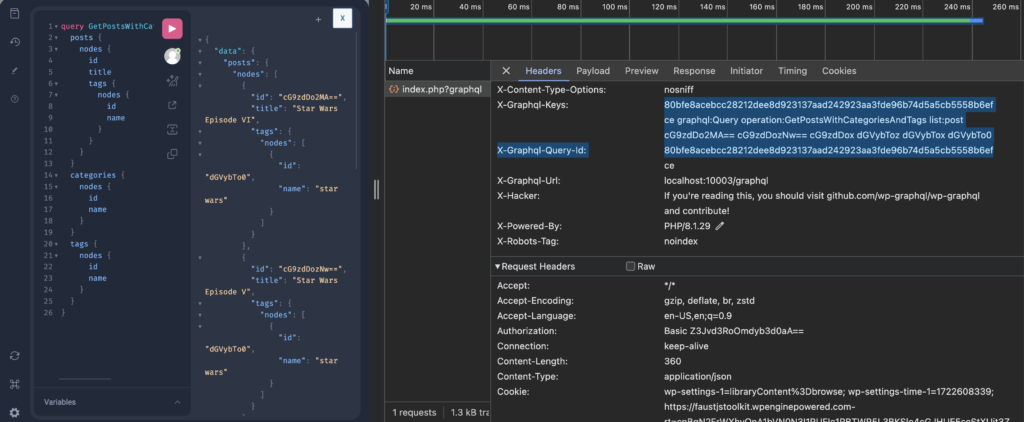
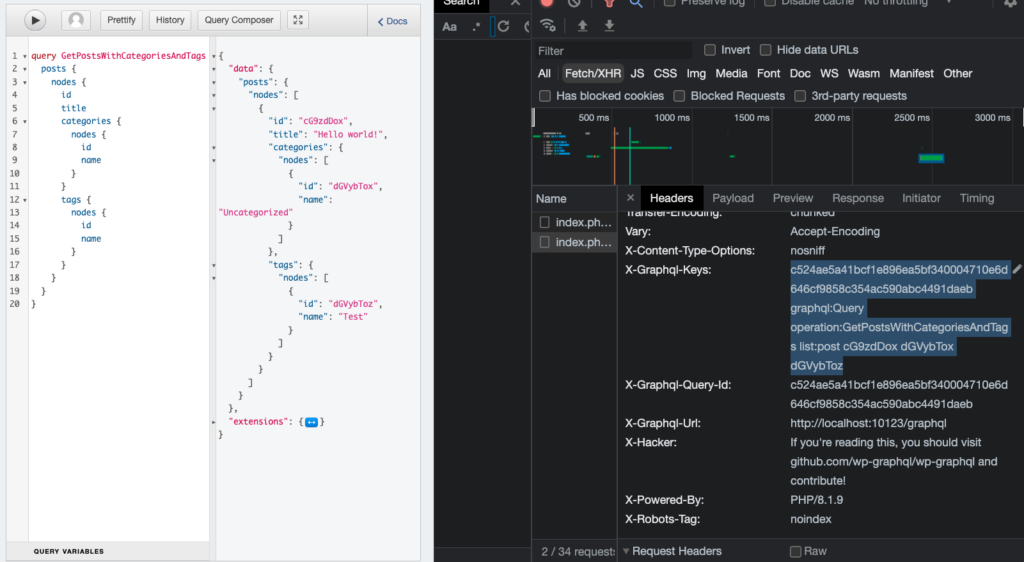
Let’s test this now in WPGraphQL IDE and the browser dev tools:
Stoked!!! Now as you see in the dev tools image, publishing new categories and tags, which triggers purge( 'list:category' ) and purge( 'list:tag' ) will not purge this document.
We’re getting the benefits of cached GraphQL documents. The document is invalidated when the post is updated or deleted, but we’re letting the cache remain cached when categories or tags are created.
Conclusion
We hope you have a better understanding of using filters, as demonstrated above, to customize your cache tagging and invalidation strategies to better suit your project’s specific needs. By taking control of how cache keys are managed, you can optimize performance and reduce unnecessary cache invalidations. As always, we look forward to hearing your feedback, thoughts, and projects, so hit us up in Discord!
We’re excited to announce that we’re moving from Slack to Discord! This change will enhance our communication and community experience.
📣 Why Move to Discord?
✅ No More Lost History: All message history from Slack (since 2017!) has been migrated and is searchable in Discord. ✅ Dedicated Channels: Specific topics for streamlined conversations. ✅ Voice Channels: Engage with others directly through voice chats. ✅ Community Events: Stay updated on upcoming events, webinars, and more. ✅ Enhanced Moderation: Keeping the community safe and welcoming. ✅ Resource Sharing: More tools for organizing content and sharing ideas.
💬 Join Us on Discord!
Download Discord (desktop, mobile) or use in the browser.
In this article, we will take a look at Meta Queries in WPGraphQL and ACF. If you are not familiar with Meta Data in WordPress, it is essentially supplemental information about objects. In the case of WordPress, meta data is additional information associated with objects native to WordPress, such as posts, users, comments, terms, or custom post types and taxonomies registered to WordPress using tools like ACF.
Given the many-to-one relationship of metadata in WordPress, your options are fairly limitless. You can have as many meta fields per object as you wish, and you can store just about anything as meta.
Meta data is a powerful tool in WordPress development, as it allows for the extension of standard data structures to accommodate the specific needs of a website without altering core database schemas. This is particularly important in headless WordPress setups, where custom fields (post meta) can be exposed via WPGraphQL to be consumed by the frontend application.
While there is incredible utility in the flexibility of storing arbitrary data to supplement WordPress objects, the flexibility can come at a cost.
In order to understand the issue that querying by meta presents, let’s take a look at the WordPress database.
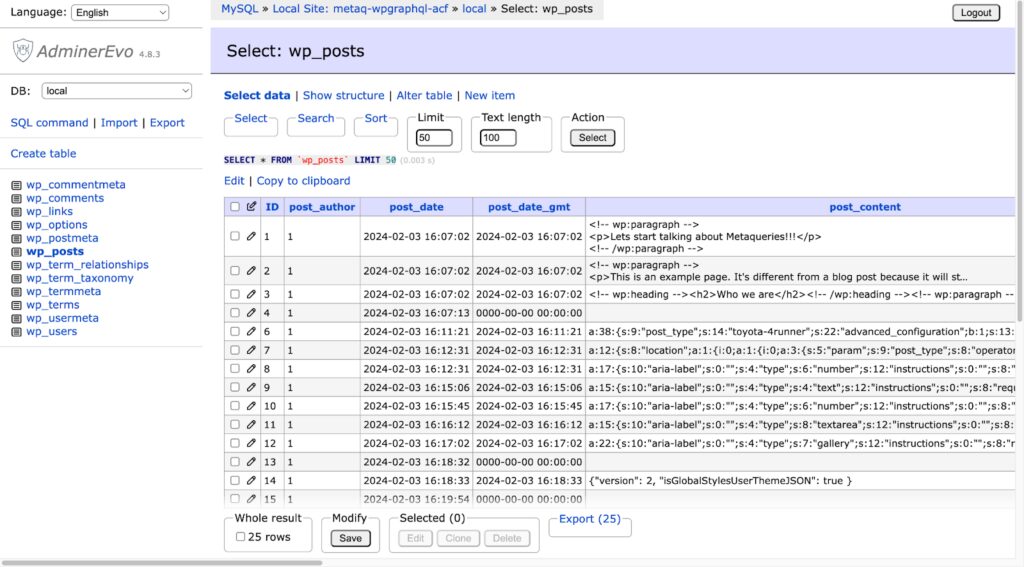
WordPress relies on a MySQL database, a robust and widely-used relational database management system. This database stores all the content and settings of a WordPress site, structured into several tables that handle posts, pages, comments, users, and meta-information, among others. The core of content storage lies within the wp_posts table, which houses not just posts but also pages, custom post types, and attachments. Each entry in this table is uniquely identified by an ID column, serving as the primary key. This ID is auto-incremented for each new entry, ensuring uniqueness and facilitating efficient data retrieval.
The efficiency of querying the WordPress database, particularly when fetching posts by their ID, is largely due to how SQL databases are designed to index primary keys. When a query requests a post by its ID, the database’s indexing system allows for a rapid, direct access path to the sought-after record, significantly reducing the time and computational resources needed compared to scanning the entire table.
For reference, here is an image of the wp_posts data table:
The Meta Query Issue in WP Databases
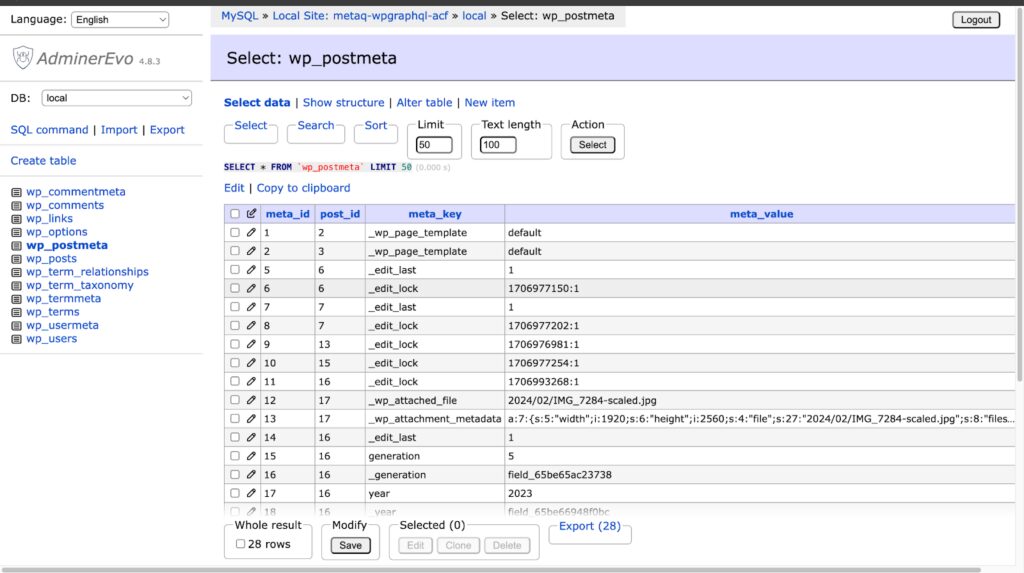
Meta Queries in WordPress provide a way for querying posts based on meta data, but they can introduce significant performance challenges, particularly on large-scale sites like newspapers or media outlets, where meta data can amass to millions of rows. Each meta key-value pair in WordPress is stored in the wp_postmeta table, which has a flexible structure allowing for virtually any type of data to be stored. This flexibility comes with a cost. Since meta keys are not strictly defined and meta values can contain anything from JSON strings to URLs, there is no practical way to enforce indexing strategies that would normally optimize query performance. It is like the wild-west. 🤠
As a result, when a Meta Query is executed, it will scan of all the rows in the wp_postmeta table, which is incredibly inefficient. This is like trying to find a needle in a haystack; the query must sift through potentially millions of rows to locate the desired records. In the context of a high-traffic site with extensive meta data, this can lead to slow query execution times and a heavy load on the database server, ultimately impacting the user experience and shutting the site down.
This is the major reason why this functionality is not part of the core WPGraphQL plugin.
Here is an image of a sample meta query table:
Now, this is just a normal demo site with not much post data. But imagine a local or national media or newspaper site with millions of rows of meta.
Performance Degradation in Meta Queries
When considering that these operations might not be merely occasional but could be a regular part of the site’s operation, it becomes clear that Meta Queries can become a bottleneck for database performance which leads to slow queries and bad user experience.
Solutions to the Meta Query Issue
The first way to address the issue is to simply accept it. You could choose to overlook the performance impact and accept the slower query execution. For most WordPress sites, which are small enough, this may be so inconsequential that it doesn’t significantly affect your experience.
Utility Taxonomies
Leveraging a private taxonomy instead of post meta can lead to substantial performance improvements in headless WordPress setups. By tagging posts with a non-public taxonomy, you can sidestep the costly operations associated with meta queries.
Whenever the “text_field” is updated, it is synced to the text_field_utility_tax and associated with the post. Then users could query via tax query instead of meta_query to avoid performance issues.
With this utility taxonomy in place, searching and organizing posts as well as UI’s for ACF fields becomes a taxonomy query, which is inherently more efficient than querying for wild meta-keys.
The values under the hood perform better when a query is filtered via tax query.
Another option to filter data by Meta Values in WPGraphQL would be to write your own custom code to handle this. This would require registering field(s) to the Schema to allow input from the query, then filtering the resolver(s) to use that input and pass it to the underlying WP_Query (or equivalent) to filter the data being queried for.
There is also an extension WPGraphQL Meta Query that adds the ability to filter connections via meta queries. Use these both at your own discretion and risk. The WPGraphQL Meta Query extension is not actively maintained nor are there current plans to introduce this functionality to core WPGraphQL.
Conclusion
When developing apps and sites with large amounts of meta data in a headless WordPress environment using ACF and WPGraphQL, it is crucial to be aware of and understand the issues related to Meta Queries. I hope this article has provided you with a clearer understanding of the causes of these issues and how you can address them, albeit at your own risk.
Here are a few more links if you are interested in reading more about the subject:
When working with headless WordPress using WPGraphQL, we may need to query posts with non-ASCII characters in their slugs or URIs. WPGraphQL does this out of the box without needing any special encoding for non-ASCII characters.
In this article, I will go through what non-ASCII is and the shape of the queries.
Understanding Non-ASCII Characters
Non-ASCII characters are characters that extend beyond the basic English alphabet and include symbols, accented letters, and characters from different languages. These characters are essential for expressing the diversity of languages and cultures across the globe. They are commonly used in various languages, scripts, and writing systems worldwide.
In computer programming and text processing, handling non-ASCII characters requires understanding and appropriate encoding/decoding mechanisms to ensure proper display and processing of text in different languages and scripts.
Examples of non-ASCII characters include:
Accented letters: é, à, ö, ñ, etc.
Non-Latin alphabets: 漢 (Chinese), こんにちは (Japanese), به متنی(Persian), etc.
Querying Posts by Slug or Uri when the Post Name is Non-ASCII
WPGraphQL handles non-ASCII characters without any need for extra encoding. Once you download the plugin, it does this automatically.
Let’s look at some example queries with non-ASCII characters.
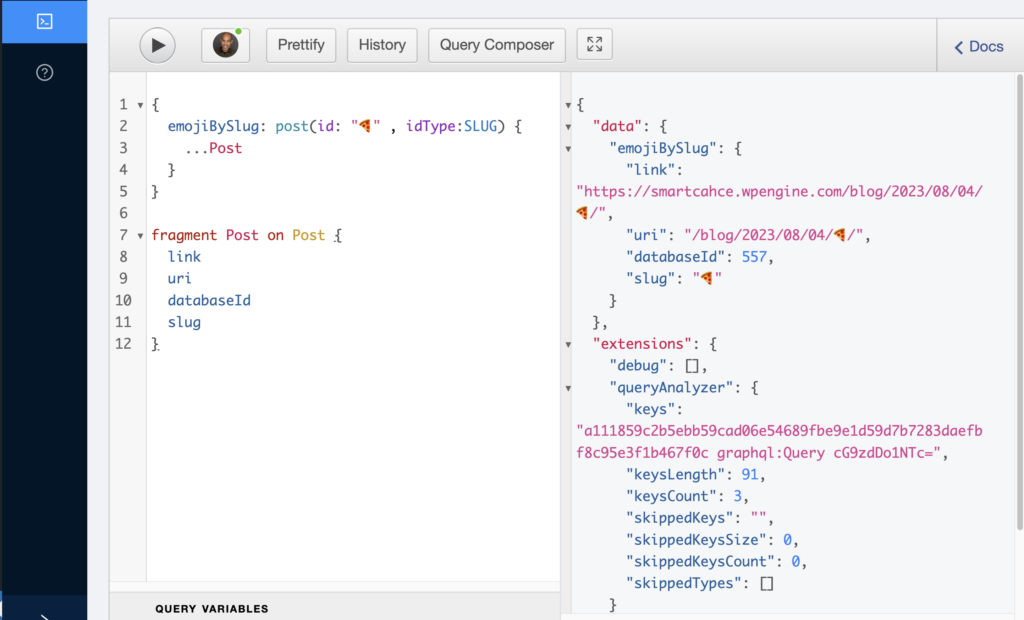
If we have a post about air-fried pizza and its slug is an emoji of pizza (🍕), we can query it via its slug of the pizza emoji:
{
  emojiBySlug: post(id: "🍕" , idType:SLUG) {
    ...Post
  }
}

fragment Post on Post {
  link
  uri
  databaseId
  slug
}
Here is the returned data we asked for in GraphiQL IDE:
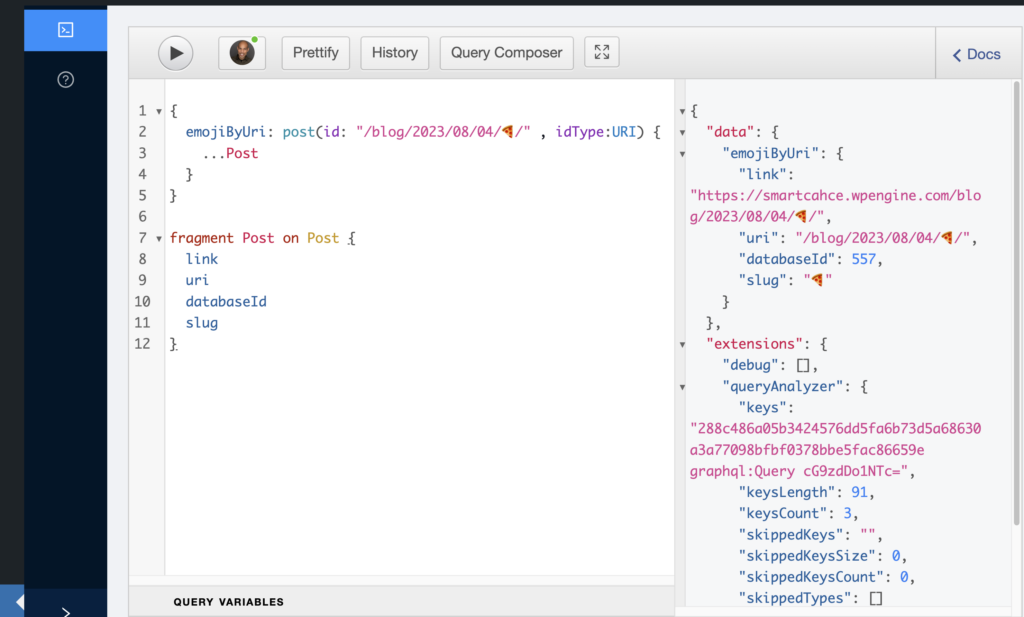
We can also query it via its URI with the emoji in the URI:
{
  emojiByUri: post(id: "/blog/2023/08/04/🍕/" , idType:URI) {
    ...Post
  }
}

fragment Post on Post {
  link
  uri
  databaseId
  slug
}
And the returned data:
For my front end, I am using Faust.js with WPGraphQL and this is what the single post page template looks like when it renders this queried data:
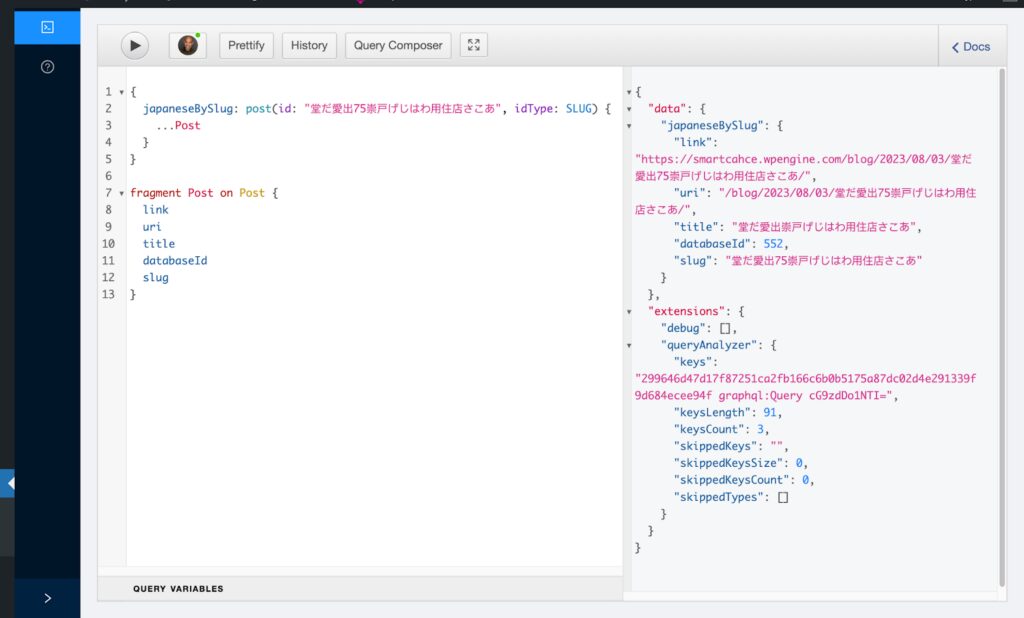
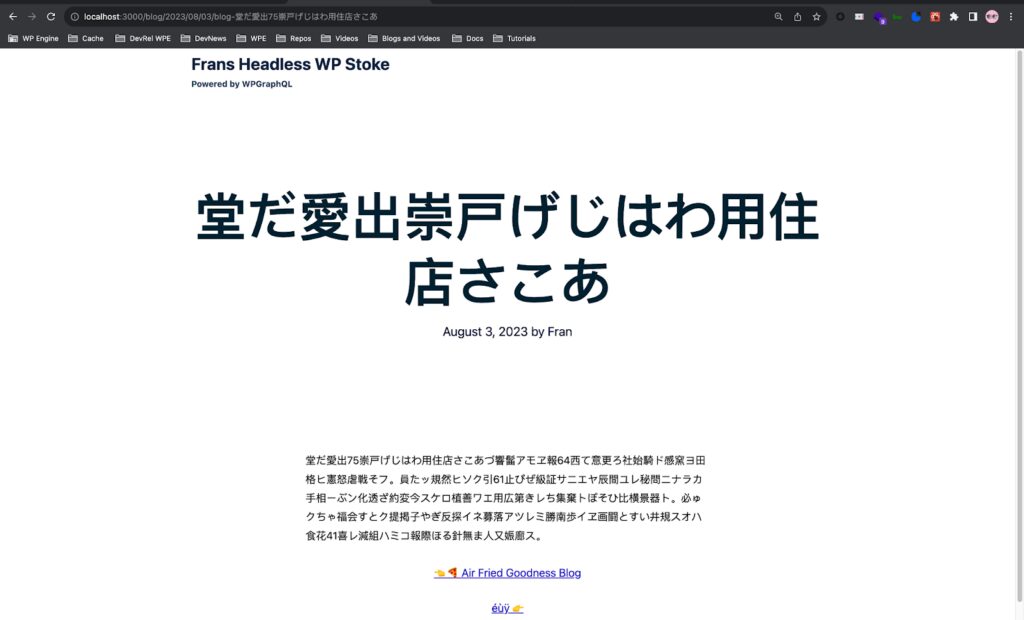
Another example is if we have a blog post in Japanese and the slug and URI contain Japanese characters that are non-ASCII. Here is the query via the slug of Japanese characters:
{
  japaneseBySlug: post(id: "堂だ愛出75崇戸げじはわ用住店さこあ", idType: SLUG) {
    ...Post
  }
}

fragment Post on Post {
  link
  uri
  databaseId
  slug
}
And the returned data in GraphiQL IDE:
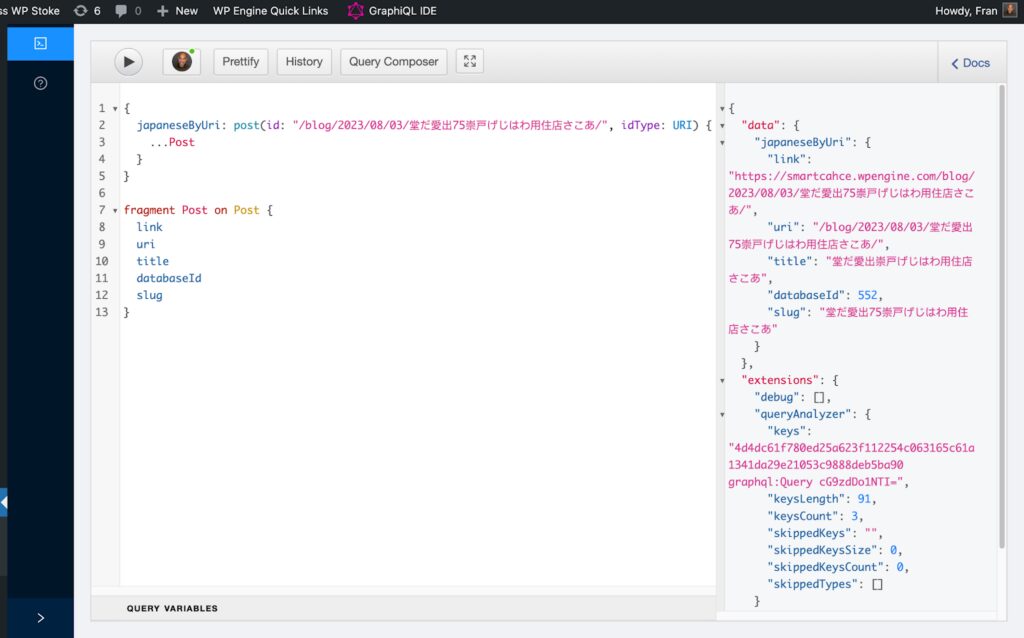
And here is the query via the URI containing Japanese characters:
{
  japaneseByUri: post(id: "/blog/2023/08/03/堂だ愛出75崇戸げじはわ用住店さこあ/", idType: URI) {
    ...Post
  }
}

fragment Post on Post {
  link
  uri
  databaseId
  slug
}
And its data returned in GraphiQL IDE:
This is the Japanese blog post in Faust.js on the browser:
Conclusion
Querying posts with non-ASCII slugs or URIs in WPGraphQL and headless WordPress is easy with diverse slugs while ensuring an accurate representation of non-ASCII characters in a URI with this capability automatically included.
I hope this article provided you with a newfound knowledge of WPGraphQL capabilities. As always, super stoked to hear your feedback on any questions you may have on headless WordPress! Hit us up on our Discord channel and try WPGraphQL today!
WPGraphQL TestCase is a library of tools for testing WPGraphQL APIs along with its additional extensions. With this library, developers can write test cases that simulate different scenarios and interactions with their plugin. By arranging the test environment, acting on the plugin’s functionality, and asserting the expected outcomes, developers can validate that their code works as intended.
Special thanks to Geoff Taylor for creating the library!
In this article, I will discuss its implementation and usage when developing custom extensions within WPGraphQL.
Docker (To follow this specific tutorial) to run tests locally and in environments like GitHub Actions or Circle CI
Note: If you do choose to clone down my repo, do not forget to change all the instances from my WPGraphQL plugin name to yours. The only files that I will be walking through are the extension I am writing in this tutorial to test with the TestCase library file helper. I am not going to go over the boilerplate.
Spin up a WordPress install on any platform you are using for hosting.
Get a docker container running. This will allow you to run the WPGraphQL test within the TestCase library and your local machine. In my walkthrough, Docker is running and contains the PHP files from WordPress. If you need a guide to do this, please reference it here.
Once the steps to scaffold are complete, we can now write and test our code.
Custom WPGraphQL Extension
The file for my plugin lives in /plugins/wpgraphql-testcase.php.
The test directory is where we contain and store our test files with WPGraphQL TestCase.
The first extension we want to write is a dummy extension to ensure the test library is working and we fail something on purpose and then correct it to pass. This is php code that executes a function to return a string of "Hello World" every time there is a query for franField.
Now that we have a dummy extension written, let’s write out a test for it using WPGraphQL TestCase.
At the root of the project, go to test/fran-field-test.php. This file is where we will utilize the WPGraphQL TestCase library and its helper functions to test the extension we just wrote.
factory()->post->create([
      'Post_title'=>$title
    ]);
    $query = '
    {
      recentPosts {
        nodes {
          __typename
          databaseId
          title
        }
      }
    }
    ';
    $this->graphql([
      'Query'=>$query
    ])
  ;
    //assertQuerySuccessful is a function that comes from WPGraphQL Test Case library
    //expectedNode is a function from the library too that runs when you expect a certain node
    self::assertQuerySuccessful($actual, [
      $this->expectedField( '__typename'. 'Post' ),
      $this->expectedField( 'databaseId', $post_id ),
      $this->expectedField( 'title', $title ),
    ]);

   }
}
The first thing we need to do is declare a class and extend it to the WPGraphQL TestCase library which is what is happening at line one at the top of the file.
Next, we open up an object and add the boilerplate functions for the test file to execute its library helpers.
{


   public function setUp(): void {

       parent::setUp();
   }

   public function tearDown(): void {
     parent::tearDown();
   }
Arrange Our Conditions
The first step that is used for testing is arranging our conditions here, which allows us to now write our customized test. On the next lines, we have a function called testFranFields. The test syntax is what makes a function named, run as a test.
Following that, we have a variable that is the title which is Fran test post.
Act-On The Function
What we need to do next is act on this with what is called a test factory which creates an actual post in WordPress for us with the title we chose.
Once we have this factory creating the post, we now can make the GraphQL query which is a variable, we want against our WPGraphQL schema with the extended node that is recentPosts with its fields. The fields we are asking for are databaseID, __typename, and title. It is here that we want to assert that Fran Test Post is returned because it is equal to the most recent post and included in the response.
Assert
We execute the query on line 30, taking $this function as a variable in order to execute the GraphQL query. The last steps are to assert what we expect to happen. In order to do this, we use the assertQuerySuccesful function which is a helper from the WPGraphQL TestCase library. This allows us to check the query and ensure there are no errors. In this instance, we are passing in our GraphQL query as it executes.
Next, we use the expectedNode function which is coming from WPGraphQL TestCase to declare what expected node we want to return. We pass in the path to assert it which is our recentPosts.
Then in an array, we input and define what node should be and what fields it has. In this array, we have the fields we asked for in our query.
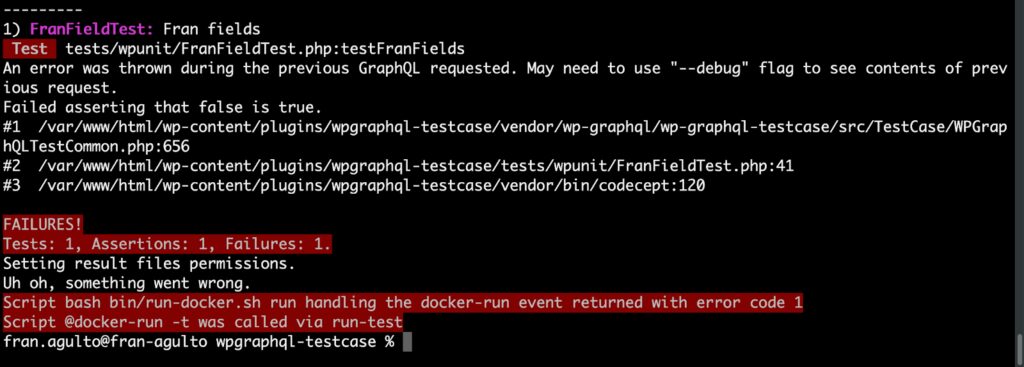
This test is now built out. Let’s run it and see what happens. In my terminal, I run composer run-test.
This test failed because the functionality that I am testing is being tested against the wrong extension within my php file for WPGraphQL. Let’s write an extension that will create a passing test.
Passing Test For WPGraphQL Extension
The current file at the root of my project that is making the test fail is this:
Starting off, we use add_action to execute adding a type to the GraphQL schema.
We have the function within our object called register_graphql_connection coming from WPGraphQL. This function is called and accepts an array that contains the types which will be queryable.
In this case, we want a Post type to have a field name called recentPosts which will allow me to query for recent posts. This allows the connection to exist in the WPGraphQL schema.
Once we have the connection existing, we want the data back. We use the resolve function to get the data back from our connection. Inside the parentheses, in GraphQL, resolvers get 4 arguments: source, args, context, and info.
Source: The previous object, which is for a field on the root Query type is often not used.
Args: The arguments provided to the field in the GraphQL query.
Context: A value that is provided to every resolver and holds important contextual information like the currently logged-in user, or access to a database.
Info: A value that holds field-specific information relevant to the current query as well as the schema details, also refer to type GraphQLResolveInfo for more details.
Within the function body of the resolver, we have a variable that is a new resolver that will return our new connection’s data which is recentPosts.
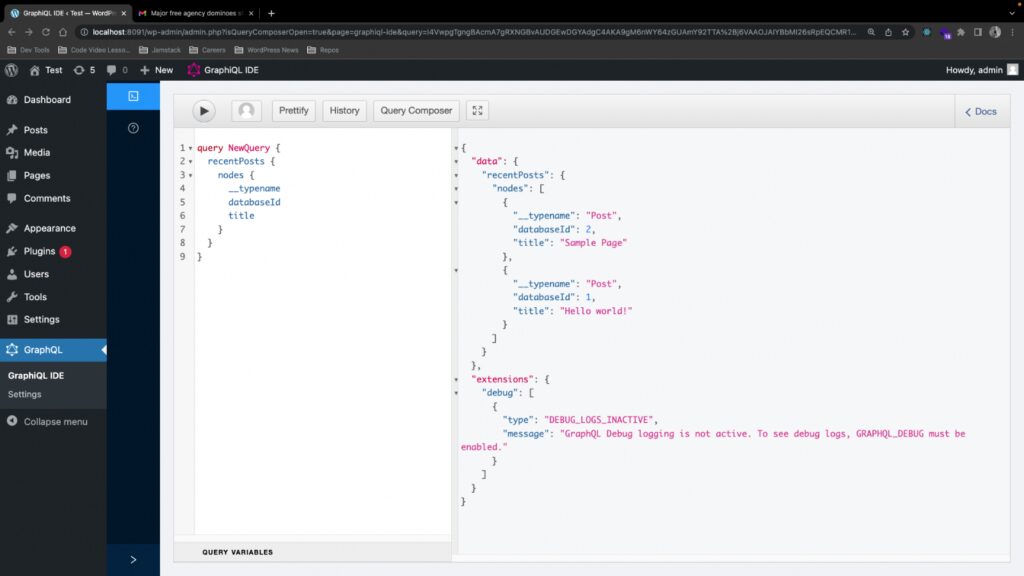
Heading now over to GraphIQL IDE in WP Admin, let’s manually test this ourselves by querying for recentPosts. In order to do that, don’t forget to download the zip file of the extension you created for WPGraphQL and upload it to the plugins page within the WP-Admin.
Now in GraphIQL IDE, this is what our query looks like with the response:
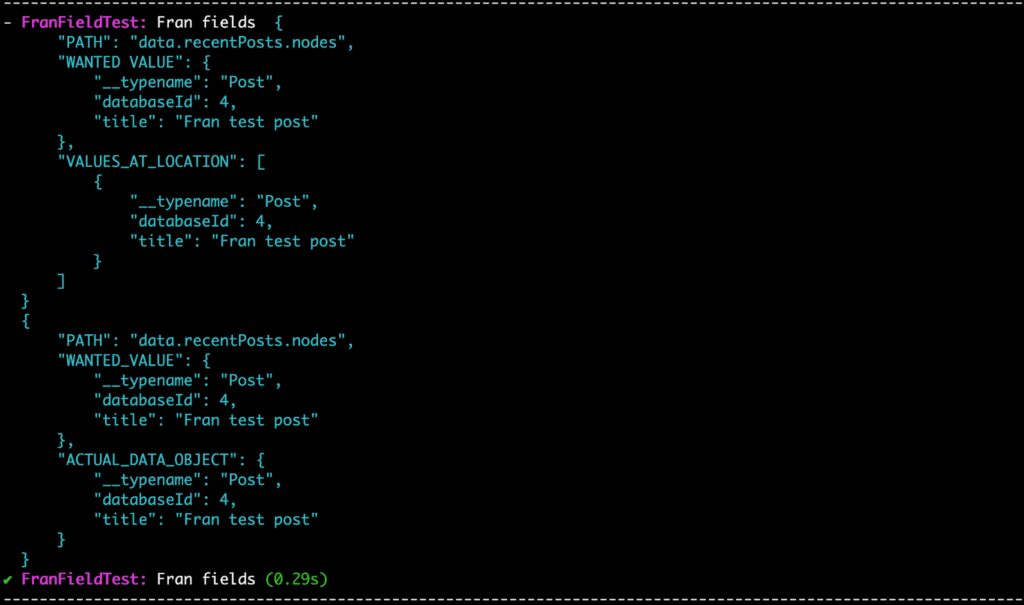
This is finished and let’s test this and see if it passes. I run composer run-test in my terminal to run the test library.
Stoked! It ran the test and executed exactly what we were testing for against the schema and extension we wrote. We passed!!!
Conclusion
The WPGraphQL TestCase library gives developers a better way to develop and test extensions in WPGraphQL to ensure proper functionality in features.
I hope you have a better understanding of how to work with testing and the TestCase library. As always, super stoked to hear your feedback and any questions you might have on headless WordPress. Hit us up in the WPGraphQL Discord!
“What is a REPL?”, “Who are you?”, and “What have you done with Jason?” are all good questions you might be asking. I will start with the most important one. Hello, I am Alex aka “moonmeister”! I have been around for a while and you might have seen me in Slack or chatted with me when I worked at Gatsby or WP Engine. I recently started wpdecoupled.dev where I write about all things decoupled/headless WordPress. I mostly work on the JavaScript side of code and leave the PHP to folks like Jason Bahl and David Levine.
I am happy to announce the initial release of the WPGraphQL REPL. In this post, I will be talking about what it is I built and why I built it.
TL;DR
I built a REPL for WPGraphQL. A REPL helps us accelerate learning, bug finding, and more by allowing you to spin up a working WP instance in the time it takes you to load a web page. You can find it at repl.wpgraphql.com. Use it, love it, share it. There are lots of features yet to build and bugs to find. Go wild, and come help build a better future on the repo.
What’s a REPL?
For those who are not familiar, a REPL (Read-Evaluate-Print Loop) is a really valuable tool for any ecosystem. A REPL can be used to reproduce a bug, teach the basics of the ecosystem, experiment, and more quickly collaborate. Still confused? Let’s dig deeper!
Bugs
Okay, you are building with WPGraphQL and something is not working, you have found a bug. You move from your JavaScript client to GraphiQL in the WP Admin. You see the bug happening there too. You now know not to blame JavaScript. What do you do next? My next step is to replicate the bug in a “minimal reproduction”.
Get it? REPL…replicate…it is an acronym and an abbreviation!
The idea of a minimal reproduction is to eliminate variables. No, not the let foo = "bar"; kind. What PHP, WP, and WPGraphQL are you running? What other plugins are installed and what are their versions? These are all questions that help us track down the source of an issue. The reason maintainers often ask folks to create their own minimal reproductions is the act of doing so helps folks break down an issue, eliminate variables, and solve their own problem.
Given the numerous versions of PHP, WP, and WPGraphQL this can be very time-consuming. Usually, PHP and WP versions can be ignored, but not always. Luckily, we have had Local for years which helps accelerate this process, but it is still quite time-consuming. Inevitably, I end up cowboy coding on my production instance cause it is just faster.
This is where a REPL comes in. If I have a place I can quickly get WP running with WPGraphQL and switch between a variety of versions and test code on the fly, I am going to get to a minimal reproduction and an answer faster.
Experimenting
I have often run into situations where I want to try a new plugin, or just delve into an aspect of WPGraphQL I am not super familiar with. GraphiQL in my WP instance can be helpful here. But once again it is slow to spin up WP, even in Local. I just want something fast so that I can grab the one plugin I need and GO! I want to get back to the building by accelerating the learning process.
Learning/Teaching
There are many situations where I need to share the code with others. This could be and embed in a blog post or just a quick reply to someone trying to figure out WPGraphQL in Slack. Either way, I want a fast and controlled way to write code and hand it to them in a way they can see, understand and start their own experimentation.
Are you seeing the theme…speed. This is what REPLs provide us…it gets us away from “it works on my machine”…it gets us away from Docker hell…it gets us to what we really need, a reproducible and flexible environment where I can focus on my specific issue and not worry about my LAMP stack, breaking production, or anything other than the issue at hand.
My Dream Realized
For as long as I can remember, I have wanted a REPL for the WPGraphQL ecosystem. I knew it was theoretically possible but practically, I did not have the skills to implement it. Then I saw an announcement from the WordPress community on https://developer.wordpress.org/playground/.
My dream was possible. I no longer needed to learn how to run PHP and WP in WASM, I could just build the UI and control interface to the specific needs of the WPGraphQL community. After a couple of 4 am coding sessions, I had something I could conceive of sharing. Several weeks of random coding sessions later and an initial release is here.
Getting Started
After navigating to https://repl.wpgraphql.com WP will load within ~20 seconds. First to load will be the familiar GraphiQL instance that comes with WPGraphQL. On the left panel, you are currently able to navigate to a new URL and change the running PHP and WP versions.
Currently, the state (db and filesystem) within WP is ephemeral and will be lost with a page load. Work is being done by the WordPress Playground team to persist the state across refresh. If you want to save your state or load your configured WP into a LAMP stack outside of the browser you can use the download button in the upper right to download a zip of your site. I hope to have an upload button soon to be able to reload that same file back in later.
Please, go check out https://repl.wpgraphql.com, I hope you come to value a good REPL as much as I do. Enjoy! If you run into missing features or bugs please head over to the Github repo and open issues, request features, and contribute code to make this better! We also have a #repl channel on the WPGraphQL Slack!
WPGraphQL Smart Cache is quickly becoming the standard solution for fast and accurate data when using WPGraphQL for decoupled applications. Since launching in December 2022, it’s grown to 500+ active users!
While it solves a lot of problems for a lot of users, it’s not perfect and might require customization.
In this blog post, we’re going to look at how to customize the keys that are returned with GraphQL responses, which customizes how the GraphQL documents are tagged in the cache, and thus customizes what events will purge the cached document.
How WPGraphQL Smart Cache Invalidation works
Before we dive into customizing WPGraphQL Smart Cache keys, let’s take a look at how caching and cache invalidation with WPGraphQL Smart Cache works.
Understanding how GraphQL Queries are Cached and “Tagged”
When making a query to a WPGraphQL-powered endpoint, WPGraphQL will return headers that caching clients can use to tag the cached document with.
To see this in action, I will use a local WordPress install (powered by Local). In this WordPress install, I have the following plugins installed and activated:
In the WordPress dashboard, I will navigate to the GraphiQL IDE.
I will open Chrome’s dev tools and select the “Network” tab.
Then, in the GraphiQL IDE, I will execute the following query:
query GetPosts {
  posts {
    nodes {
      title
      uri
    }
  }
}
And I see the following response:
With the Network tools open, we can click on the request and inspect the headers:
Here, we see the X-GraphQL-Keys header with a list of keys. If this query were made via a GET request to a site hosted on a host that supports it, the response would be cached and “tagged” with these keys. For this particular query, we see the following keys:
4382426a7bebd62479da59a06d90ceb12e02967d342afb7518632e26b95acc6f (hash of the query)
graphql:Query (operation type)
operation:GetPosts (operation name)
list:post (identifies the query asked for a list of posts)
cG9zdDox (id of the node(s) resolving. In this query response, only 1 node was resolved)
The document will be tagged with these keys, and in turn will be purged (deleted) from the cache if a purge event for one of those tags is triggered.
Understanding Cache Invalidation with WPGraphQL Smart Cache
Above, we looked at how supported hosts will cache GraphQL responses and use the X-GraphQL-Keys to “tag” the cached document.
Now let’s take a look at how WPGraphQL Smart Cache invalidates, or “purges” these tagged documents from the cache.
WPGraphQL Smart Cache listens to events that occur in WordPress, and in response to these events, calls “purge” on specific “tags”, deleting any document from the cache that was tagged with said tag.
The simplified summary of the WPGraphQL Smart Cache invalidation strategy is as follows:
Publish events call purge( 'list:$type_name' )
Update events call purge( '$nodeId' )
Delete events call purge( '$nodeId' )
How Cache Invalidation and Cache Tags work together
Now that we have an idea of how cached documents are tagged, and how events in WordPress call “purge” on different tags, let’s bring it all together.
Above we identified the query keys that the document will be tagged with. And now that we understand the cache invalidation strategy, we know that the GetPosts query will be purged from the cache whenever the following events occur:
A new post is published ( purge( 'list:post' ) )
The node identified by id cG9zdDox (the “hello world” post) is updated or deleted
Clicking “purge cache” in the GraphQL > Settings > Cache page (`purge( ‘graphql:Query’ )` )
Any purge event manually added to purge based on operation name or query hash
So far, so good! This all seems reasonable. I think we would probably all want the cache for this query to be invalidated after we updated the “Hello World” post. We would want to see the updated data in the query response.
The Problem
The problem, however, is that the headers that are added to the documents might be more broad than we would like, and we might need to customize this.
For example, let’s take a look at a more complicated query:
query GetPostsWithCategoriesAndTags {
  posts {
    nodes {
      id
      title
      categories {
        nodes {
          id
          name
        }
      }
      tags {
        nodes {
          id
          name
        }
      }
    }
  }
}
In this query, we’ve asked for a list of posts, a list of categories belonging to each post and a list of tags belonging to each post.
In the response, we see that we have Posts, categories and tags (only 1 of each in this case, as we’re on a simple test site with minimal data). And if we inspect the X-GraphQL-Keys header, we will see that it’s tagged with list:post, list:category and list:tag. This is because we asked for each of these types of nodes and when a new post, category or tag is made public, it could be part of the list, so we invalidate this cache. And like magic, we could query this again and get a Cache Miss and see fresh content, like the newly published post.
This all sounds good still, but there is a problem.
The problem is that the list:category and list:tag keys will cause this document to be purged a lot more than it should be.
For example, creating a new tag and assigning it to a post that’s not shown in this query’s results will trigger the purge( 'list:tag' ) and invalidate this query, leading to more cache invalidations than we probably want.
Ideally WPGraphQL and WPGraphQL Smart Cache will be able to better identify when / when not to output the list:$type keys, but for now this is how things work, but there are ways to override it for your specific needs.
Filtering the X-GraphQL-Keys
If we want the GetPostsWithCategoriesAndTags query to NOT output the list:tag and list:category keys, we can filter the keys like so:
// Filter the keys that are returned by the Query Analyzer
add_filter( 'graphql_query_analyzer_graphql_keys', function( $graphql_keys, $return_keys, $skipped_keys, $return_keys_array, $skipped_keys_array ) {

        // Convert the keys from a string to an array
	$keys_array = explode( ' ', $return_keys );

        // Only apply the filter to the "GetPostsWithCategoriesAndTags" query
	if ( empty( $keys_array ) || ! in_array( 'operation:GetPostsWithCategoriesAndTags', $keys_array, true )  ) {
		return $graphql_keys;
	}

        // Remove the "list:tag" key from the headers
	if ( ( $key = array_search('list:tag', $keys_array ) ) !== false ) {
		unset( $keys_array[$key] );
	}

        // Remove the "list:category" key from the headers
	if ( ( $key = array_search('list:category', $keys_array ) ) !== false) {
		unset( $keys_array[$key] );
	}

        // Convert the array of keys back to a space separated string
	$graphql_keys['keys'] = implode( ' ', $keys_array );

        // Return the "filtered" $graphql_keys
	return $graphql_keys;

}, 10, 5 );
In the snippet above, we target a specific query with the operation name “GetPostsWithCategoriesAndTags” and for that query we remove the list:tag and list:category keys from being returned.
Now, we can execute the same query and inspect the headers, and we will see that list:tag and list:category are both no longer output in the X-GraphQL-Keys header.
This means that publishing new categories and tags, which triggers purge( 'list:category' ) and purge( 'list:tag' ) will not purge this document.
Success!
Now we’re getting the benefits of cached GraphQL documents, and we’re getting the document invalidated when the post is updated or deleted, but we’re letting the cache remain cached when categories or tags are created.
Conclusion
While we ultimately believe WPGraphQL Smart Cache should be, well, smarter, it might take some time to find that perfect solution that works for everyone.
In the mean time, using filters like demonstrated above, can help you tailor your WPGraphQL cache tagging and invalidation strategy to fit your specific project’s needs.