In part one of this series, we built a headless Gravity Forms integration with Nuxt/Vue by querying form fields via GraphQL interfaces and mapping each static type to its own Vue component—consolidating shared inputs into reusable InputField, DropdownField, and ChoiceListField components. While that approach gives you fine‑grained control and clear component boundaries, it also means maintaining a growing switch statement (and import list) whenever you add or customize a field type.
In this second part article, we’ll streamline our setup by leveraging the inputType property that WPGraphQL for Gravity Forms exposes on every field. Instead of manually importing and mapping each component, we’ll implement a single resolveFieldComponent(field) helper that dynamically loads the right Vue component.
This makes our form renderer more flexible, reduces boilerplate, and automatically adapts to new or custom Gravity Forms fields as they’re added.
In your components/form-fields directory, you can safely delete EmailField.vue. In the original article, we already consolidated TextField.vue, and WebsiteField.vue.
Now, we’ll add the email field to InputField.vue to handle all three field types (text, email, and website). Here’s the full code for InputField.vue that you can drop straight into your project:
I am not going to go over the entire code. Here are the bullet points on why this works:
Single responsibility: One component now handles text, email, and website inputs.
Dynamic <input> types: The computedInputType maps your GraphQL inputType (or fallback type) to email, url, or text.
Two‑way binding: Using v-model on a local internalValue ensures that parent components stay in sync without extra boilerplate.
Conditional label & required indicator: The <label> only renders if field.label is present, and the red asterisk appears when field.isRequired is true.
By consolidating these three nearly identical components into InputField.vue, you keep your code DRY (Don’t Repeat Yourself) and maintainable—any future tweaks to generic inputs (styling, validation attributes, accessibility features) happen in one place.
Why Some Fields Retain Custom Components
Even with our dynamic mapping in place, you will notice a handful of Gravity Forms fields that still warrant their own dedicated Vue components. These “composite” fields each have unique markup or behavior that goes beyond a simple single‑element input.
By keeping these specialized components, we preserve clarity and maintainability—each one encapsulates its own layout, validation rules, and third‑party widget integrations. All the other “simple” fields (text, email, URL, select, checkbox, radio, etc.) are routed through our generic InputField, DropdownField, or ChoiceListField.
The useFormFields.js File
Next, let’s look at how we dynamically map each Gravity Forms field to its Vue component using a single composable. Update your composables/useFormFields.js with the following:
import { defineAsyncComponent } from "vue";

// Cache to store component references keyed by field type.
const componentCache = {};

// Mapping from field type to component filename.
const typeToComponent = {
  ADDRESS: "AddressField",
  TEXT: "InputField",
  TEXTAREA: "InputField",
  EMAIL: "InputField",
  NAME: "NameField",
  PHONE: "PhoneField",
  SELECT: "DropdownField",
  MULTISELECT: "DropdownField",
  CHECKBOX: "ChoiceListField",
  RADIO: "ChoiceListField",
  DATE: "DateField",
  TIME: "TimeField",
  WEBSITE: "InputField",
};

export const useFormFields = () => {
  // For debugging purposes, you can track which types are processed.
  const loggedTypes = new Set();

  /**
   * Resolves the Vue component for a given field based on its inputType.
   * Uses a cache so that the same component reference is returned for a given type.
   * @param {Object} field - The Gravity Form field object.
   * @returns {Component|null} The async Vue component for this field.
   */
  const resolveFieldComponent = (field) => {
    const fieldType = field.inputType
      ? field.inputType.toUpperCase()
      : field.type.toUpperCase();

    // Add each field type once
    if (!loggedTypes.has(fieldType)) {
      console.log("Mapping field type:", fieldType);
      loggedTypes.add(fieldType);
    }

    // Return from cache if we’ve already loaded this component
    if (componentCache[fieldType]) {
      return componentCache[fieldType];
    }

    // Dynamically import the matching component
    const componentName = typeToComponent[fieldType];
    if (componentName) {
      const asyncComponent = defineAsyncComponent(() =>
        import(`~/components/form-fields/${componentName}.vue`)
      );
      componentCache[fieldType] = asyncComponent;
      return asyncComponent;
    }

    // Fallback if no mapping exists
    return null;
  };

  return {
    resolveFieldComponent,
  };
};
What is happening in this code block:
Dynamic Resolution
Instead of hard‑coding imports for every field type, we use the field’s inputType (or fallback to type) to look up the correct component in a simple map.
Lazy Loading
We wrap each import in defineAsyncComponent, so components are only fetched when they’re actually rendered—improving initial load times.
Component Caching
Once a component is resolved, we store the reference in componentCache. This ensures we don’t re‑import the same file multiple times, keeping render performance snappy.
DRY and Scalable
As new field types are added in Gravity Forms (or you build custom ones), you simply extend the typeToComponent map. No more boilerplate imports or switch statements cluttering your page component.
Debugging Insight
The loggedTypes set and console messages help you verify which field types are encountered at render time, making it easier to spot missing mappings.
By centralizing all your field‑component logic in useFormFields.js, you maintain a clean separation of concerns. Your page doesn’t need to know about every single component, and your mapping stays in one easy‑to‑update place.
The pages/questionnaire/index.vue File
Finally, let’s update our page component to use resolveFieldComponent instead of a static map. In pages/questionnaire/index.vue, replace all manual imports and the fieldComponents object with a single import of your composable:
Error: {{ error }}
Loading form…
In the part of the file we refactored, we now have a single source of truth. Instead of importing each individual field component and maintaining a fieldComponents object, we now call resolveFieldComponent(field) directly in a template.
Let’s go over the rest of the code block:
Cleaner Imports
We only import useFormFields (for dynamic mapping) and useGravityForm (for data). There are no longer dozens of component imports at the top.
Reactive Rendering
The <component :is="…"> syntax picks the right component at render time, based solely on each field’s inputType or type.
Simplified Maintenance
Adding support for new field types now only requires updating the typeToComponent map in useFormFields.js, not touching this page at all.
Consistent v-model
Leveraging v-model with each dynamically resolved component ensures two‑way binding of all field values without extra boilerplate.
By swapping out static maps for resolveFieldComponentyour index.vue becomes significantly more concise, and all field‑to‑component logic lives in one easy‑to‑update composable.
Conclusion
We hope this article helped you understand how to render dynamic fields in WPGraphQL for Gravity Forms in Nuxt.js!
As always, we’re super stoked to hear your feedback and learn about the headless projects you’re working on, so hit us up in the WPGraphQL Discord!
Gravity Forms is a WordPress plugin that allows you to create a variety of forms on your WordPress site. Its large selection of add-ons lets you send collected form data to various CRMs, process data, and more!
In this article, you’ll learn how you can query for Gravity Form data, render the form in a Nuxt.js app, perform field validation, and submit the form entries to your headless WordPress backend.
I’ll provide a Nuxt.js app repo that contains Vue components, Vue composables, and helper functions that you can use for your own projects and experiment with. Let’s dive in!
Import the questionnaire form. From the WordPress admin sidebar, go to Forms > Import/Export > Import Forms. Select the gravityforms-questionnaire-form.json inside the root of the Nuxt project folder and click the button to import it.
Create a .env.local file inside of the root of the Nuxt project. Open that file in a text editor and paste in: NUXT_PUBLIC_WORDPRESS_API_URL=http://wpgraphqlgravtyforms.local/graphql,replacing wpgraphqlgravtyforms.local with the domain for your WordPress site. This is the endpoint that Nuxt will use when it sends requests to your WordPress backend.
Run npm install to install the dependencies.
Run npm run dev to get the server running locally.
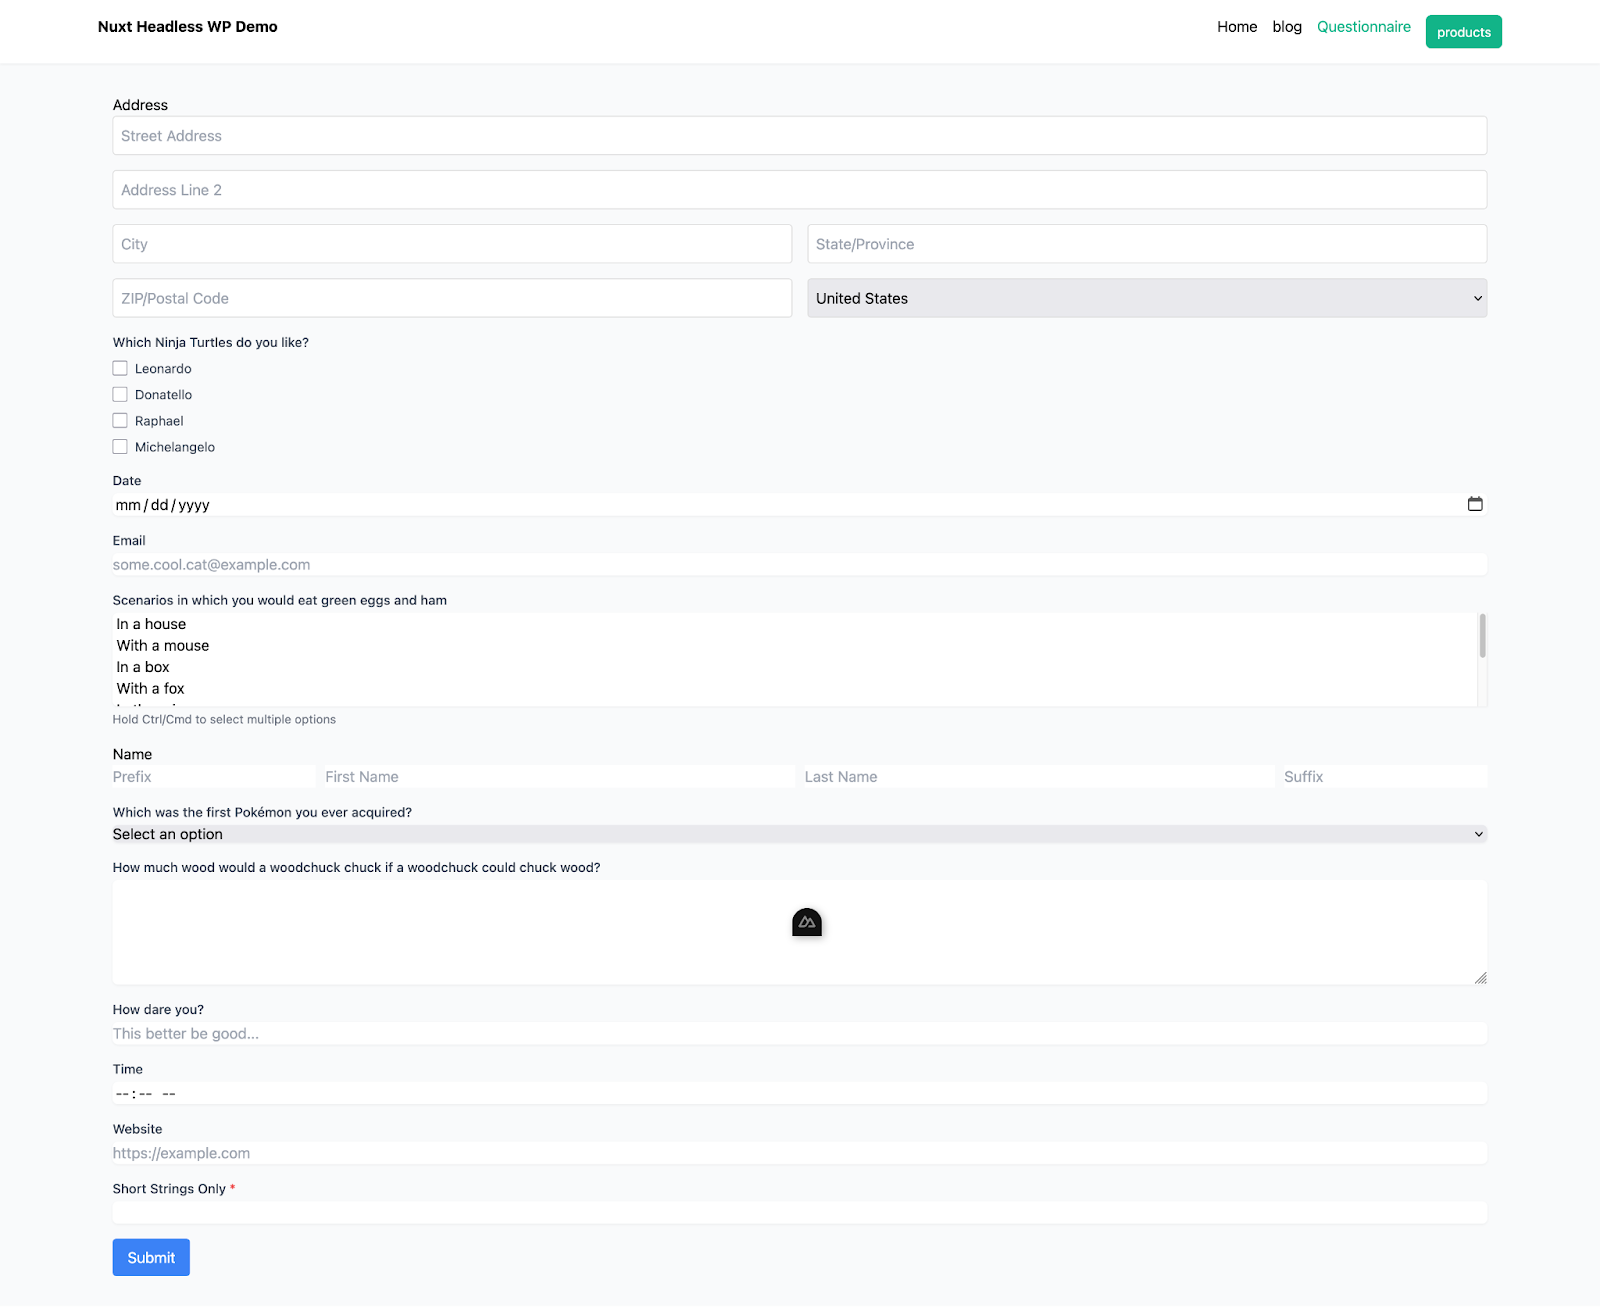
You should now be able to click the “Questionnaire” link in the header to go to the form at http://localhost:3000/questionnaire in a web browser and see it in all its glory:
WPGraphQL for Gravity Forms
The WPGraphQL for Gravity Forms plugin is a powerful extension for WPGraphQL that provides a comprehensive suite of features that allows developers to interact with Gravity Forms via GraphQL. Let’s start by querying for a form.
Querying for a Form
To query for a form, we have the `gfForm` query that we can use to query for data about our Gravity Forms. Here’s a simple example if you want to replace the existing query in the project, open up `composables/useGravityForm.js` and paste this query in replacement of the one currently there:
query getForm {
  gfForm(id: 1, idType: DATABASE_ID) {
    databaseId
    title
    description
    formFields(first: 500) {
      nodes {
        ... on TextField {
          id
          type
          label
        }
        ... on SelectField {
          id
          type
          label
          choices {
            text
            value
          }
        }
      }
    }
  }
}
In this query, we are asking for form data. The `gfForm` query retrieves a specific form by its database ID (id: 1).
For that form, the query fetches basic information like its title and description.
The query also fetches the formFields (up to ), and for each field, it checks whether it’s a TextField or SelectField. Depending on the type, it will fetch the appropriate data such as id, type, label, and for SelectField, it will also retrieve the choices (with their text and value).
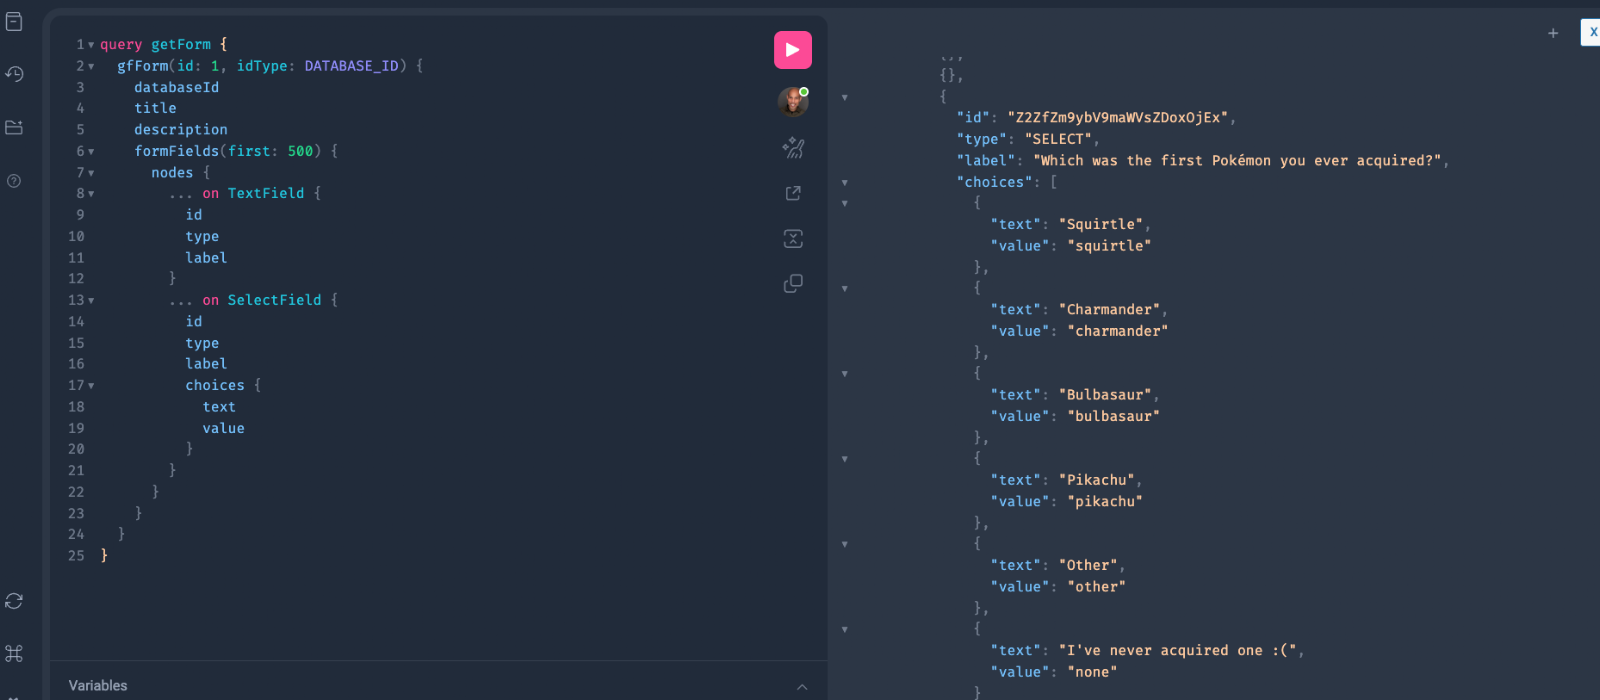
Go ahead and test out this query right from the WordPress admin by following these steps:
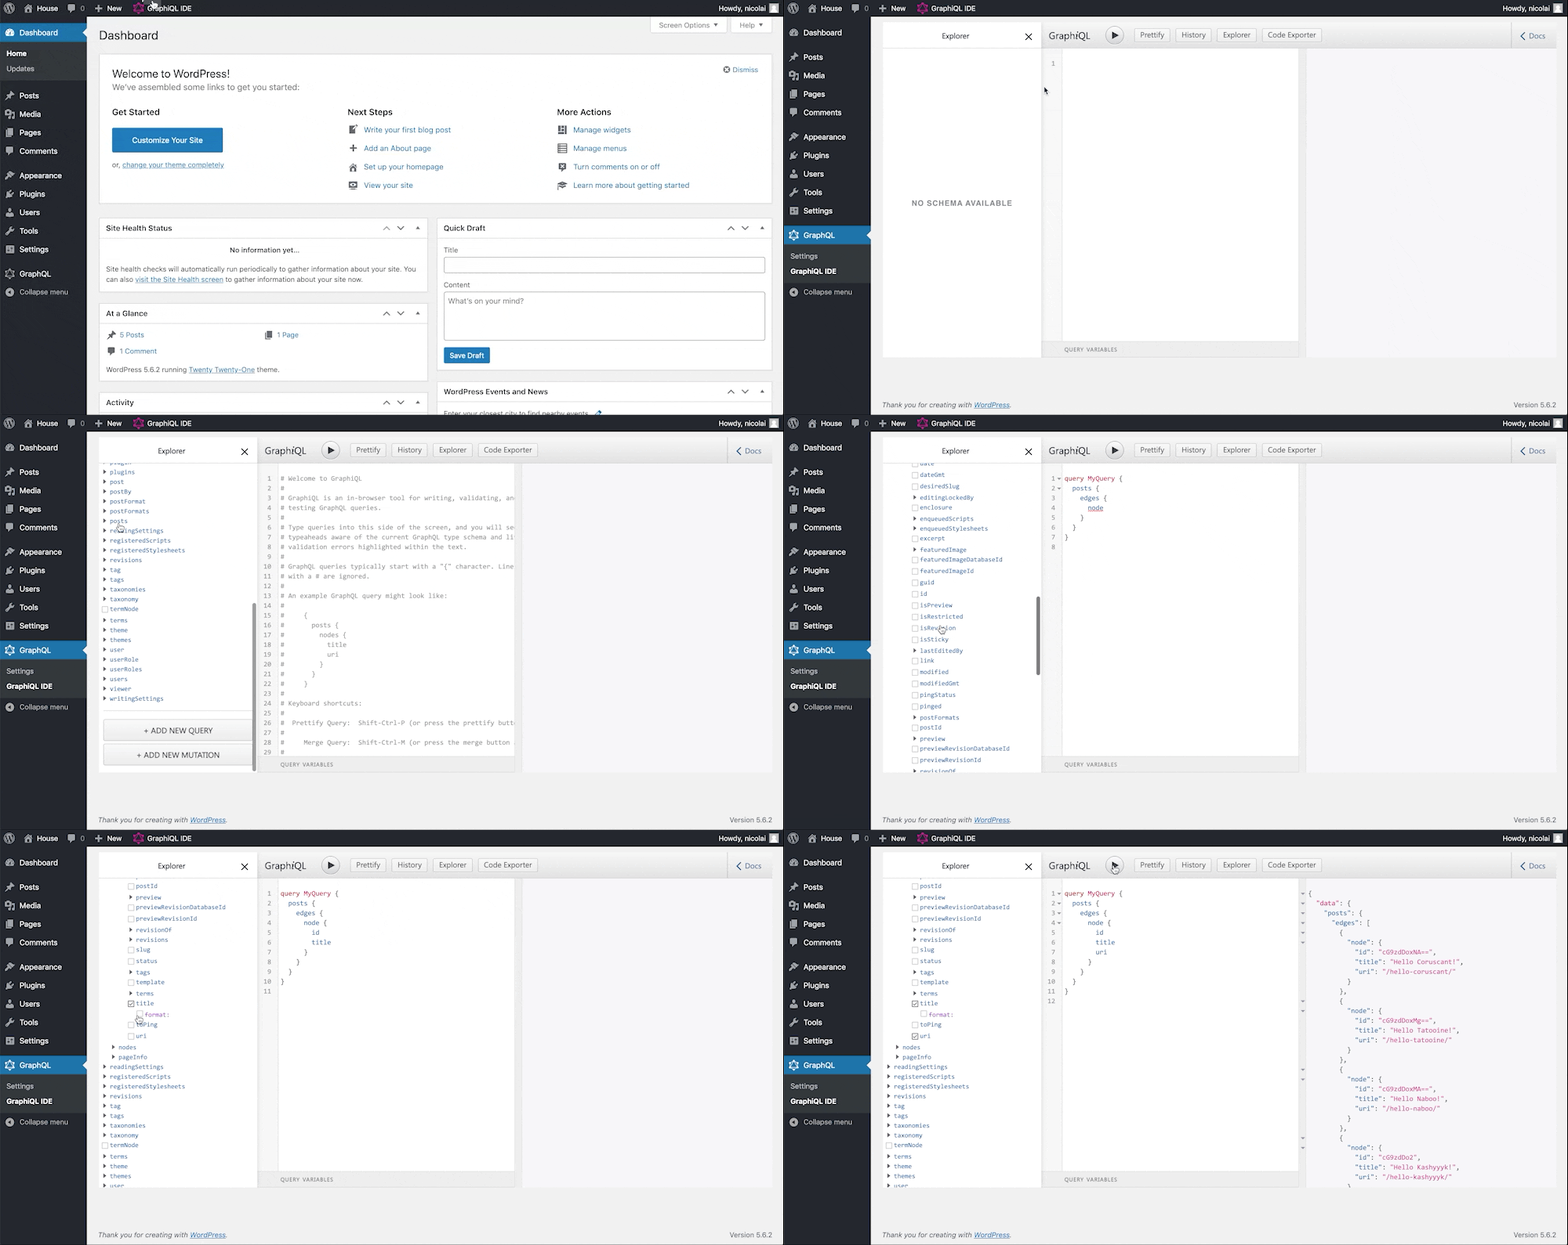
Go to GraphQL > GraphiQL IDE.
Paste the query above into the left column, replacing id: 1 with the ID of the imported form.
Click the ▶ button to execute the query.
See the results returned in the right column. You should see this:
Gravity Forms Field Support
Now, let’s highlight one of the latest features of WPGraphQL for Gravity Forms which we use in this project. This feature is Forms Field support with the FormField interface.
The interface approach leverages GraphQL interfaces to abstract shared properties among Gravity Forms fields, meaning you can query a common set of fields like “label” or “isRequired” across multiple field types.
This method allows you to write a more composable query that automatically includes any new field type that implements a given interface without needing to update your query.
In our project, we used inline fragments on interfaces such as GfFieldWithLabelSetting and GfFieldWithRulesSetting to fetch common properties like label and isRequired from each form field.
Our query retrieves both inputType and type values. The sample’s current component mapping relies on the static type property to determine which Vue component to render. For the scope of this article, the inputType is still included in the query output to point out the new support.
inputType Prop
For other use cases outside the scope of this article, you can leverage the inputType property instead of the static type to dynamically determine which component to render for each Gravity Forms field.
This dynamic approach allows a single form field to resolve into multiple input types—such as a Quiz Field that can be rendered as either a Checkbox or Radio Field—based on its configuration. Using the inputType allows your code to automatically map to the correct component, making it a bit more flexible and easier to maintain as new input variants are introduced. Stay tuned for a future article that focuses on this!
Check out the WPGraphQL for Gravity Forms readme for more documentation on gfForm , the FormField interface and other queries and mutations the plugin offers.
Querying for the form in Nuxt
Now that we know what a query for a form looks like and the FormField interface the types inherit let’s see how we can use it in our Nuxt app.
Open up the Nuxt app in your code editor and navigate to the composables/useGravityForm.js file.
This file is a Nuxt.js composable designed to interface with WPGraphQL for fetching Gravity Forms data. It imports the ref function from Vue and the runtime configuration using useRuntimeConfig from Nuxt’s #app alias. It defines a reactive variable called formFields that will hold the array of form field objects retrieved from the backend.
A multi-line GraphQL query named formQuery is declared to fetch a Gravity Form’s fields by its ID. The query leverages GraphQL interfaces to abstract common properties shared by multiple field types.
For more complex field configurations, inline fragments on GfFieldWithChoicesSetting fetch choices and input details, while GfFieldWithConditionalLogicSetting retrieves any conditional logic rules defined on the field:
const formQuery = `
  query GetGravityForm($formId: ID!) {
  gfForm(id: $formId, idType: DATABASE_ID) {
    formFields(first: 300) {
      nodes {
        id
        databaseId
        inputType
        type
        visibility
        ... on GfFieldWithLabelSetting {
          label
        }
        ... on GfFieldWithRulesSetting {
          isRequired
        }
        ... on GfFieldWithCssClassSetting {
          cssClass
        }
        ... on GfFieldWithDefaultValueSetting {
          defaultValue
        }
        ... on GfFieldWithSizeSetting {
          size
        }
        ... on GfFieldWithPlaceholderSetting {
          placeholder
        }
        ... on GfFieldWithMaxLengthSetting {
          maxLength
        }
        ... on GfFieldWithInputMaskSetting {
          inputMaskValue
        }
        ... on GfFieldWithChoicesSetting {
          choices {
            text
            value
          }
          inputs {
            id
            label
          }
        }
        ... on GfFieldWithConditionalLogicSetting {
          conditionalLogic {
            actionType
            logicType
            rules {
              fieldId
              operator
              value
            }
          }
        }
      }
    }
  }
}
The fetchForm function is defined to send a POST request to the WordPress GraphQL endpoint using Nuxt’s useFetchcomposable. It includes a request body that contains the query and variables, with a default formId of "1" to retrieve a specific form. In this line containing the body object, go ahead and replace the integer with your specific ID:
 body: JSON.stringify({
          query: formQuery,
          variables: { formId: "1" }, // Default formId (you can change this to what your id is)
        }),
The immediate flag shown below is set to false so that the fetch operation is not executed automatically, allowing for manual triggering via the execute function.
This is important because it provides better control over when data is fetched, optimizing performance and preventing unnecessary network requests. By waiting for a specific point in the component lifecycle—such as when a button is clicked or a user interacts with the page—we ensure that data is only fetched when needed. In this case, we trigger the fetch manually within the onMountedlifecycle hook, which ensures that the data is loaded once the Nuxt page component rendering the form is attached to the DOM:
immediate: false, // Prevent automatic execution
        transform: (res) => {
          if (res.errors) {
            console.error("GraphQL Errors:", res.errors);
            throw new Error(res.errors[0].message);
          }
          const fields = res.data?.gfForm?.formFields?.nodes;
          if (!Array.isArray(fields)) {
            console.error("Invalid fields data:", res.data);
            throw new Error("Invalid form fields data");
          }
          return fields;
        },
      }
    );

    // Return execute to manually trigger the fetch later
    return { data, status, fetchError, execute, refresh };
  };
Submitting the form in Nuxt
Staying in the useGravityForm.js file, we finish off the logic to allow the user to submit form data to our WordPress backend via Nuxt.
We do this with the submitForm function. This is an asynchronous function that accepts a form ID and field values, transforms these values using transformFieldValue, and then submits them via a GraphQL mutation.
This mutation sends the form ID and the transformed field values to the backend, which responds with either errors or confirmation details. Finally, the composable returns an object containing formFields, fetchForm, and submitForm so that other parts of the Nuxt application can fetch and submit Gravity Forms data:
Now that we know how the form data is being queried for and submitted, let’s check out where this logic is being used, how the state is being managed, and where the data is being rendered.
Navigate over to pages/headlesswp-gform/index.vue.
Take a look at the entire file in your code editor. Let’s break it down from top to bottom.
The script starts by importing Vue’s reactive functions (ref, reactive, onMounted, watch) and several form field components (e.g., InputField, EmailField –Don’t worry, we will discuss where these are coming from in the next section) to render the form.
It then imports the useGravityForm composable, which provides functions to fetch form metadata and submit form data from WPGraphQL:
import { ref, reactive, onMounted, watch } from "vue";

import {
  InputField,
  DropdownField,
  ChoiceListField,
  AddressField,
  DateField,
  TimeField,
  NameField,
  PhoneField,
} from "~/components/form-fields";

import EmailFieldComponent from "~/components/form-fields/EmailField.vue";

import useGravityForm from "~/composables/useGravityForm";
const { fetchForm, submitForm, formFields } = useGravityForm();
Following that, a reactive reference formValues is declared using ref({}) to store user input for each form field.
Then we establish a reactive error storage object for both address and email validations. It defines a validateAddress function that checks if each required component of an address is present and formatted correctly, updating error messages as needed.
Similarly, the validateEmail function uses a regular expression to confirm that the email address adheres to a valid format. If any validation fails, the corresponding error message is set and the function returns false. This client-side validation ensures that only complete and correctly formatted data is submitted, improving user experience and data integrity.
const formValues = ref({});
const error = ref(null);

const validationErrors = reactive({
  address: {
    street: null,
    city: null,
    state: null,
    zip: null,
    country: null,
  },
  email: null,
});

// Validate the entire address object and update errors per field.
const validateAddress = (address) => {
  let valid = true;
  if (!address.street) {
    validationErrors.address.street = "Street address is required.";
    valid = false;
  } else {
    validationErrors.address.street = null;
  }
  if (!address.city) {
    validationErrors.address.city = "City is required.";
    valid = false;
  } else {
    validationErrors.address.city = null;
  }
  if (!address.state) {
    validationErrors.address.state = "State is required.";
    valid = false;
  } else {
    validationErrors.address.state = null;
  }
  if (!address.zip || !/^\d{5}$/.test(address.zip)) {
    validationErrors.address.zip = "Please enter a valid 5-digit ZIP code.";
    valid = false;
  } else {
    validationErrors.address.zip = null;
  }
  if (!address.country) {
    validationErrors.address.country = "Country is required.";
    valid = false;
  } else {
    validationErrors.address.country = null;
  }
  return valid;
};

// Validate the email value and update the error.
const validateEmail = (email) => {
  const emailRegex = /^[a-zA-Z0-9._%+-]+@[a-zA-Z0-9.-]+\.[a-zA-Z]{2,}$/;
  if (!emailRegex.test(email)) {
    validationErrors.email = "Please enter a valid email address.";
    return false;
  }
  validationErrors.email = null;
  return true;
};
Next, The updateFieldValue function merges the current formValues with a new value for a given field ID, ensuring that changes to input fields update the reactive state.
Inside the onMounted lifecycle hook, the code calls fetchForm() to get the form metadata and immediately triggers the fetch using execute():
A watcher on the returned data initializes formFields and builds an initialValues object based on the field type, setting default values (e.g., an object for addresses, and an empty array for checkboxes).
For example, if a field is of type “ADDRESS,” the code sets its default value to an object with empty strings for street, lineTwo, city, state, zip, and a default country of “US.”
A separate watcher monitors fetchError and updates the local error reference with the error message if the fetch fails:
The handleSubmit function validates the email and address fields by checking their corresponding values in formValues and displays an alert if validation fails:
const handleSubmit = async () => {

  let isValid = true;

  // Validate email field before submission

  const emailField = formFields.value.find((field) => field.type === "EMAIL");

  if (emailField && formValues.value[emailField.databaseId]) {

    if (!validateEmail(formValues.value[emailField.databaseId])) {

      isValid = false;

    }

  }

  // Validate address field before submission

  const addressField = formFields.value.find(

    (field) => field.type === "ADDRESS"

  );

  if (addressField && formValues.value[addressField.databaseId]) {

    if (!validateAddress(formValues.value[addressField.databaseId])) {

      isValid = false;

    }

  }

  if (!isValid) {

    alert("Please fix the errors before submitting.");

    return;

  }
If validation passes, it calls submitForm with the current form values, transforming them as needed and handling the response for errors or confirmation.
On successful submission, the form is reset by building a new object (resetValues) with default values for each field, which is then assigned to formValues.value.
Finally, the template loops over formFields and dynamically renders the appropriate component for each field type (using the fieldComponentsmapping), binding each component’s value to formValues via v-model and providing a submit button to send the form data:
Now let’s discuss where those field component imports were coming from in the previous section. Navigate to components/field-forms. This folder contains all the component files for the fields.
In our project, we organized the form field components into groups based on shared behavior and UI patterns. We consolidated similar text-based inputs—like Text, Email, Website, and even Text Area—into a single InputField component.
For fields that use dropdowns, we combined Select and MultiSelect into a unified DropdownField component. For fields that involve multiple choice inputs, such as Checkbox and Radio fields, we created a consolidated ChoiceListField component.
Meanwhile, fields with unique layouts or behaviors (like AddressField, DateField, TimeField, and NameField) were kept as separate components.
To simplify importing these components into our main form, we created a barrel file (index.js) in the form-fields folder that re-exports all of them.
Since there are a few, let’s just break down the common patterns they follow:
Props Definition
All components define a consistent set of props:
field: An object containing field metadata (required)
Contains information like databaseId, label, isRequired, and field-specific properties
modelValue: The current value of the field
Type varies based on the field (string, array, object)
Includes appropriate default values
Event Handling
Each component emits events to update the parent component’s state:
All components use the update:modelValue or update:model-value event for two-way binding.
This follows Vue’s convention for custom v-model implementation
Field-Specific Validation
Many components include field-specific validation logic:
Simple fields may validate on input
Complex fields (like EmailField, AddressField) have dedicated validation functions
Error messages are stored in reactive variables and displayed in the template
Consistent Template Structure
All components follow a similar template structure:
A wrapper div with class field-wrapper
A label displaying the field name and required indicator if needed
Input element(s) with appropriate bindings:
:value bound to the model value
Event handlers to emit update events
Error message displayed when validation fails
Complex Field Handling
For complex fields (like Address, Name):
Data is structured as objects with multiple properties
Components use appropriate layout techniques (grid, flexbox) to organize multiple inputs
Updates maintain the overall object structure while changing specific properties
What’s the deal with Errors and Why do we handle them?
What is the deal, Jerry??? Well, the deal is that we handle two types of errors in this app. This would be a great question, the great comedian, Jerry Seinfeld could ask.
Request or Server Errors
These are errors that prevent the form entry from being saved. In our Nuxt implementation with Gravity Forms, we encounter several types of network-related errors:
Network connectivity issues when the user’s connection drops
WordPress backend errors (500 Internal Server Error)
Authentication or permission errors when submitting to protected forms
GraphQL syntax or schema errors
Our application handles these errors through the try/catch block in the form submission process. When using the submitForm function from our useGravityForm composable, we capture server errors and display them prominently to the user with an alert.
Inside the useGravityForm composable, we format GraphQL errors into a user-friendly message that tells the user that the submission failed on a popup in the browser.
You can test this error handling by disabling your network connection in DevTools and attempting to submit the form. The application will display an error message indicating the network failure.
Field Validation Errors
Our application implements a dual-layer validation approach:
Client-Side Validation: Implemented for specific field types to provide immediate feedback
Server-Side Validation: Handled by the WordPress Gravity Forms backend
When the server returns validation errors, they’re processed in the handleSubmit function of our index.vue component. The application checks response?.errors?.length to determine if validation errors exist and displays them accordingly.
For client-side validation, certain field types have built-in validation:
Email Field: Validates email format using a regex pattern
Address Field: Validates complete address information and proper postal code formats
Required Fields: All required fields are checked before submission
To test field validation, use the “Short Strings Only” field at the bottom of the form. This field is configured in the Gravity Forms admin to accept a maximum of 5 characters. If you enter more than 5 characters and submit the form, the server will reject the submission and return a validation error.
Unlike some fields that implement client-side validation (like email and address), this text field relies on server-side validation in Gravity Forms. The error message will display after the submission attempt, informing you about the 5-character limit constraint.
This demonstrates how our application strategically combines client-side validation for enhanced user experience with server-side validation for critical business rules and data integrity.
What is Not Included
You can drop these components, and composables and get up and running with Gravity Forms forms quickly in a Nuxt app, but there are features they don’t provide. Some examples:
Support for Gravity Forms’ Conditional Logic rules
Rendering an existing Gravity Forms entry and allowing the user to update its field values
Support for all field types
Conclusion
We hope this blog post helped you understand how to use forms in headless WordPress with Gravity Forms, WPGraphQL for Gravity Forms, and Nuxt!
As always, we’re super stoked to hear your feedback and learn about the headless projects you’re working on, so hit us up in the WPGraphQL Discord!
Special thanks to David Levine and Daniel Roe for helping me write this article and the code!
Gridsome is a Vue.js framework for building static generated sites/apps. It’s performant, powerful, yet simple and really faaaaast. Gridsome can pull in data from all sorts of data-sources like CMSs, APIs, Markdown etc. It has a lot of features. Go check ’em out.
Since GraphQL is so efficient and great to work with it makes sense to fetch our WordPress data in that manner. That’s obviously where WPGraphQL comes into the picture and I think it’s a match made in heaven. ????
If you’re up for it, below is a quick-start tutorial that will guide you through building your first WPGraphQL-Gridsome app.
I know I’m stoked about it!
What we will be building
We’ll go ahead and build a small personal site in Gridsome. Basically just a blog. The blog posts will be fetched from WordPress via WPGraphQL.
This project is very minimal, lightweight and this project alone might not blow your socks off, but it’s foundational and a great start to get into headless WordPress with Gridsome.
Setup a WordPress install
First off is to install WordPress.
I highly recommend Local for setting up WordPress locally. It handles everything from server setup and configuration to installing WordPress.
You can also use MAMP/WAMP/LAMP or however else you like to do it. It’s all good.
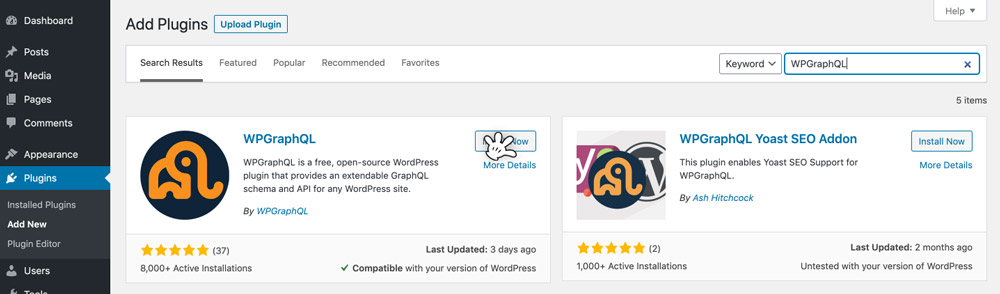
With WordPress spun up and ready to go, we want to install and activate our one and only plugin. WPGraphQL.
Now go to WPGraphQL > Settings and tick “Enable Public Introspection“.
That’s it. We are now cooking with GraphQL ????????????
Included with WPGraphQL is the IDE tool which is awesome for building/testing out queries directly in WordPress. It might be a good idea to play around in here for a few minutes before we move along.
Aaaaaaand we’re back. Last thing we need to do is just to add a new post. Add a title, add some content and press publish.
Now move into the project directory – then start the local develoment
cd my-personal-site
gridsome develop
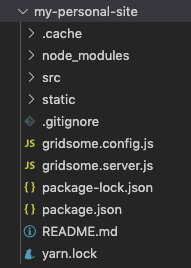
In our code editor we should have the following:
We’re now exactly where we want to be. From here we need to pull in WPGraphQL to Gridsome as our data-source. For that we’ll be using this gridsome source plugin. Go ahead and install it.
npm install gridsome-source-graphql
The source plugin needs to be configured. Open up gridsome.config.js and provide the following object for the plugins array.
Remember the options.url is the site url + graphql endpoint. (Can be found in WordPress under WPGraphQL > Settings > GraphQL endpoint)
For every change to gridsome.config.js or gridsome.server.js, we need to restart the app. You can type ctrl + c to exit the gridsome develop process and run gridsome develop again to restart.
Now you can test the new GraphQL data-source in Gridsome Playground/IDE – located at http://localhost:8080/___graphql Write out the following query and hit the execute button (▶︎):
query {
  posts {
    edges {
      node {
        id
        uri
      }
    }
  }
}
There you have it. On the right side you should see your posts data.
That data could prove to be mighty useful, huh?
We’ll start setting up a Gridsome template for our posts.
Within the “src” folder there’s a folder called “templates”.
A template is used to create a single page/route in a given collection (think posts). Go to/create a file within “templates” folder called Post.vue.
/src/templates/Post.vue
In order to query the data from the GraphQL data layer into our templates we can use the following blocks;
<page-query> for pages/templates, requires id. <static-query> for components.
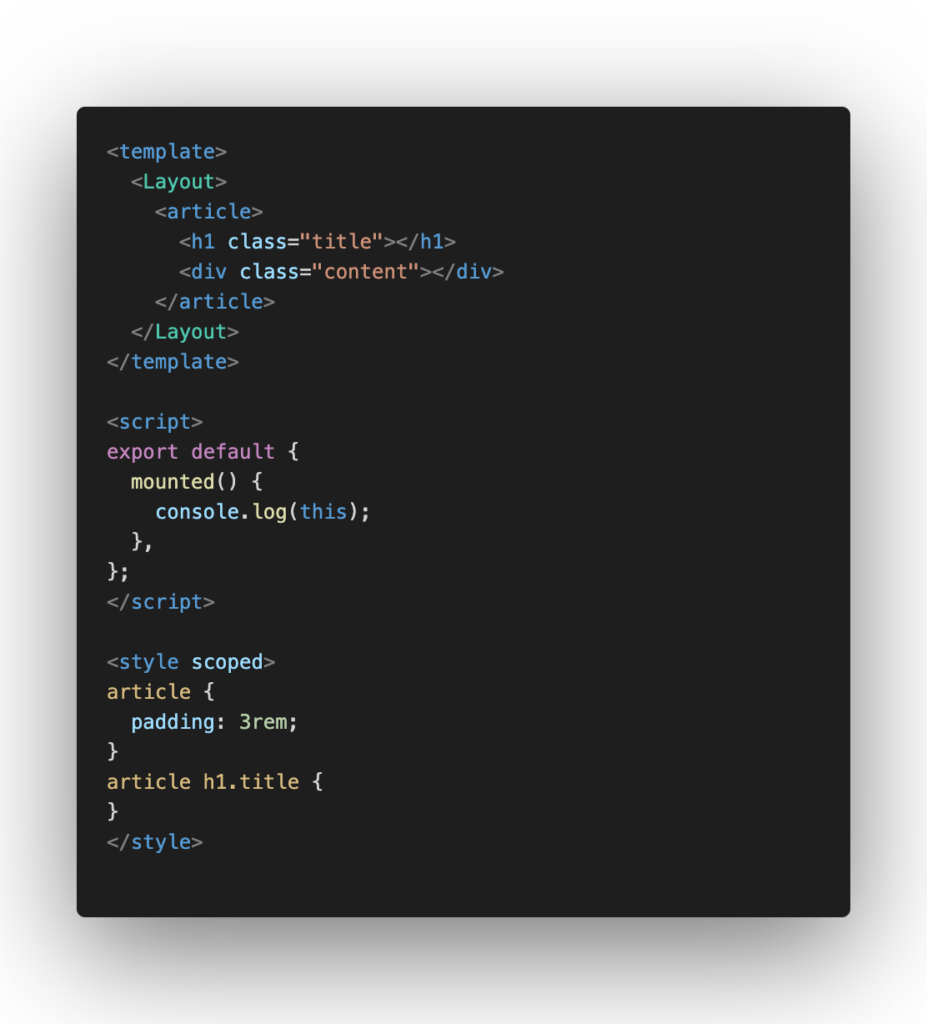
In the Post.vue template we are fetching a specific post (by id – more on that later), so we’ll write the following <page-query> in between the <template> and <script> blocks:
Also – change console.log(this) to console.log(this.$page).
Important – we’ve only laid the groundwork for our template. It won’t actually fetch the data yet, since the route/page and id (dynamically) haven’t been created. The step needed is the Pages API and that’s where we are heading right now.
Open up gridsome.server.js and provide the following. (Remember to restart afterwards)
// gridsome.server.js
module.exports = function(api) {
  api.loadSource(({ addCollection }) => {
    // Use the Data Store API here: https://gridsome.org/docs/data-store-api/
  });

  api.createPages(async ({ graphql, createPage }) => {
    const { data } = await graphql(`

        query {
          posts {
            edges {
              node {
                id
                uri
              }
            }
          }
        }

    `);

    data.posts.edges.forEach(({ node, id }) => {
      createPage({
        path: `${node.uri}`,
        component: "./src/templates/Post.vue",
        context: {
          id: node.id,
        },
      });
    });
  });
};
Remember the Gridsome Playground query?
Basically the api.createPages hook goes into the data layer fetched from WPGraphQL and queries the posts (the exact query we ran in Playground) and then loops through the collection to create single page/routes. We’ll provide a path/url for the route, a component which is the Post.vue template and lastly and context.id of the post/node id.
Magic happened when running “gridsome develop” and now we have routes (got routes?). These can be found in src/.temp/routes.js.
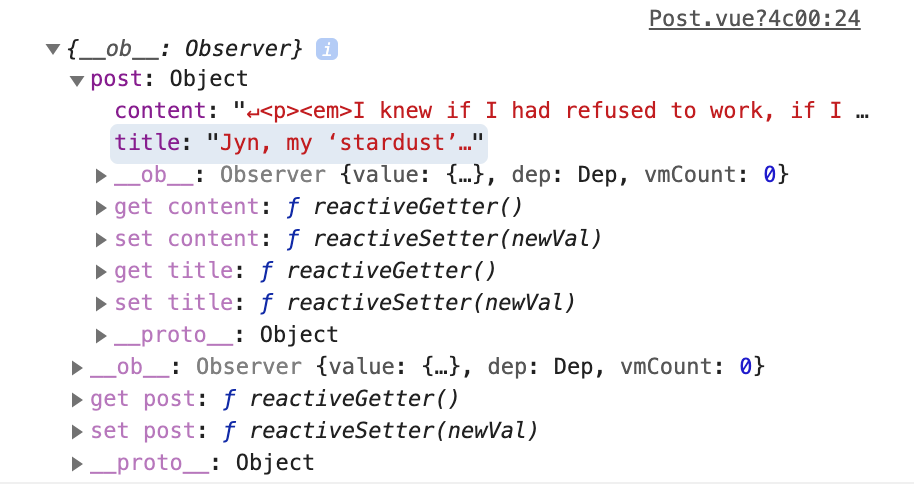
Try accessing the very first Post route in the browser – localhost:8080/{path} – and open up the inspection tool to get the console.
Because of the console.log(this.$page) in the mounted() hook of our Post.vue – the post data from WordPress is now being written out in the console.
With this specific data now being available we just need to bind it to the actual template, so we can finally get the HTML and post displayed. Replace the current <article> block with the following:
Refresh the page.
Well, ain’t that a sight for sore eyes. Our blog posts are finally up.
Even though we’re not quite done yet this is awesome. Good job!
Now. We have posts and that’s really great for a blog, but our visitors might need a way to navigate to these. Let’s set up a page called “blog” to list all of our blog posts.
There’s a folder with “src” called “pages” and this is a great way to setup single pages/routes non-programmatically. Basically we just put a file with the .vue extension in there and we now have a singe page for that particular route and only that route. Even if we did set up a Page.vue template within “templates”, the Blog.vue file in the “pages” folder would still supercede. Sweet!
But why would you do that? Well, simple and fast is not always a sin. We also really don’t need to maintain a page in WordPress that only list out blog posts and the content is not really changing. However, just know that we could create a Page.vue template if we choose to, and obviously it would include our blog page.
In our new Blog.vue file in “pages” folder insert this <static-query> in between the <template> and <script> blocks:
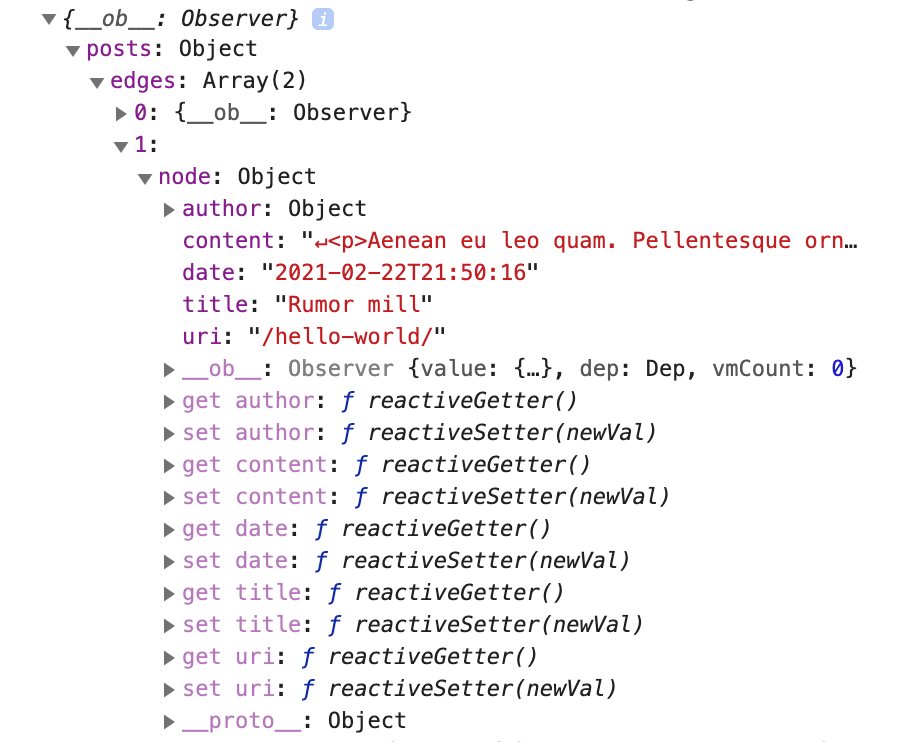
So we want to fetch all the posts to display on our blog page and that’s why we’re writing a static query. There’s no page template/Wordpress data for this page and so even if we wrote out a <page-query> (like in Post.vue) it would return null. nothing. nada. nichego. Change the console.log(this) to console.log(this.$static) and open up our blog page in the browser. Also open the inspection tool and look at the console.
Awesome. Our static-query ($static) has returned an object with an array of 2 posts. We now have the data, so let’s display it on the page.
Replace the <script> block with the following:
This adds a getDate function that we will be using in our Template.
Now, replace the <template> block with the following:
Voila! Go check out the page in the browser.
We are now displaying our posts or rather an excerpt of these with a button to take us to the actual post. That’s wild! Again, good job.
That pretty much concludes the tutorial. You’ve created a personal site with a blog in Gridsome using WordPress & WPGraphQL.
Build. Deployment. Live.
The last thing to this build is to actually use the command ‘build’.
Go to the terminal/console and execute:
gridsome build
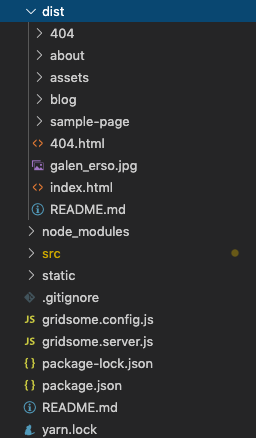
Gridsome is now generating static files and upon completion you’ll find the newly created “dist” folder and all of the files and assets.
That’s the site and all of the data from WordPress in a folder that you can actually just drop onto a FTP server and you have a live site.
However a more dynamic and modern way of doing static deployment is to use a static web host and build from a git repository.
There’s lots of hosts out there. I absolutely love and recommend Netlify, but others include Vercel, Amplify, Surge.sh.
The links above should take you to some guides of how exactly to deploy using their services.
It would also be pretty cool if we could trigger a build whenever a post is created/updated/deleted in WordPress. Otherwise we could have to manually build from time to time retrieve the latest data from WordPress. Luckily plugins like JAMstack Deployments help us in that regard. It takes in a build hook url from a static web host and hits that each time WordPress does its operations. I would suggest you to try it out.
I won’t go into deployment in further details, but just wanted to let you in on some of the options for deploying a static site. I’m quite sure can take it from here.
Where to go from here?
Obviously deployment – taking this site live should be one of the next steps, but we might also want to enhance the project. I’ve listed some possible improvements, which could also just serve as great practice ↓
Something entirely different that you feel like creating, e.g.
Other sites (Personal/Product/Corporate/Agency)
E-commerce
PWAs
* A word about extensions – WPGraphQL can be extended to integrate with other WordPress plugins. Advanced Custom Fields is a great plugin used by so many to enrich the content and structure of a WordPress site. There’s an WPGraphQL extension for it (and other great plugins too) and these are maintained by some awesome community contributors. Gridsome also has a badass community and a lot of plugins to get you started.
It’s almost too good to be true ????
Wrap it up already
So that’s basically it. Thanks for reading and coding along.
I definitely encourage you to go further read the documentation on both Gridsome and WPGraphQL. It’s very well written and has examples that will help you no matter what you might build.
Lastly, if you need to get in touch I’ll try to help you out the best I can. Very lastly, if this was of any use to you, or maybe you just hated it – go ahead and let me know.