In part one of this series, we built a headless Gravity Forms integration with Nuxt/Vue by querying form fields via GraphQL interfaces and mapping each static type to its own Vue component—consolidating shared inputs into reusable InputField, DropdownField, and ChoiceListField components. While that approach gives you fine‑grained control and clear component boundaries, it also means maintaining a growing switch statement (and import list) whenever you add or customize a field type.
In this second part article, we’ll streamline our setup by leveraging the inputType property that WPGraphQL for Gravity Forms exposes on every field. Instead of manually importing and mapping each component, we’ll implement a single resolveFieldComponent(field) helper that dynamically loads the right Vue component.
This makes our form renderer more flexible, reduces boilerplate, and automatically adapts to new or custom Gravity Forms fields as they’re added.
In your components/form-fields directory, you can safely delete EmailField.vue. In the original article, we already consolidated TextField.vue, and WebsiteField.vue.
Now, we’ll add the email field to InputField.vue to handle all three field types (text, email, and website). Here’s the full code for InputField.vue that you can drop straight into your project:
I am not going to go over the entire code. Here are the bullet points on why this works:
Single responsibility: One component now handles text, email, and website inputs.
Dynamic <input> types: The computedInputType maps your GraphQL inputType (or fallback type) to email, url, or text.
Two‑way binding: Using v-model on a local internalValue ensures that parent components stay in sync without extra boilerplate.
Conditional label & required indicator: The <label> only renders if field.label is present, and the red asterisk appears when field.isRequired is true.
By consolidating these three nearly identical components into InputField.vue, you keep your code DRY (Don’t Repeat Yourself) and maintainable—any future tweaks to generic inputs (styling, validation attributes, accessibility features) happen in one place.
Why Some Fields Retain Custom Components
Even with our dynamic mapping in place, you will notice a handful of Gravity Forms fields that still warrant their own dedicated Vue components. These “composite” fields each have unique markup or behavior that goes beyond a simple single‑element input.
By keeping these specialized components, we preserve clarity and maintainability—each one encapsulates its own layout, validation rules, and third‑party widget integrations. All the other “simple” fields (text, email, URL, select, checkbox, radio, etc.) are routed through our generic InputField, DropdownField, or ChoiceListField.
The useFormFields.js File
Next, let’s look at how we dynamically map each Gravity Forms field to its Vue component using a single composable. Update your composables/useFormFields.js with the following:
import { defineAsyncComponent } from "vue";

// Cache to store component references keyed by field type.
const componentCache = {};

// Mapping from field type to component filename.
const typeToComponent = {
  ADDRESS: "AddressField",
  TEXT: "InputField",
  TEXTAREA: "InputField",
  EMAIL: "InputField",
  NAME: "NameField",
  PHONE: "PhoneField",
  SELECT: "DropdownField",
  MULTISELECT: "DropdownField",
  CHECKBOX: "ChoiceListField",
  RADIO: "ChoiceListField",
  DATE: "DateField",
  TIME: "TimeField",
  WEBSITE: "InputField",
};

export const useFormFields = () => {
  // For debugging purposes, you can track which types are processed.
  const loggedTypes = new Set();

  /**
   * Resolves the Vue component for a given field based on its inputType.
   * Uses a cache so that the same component reference is returned for a given type.
   * @param {Object} field - The Gravity Form field object.
   * @returns {Component|null} The async Vue component for this field.
   */
  const resolveFieldComponent = (field) => {
    const fieldType = field.inputType
      ? field.inputType.toUpperCase()
      : field.type.toUpperCase();

    // Add each field type once
    if (!loggedTypes.has(fieldType)) {
      console.log("Mapping field type:", fieldType);
      loggedTypes.add(fieldType);
    }

    // Return from cache if we’ve already loaded this component
    if (componentCache[fieldType]) {
      return componentCache[fieldType];
    }

    // Dynamically import the matching component
    const componentName = typeToComponent[fieldType];
    if (componentName) {
      const asyncComponent = defineAsyncComponent(() =>
        import(`~/components/form-fields/${componentName}.vue`)
      );
      componentCache[fieldType] = asyncComponent;
      return asyncComponent;
    }

    // Fallback if no mapping exists
    return null;
  };

  return {
    resolveFieldComponent,
  };
};
What is happening in this code block:
Dynamic Resolution
Instead of hard‑coding imports for every field type, we use the field’s inputType (or fallback to type) to look up the correct component in a simple map.
Lazy Loading
We wrap each import in defineAsyncComponent, so components are only fetched when they’re actually rendered—improving initial load times.
Component Caching
Once a component is resolved, we store the reference in componentCache. This ensures we don’t re‑import the same file multiple times, keeping render performance snappy.
DRY and Scalable
As new field types are added in Gravity Forms (or you build custom ones), you simply extend the typeToComponent map. No more boilerplate imports or switch statements cluttering your page component.
Debugging Insight
The loggedTypes set and console messages help you verify which field types are encountered at render time, making it easier to spot missing mappings.
By centralizing all your field‑component logic in useFormFields.js, you maintain a clean separation of concerns. Your page doesn’t need to know about every single component, and your mapping stays in one easy‑to‑update place.
The pages/questionnaire/index.vue File
Finally, let’s update our page component to use resolveFieldComponent instead of a static map. In pages/questionnaire/index.vue, replace all manual imports and the fieldComponents object with a single import of your composable:
Error: {{ error }}
Loading form…
In the part of the file we refactored, we now have a single source of truth. Instead of importing each individual field component and maintaining a fieldComponents object, we now call resolveFieldComponent(field) directly in a template.
Let’s go over the rest of the code block:
Cleaner Imports
We only import useFormFields (for dynamic mapping) and useGravityForm (for data). There are no longer dozens of component imports at the top.
Reactive Rendering
The <component :is="…"> syntax picks the right component at render time, based solely on each field’s inputType or type.
Simplified Maintenance
Adding support for new field types now only requires updating the typeToComponent map in useFormFields.js, not touching this page at all.
Consistent v-model
Leveraging v-model with each dynamically resolved component ensures two‑way binding of all field values without extra boilerplate.
By swapping out static maps for resolveFieldComponentyour index.vue becomes significantly more concise, and all field‑to‑component logic lives in one easy‑to‑update composable.
Conclusion
We hope this article helped you understand how to render dynamic fields in WPGraphQL for Gravity Forms in Nuxt.js!
As always, we’re super stoked to hear your feedback and learn about the headless projects you’re working on, so hit us up in the WPGraphQL Discord!
Gravity Forms is a WordPress plugin that allows you to create a variety of forms on your WordPress site. Its large selection of add-ons lets you send collected form data to various CRMs, process data, and more!
In this article, you’ll learn how you can query for Gravity Form data, render the form in a Nuxt.js app, perform field validation, and submit the form entries to your headless WordPress backend.
I’ll provide a Nuxt.js app repo that contains Vue components, Vue composables, and helper functions that you can use for your own projects and experiment with. Let’s dive in!
Import the questionnaire form. From the WordPress admin sidebar, go to Forms > Import/Export > Import Forms. Select the gravityforms-questionnaire-form.json inside the root of the Nuxt project folder and click the button to import it.
Create a .env.local file inside of the root of the Nuxt project. Open that file in a text editor and paste in: NUXT_PUBLIC_WORDPRESS_API_URL=http://wpgraphqlgravtyforms.local/graphql,replacing wpgraphqlgravtyforms.local with the domain for your WordPress site. This is the endpoint that Nuxt will use when it sends requests to your WordPress backend.
Run npm install to install the dependencies.
Run npm run dev to get the server running locally.
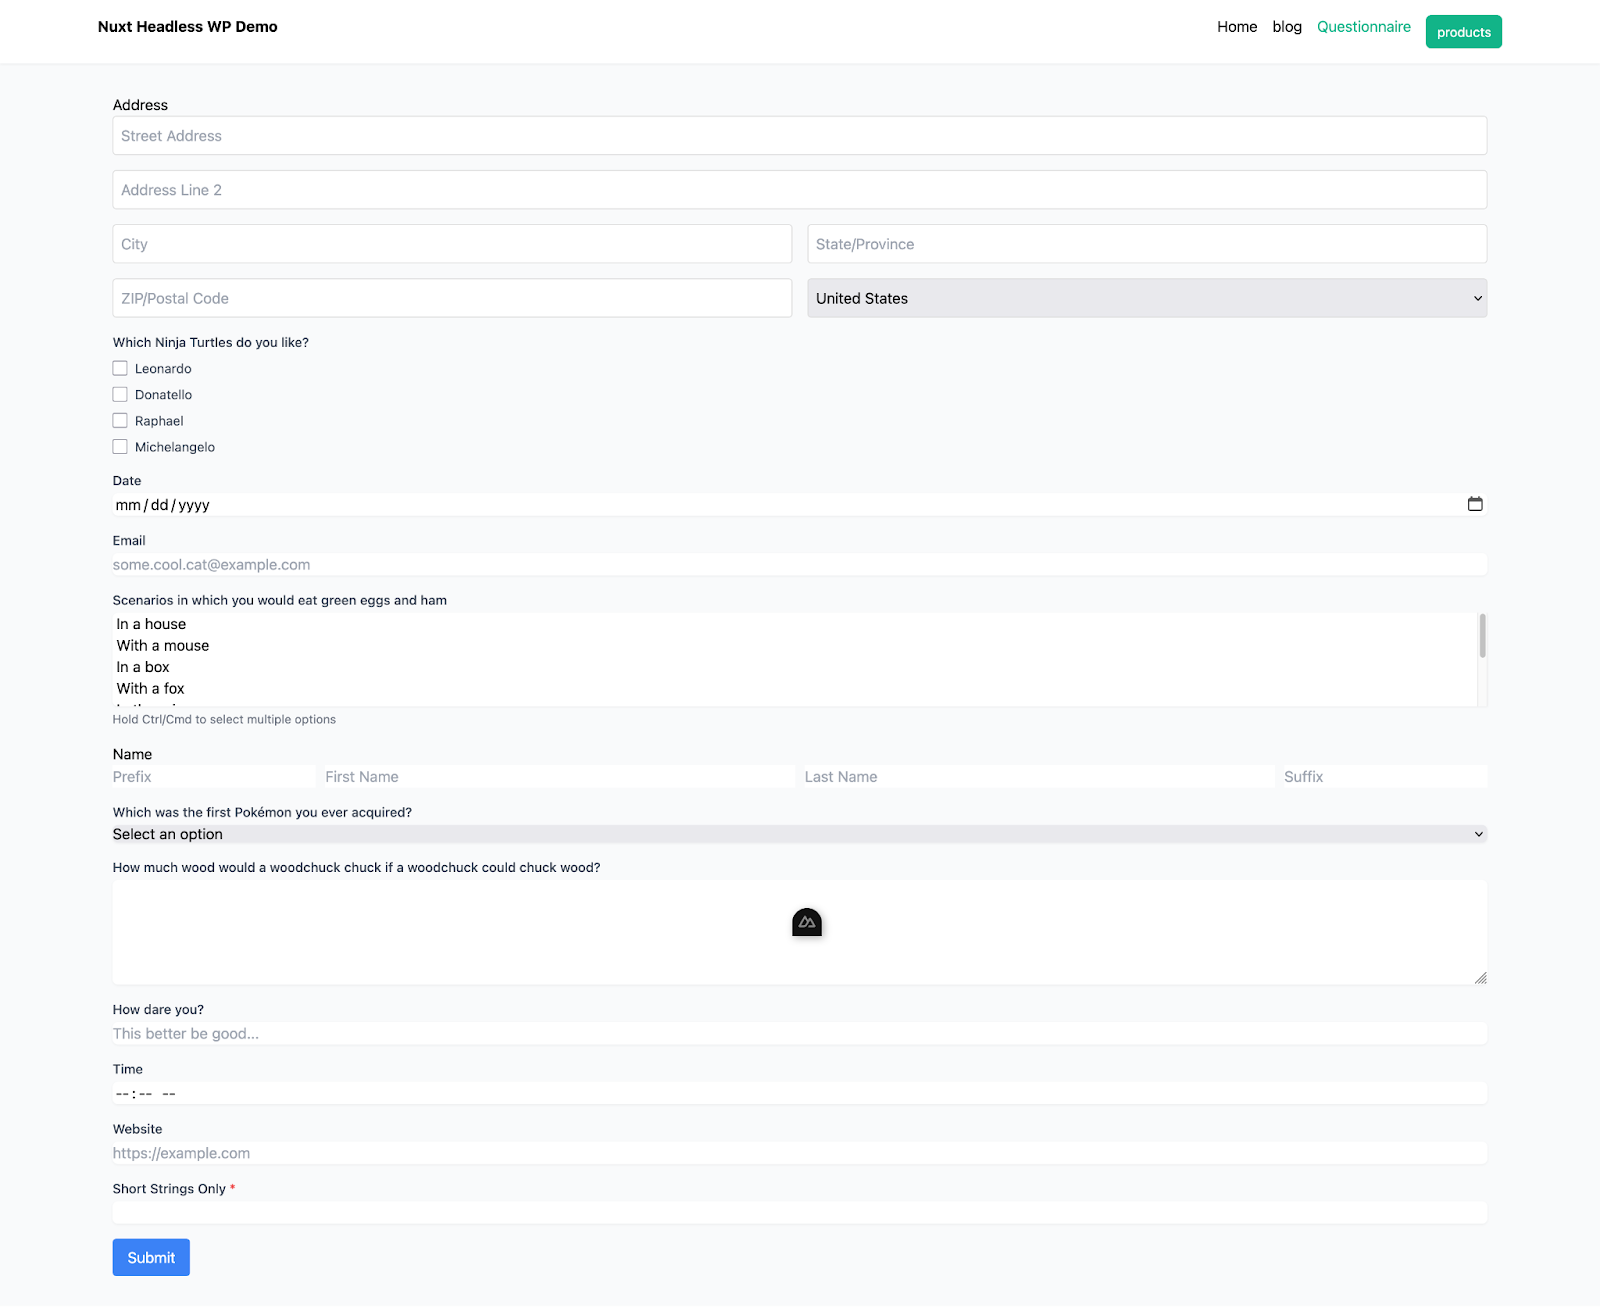
You should now be able to click the “Questionnaire” link in the header to go to the form at http://localhost:3000/questionnaire in a web browser and see it in all its glory:
WPGraphQL for Gravity Forms
The WPGraphQL for Gravity Forms plugin is a powerful extension for WPGraphQL that provides a comprehensive suite of features that allows developers to interact with Gravity Forms via GraphQL. Let’s start by querying for a form.
Querying for a Form
To query for a form, we have the `gfForm` query that we can use to query for data about our Gravity Forms. Here’s a simple example if you want to replace the existing query in the project, open up `composables/useGravityForm.js` and paste this query in replacement of the one currently there:
query getForm {
  gfForm(id: 1, idType: DATABASE_ID) {
    databaseId
    title
    description
    formFields(first: 500) {
      nodes {
        ... on TextField {
          id
          type
          label
        }
        ... on SelectField {
          id
          type
          label
          choices {
            text
            value
          }
        }
      }
    }
  }
}
In this query, we are asking for form data. The `gfForm` query retrieves a specific form by its database ID (id: 1).
For that form, the query fetches basic information like its title and description.
The query also fetches the formFields (up to ), and for each field, it checks whether it’s a TextField or SelectField. Depending on the type, it will fetch the appropriate data such as id, type, label, and for SelectField, it will also retrieve the choices (with their text and value).
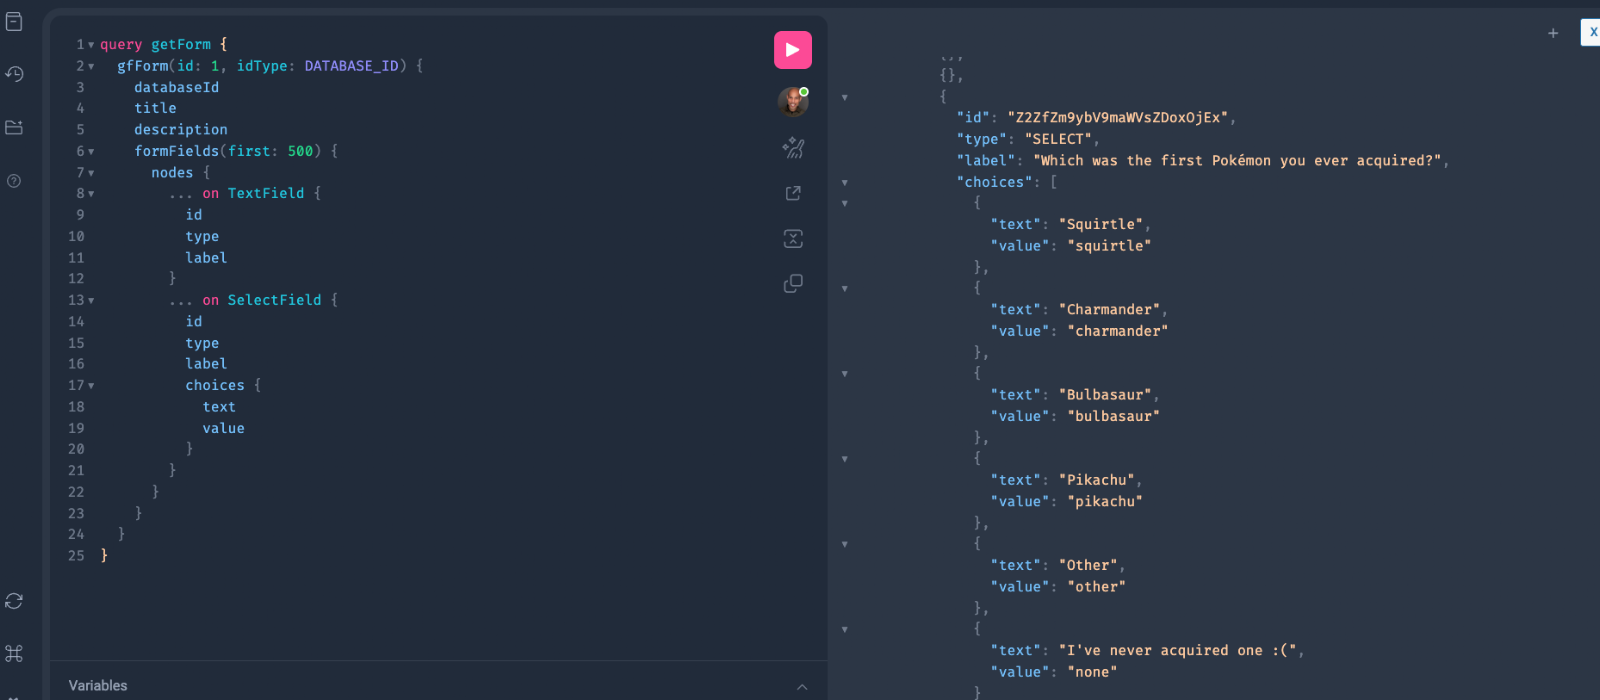
Go ahead and test out this query right from the WordPress admin by following these steps:
Go to GraphQL > GraphiQL IDE.
Paste the query above into the left column, replacing id: 1 with the ID of the imported form.
Click the ▶ button to execute the query.
See the results returned in the right column. You should see this:
Gravity Forms Field Support
Now, let’s highlight one of the latest features of WPGraphQL for Gravity Forms which we use in this project. This feature is Forms Field support with the FormField interface.
The interface approach leverages GraphQL interfaces to abstract shared properties among Gravity Forms fields, meaning you can query a common set of fields like “label” or “isRequired” across multiple field types.
This method allows you to write a more composable query that automatically includes any new field type that implements a given interface without needing to update your query.
In our project, we used inline fragments on interfaces such as GfFieldWithLabelSetting and GfFieldWithRulesSetting to fetch common properties like label and isRequired from each form field.
Our query retrieves both inputType and type values. The sample’s current component mapping relies on the static type property to determine which Vue component to render. For the scope of this article, the inputType is still included in the query output to point out the new support.
inputType Prop
For other use cases outside the scope of this article, you can leverage the inputType property instead of the static type to dynamically determine which component to render for each Gravity Forms field.
This dynamic approach allows a single form field to resolve into multiple input types—such as a Quiz Field that can be rendered as either a Checkbox or Radio Field—based on its configuration. Using the inputType allows your code to automatically map to the correct component, making it a bit more flexible and easier to maintain as new input variants are introduced. Stay tuned for a future article that focuses on this!
Check out the WPGraphQL for Gravity Forms readme for more documentation on gfForm , the FormField interface and other queries and mutations the plugin offers.
Querying for the form in Nuxt
Now that we know what a query for a form looks like and the FormField interface the types inherit let’s see how we can use it in our Nuxt app.
Open up the Nuxt app in your code editor and navigate to the composables/useGravityForm.js file.
This file is a Nuxt.js composable designed to interface with WPGraphQL for fetching Gravity Forms data. It imports the ref function from Vue and the runtime configuration using useRuntimeConfig from Nuxt’s #app alias. It defines a reactive variable called formFields that will hold the array of form field objects retrieved from the backend.
A multi-line GraphQL query named formQuery is declared to fetch a Gravity Form’s fields by its ID. The query leverages GraphQL interfaces to abstract common properties shared by multiple field types.
For more complex field configurations, inline fragments on GfFieldWithChoicesSetting fetch choices and input details, while GfFieldWithConditionalLogicSetting retrieves any conditional logic rules defined on the field:
const formQuery = `
  query GetGravityForm($formId: ID!) {
  gfForm(id: $formId, idType: DATABASE_ID) {
    formFields(first: 300) {
      nodes {
        id
        databaseId
        inputType
        type
        visibility
        ... on GfFieldWithLabelSetting {
          label
        }
        ... on GfFieldWithRulesSetting {
          isRequired
        }
        ... on GfFieldWithCssClassSetting {
          cssClass
        }
        ... on GfFieldWithDefaultValueSetting {
          defaultValue
        }
        ... on GfFieldWithSizeSetting {
          size
        }
        ... on GfFieldWithPlaceholderSetting {
          placeholder
        }
        ... on GfFieldWithMaxLengthSetting {
          maxLength
        }
        ... on GfFieldWithInputMaskSetting {
          inputMaskValue
        }
        ... on GfFieldWithChoicesSetting {
          choices {
            text
            value
          }
          inputs {
            id
            label
          }
        }
        ... on GfFieldWithConditionalLogicSetting {
          conditionalLogic {
            actionType
            logicType
            rules {
              fieldId
              operator
              value
            }
          }
        }
      }
    }
  }
}
The fetchForm function is defined to send a POST request to the WordPress GraphQL endpoint using Nuxt’s useFetchcomposable. It includes a request body that contains the query and variables, with a default formId of "1" to retrieve a specific form. In this line containing the body object, go ahead and replace the integer with your specific ID:
 body: JSON.stringify({
          query: formQuery,
          variables: { formId: "1" }, // Default formId (you can change this to what your id is)
        }),
The immediate flag shown below is set to false so that the fetch operation is not executed automatically, allowing for manual triggering via the execute function.
This is important because it provides better control over when data is fetched, optimizing performance and preventing unnecessary network requests. By waiting for a specific point in the component lifecycle—such as when a button is clicked or a user interacts with the page—we ensure that data is only fetched when needed. In this case, we trigger the fetch manually within the onMountedlifecycle hook, which ensures that the data is loaded once the Nuxt page component rendering the form is attached to the DOM:
immediate: false, // Prevent automatic execution
        transform: (res) => {
          if (res.errors) {
            console.error("GraphQL Errors:", res.errors);
            throw new Error(res.errors[0].message);
          }
          const fields = res.data?.gfForm?.formFields?.nodes;
          if (!Array.isArray(fields)) {
            console.error("Invalid fields data:", res.data);
            throw new Error("Invalid form fields data");
          }
          return fields;
        },
      }
    );

    // Return execute to manually trigger the fetch later
    return { data, status, fetchError, execute, refresh };
  };
Submitting the form in Nuxt
Staying in the useGravityForm.js file, we finish off the logic to allow the user to submit form data to our WordPress backend via Nuxt.
We do this with the submitForm function. This is an asynchronous function that accepts a form ID and field values, transforms these values using transformFieldValue, and then submits them via a GraphQL mutation.
This mutation sends the form ID and the transformed field values to the backend, which responds with either errors or confirmation details. Finally, the composable returns an object containing formFields, fetchForm, and submitForm so that other parts of the Nuxt application can fetch and submit Gravity Forms data:
Now that we know how the form data is being queried for and submitted, let’s check out where this logic is being used, how the state is being managed, and where the data is being rendered.
Navigate over to pages/headlesswp-gform/index.vue.
Take a look at the entire file in your code editor. Let’s break it down from top to bottom.
The script starts by importing Vue’s reactive functions (ref, reactive, onMounted, watch) and several form field components (e.g., InputField, EmailField –Don’t worry, we will discuss where these are coming from in the next section) to render the form.
It then imports the useGravityForm composable, which provides functions to fetch form metadata and submit form data from WPGraphQL:
import { ref, reactive, onMounted, watch } from "vue";

import {
  InputField,
  DropdownField,
  ChoiceListField,
  AddressField,
  DateField,
  TimeField,
  NameField,
  PhoneField,
} from "~/components/form-fields";

import EmailFieldComponent from "~/components/form-fields/EmailField.vue";

import useGravityForm from "~/composables/useGravityForm";
const { fetchForm, submitForm, formFields } = useGravityForm();
Following that, a reactive reference formValues is declared using ref({}) to store user input for each form field.
Then we establish a reactive error storage object for both address and email validations. It defines a validateAddress function that checks if each required component of an address is present and formatted correctly, updating error messages as needed.
Similarly, the validateEmail function uses a regular expression to confirm that the email address adheres to a valid format. If any validation fails, the corresponding error message is set and the function returns false. This client-side validation ensures that only complete and correctly formatted data is submitted, improving user experience and data integrity.
const formValues = ref({});
const error = ref(null);

const validationErrors = reactive({
  address: {
    street: null,
    city: null,
    state: null,
    zip: null,
    country: null,
  },
  email: null,
});

// Validate the entire address object and update errors per field.
const validateAddress = (address) => {
  let valid = true;
  if (!address.street) {
    validationErrors.address.street = "Street address is required.";
    valid = false;
  } else {
    validationErrors.address.street = null;
  }
  if (!address.city) {
    validationErrors.address.city = "City is required.";
    valid = false;
  } else {
    validationErrors.address.city = null;
  }
  if (!address.state) {
    validationErrors.address.state = "State is required.";
    valid = false;
  } else {
    validationErrors.address.state = null;
  }
  if (!address.zip || !/^\d{5}$/.test(address.zip)) {
    validationErrors.address.zip = "Please enter a valid 5-digit ZIP code.";
    valid = false;
  } else {
    validationErrors.address.zip = null;
  }
  if (!address.country) {
    validationErrors.address.country = "Country is required.";
    valid = false;
  } else {
    validationErrors.address.country = null;
  }
  return valid;
};

// Validate the email value and update the error.
const validateEmail = (email) => {
  const emailRegex = /^[a-zA-Z0-9._%+-]+@[a-zA-Z0-9.-]+\.[a-zA-Z]{2,}$/;
  if (!emailRegex.test(email)) {
    validationErrors.email = "Please enter a valid email address.";
    return false;
  }
  validationErrors.email = null;
  return true;
};
Next, The updateFieldValue function merges the current formValues with a new value for a given field ID, ensuring that changes to input fields update the reactive state.
Inside the onMounted lifecycle hook, the code calls fetchForm() to get the form metadata and immediately triggers the fetch using execute():
A watcher on the returned data initializes formFields and builds an initialValues object based on the field type, setting default values (e.g., an object for addresses, and an empty array for checkboxes).
For example, if a field is of type “ADDRESS,” the code sets its default value to an object with empty strings for street, lineTwo, city, state, zip, and a default country of “US.”
A separate watcher monitors fetchError and updates the local error reference with the error message if the fetch fails:
The handleSubmit function validates the email and address fields by checking their corresponding values in formValues and displays an alert if validation fails:
const handleSubmit = async () => {

  let isValid = true;

  // Validate email field before submission

  const emailField = formFields.value.find((field) => field.type === "EMAIL");

  if (emailField && formValues.value[emailField.databaseId]) {

    if (!validateEmail(formValues.value[emailField.databaseId])) {

      isValid = false;

    }

  }

  // Validate address field before submission

  const addressField = formFields.value.find(

    (field) => field.type === "ADDRESS"

  );

  if (addressField && formValues.value[addressField.databaseId]) {

    if (!validateAddress(formValues.value[addressField.databaseId])) {

      isValid = false;

    }

  }

  if (!isValid) {

    alert("Please fix the errors before submitting.");

    return;

  }
If validation passes, it calls submitForm with the current form values, transforming them as needed and handling the response for errors or confirmation.
On successful submission, the form is reset by building a new object (resetValues) with default values for each field, which is then assigned to formValues.value.
Finally, the template loops over formFields and dynamically renders the appropriate component for each field type (using the fieldComponentsmapping), binding each component’s value to formValues via v-model and providing a submit button to send the form data:
Now let’s discuss where those field component imports were coming from in the previous section. Navigate to components/field-forms. This folder contains all the component files for the fields.
In our project, we organized the form field components into groups based on shared behavior and UI patterns. We consolidated similar text-based inputs—like Text, Email, Website, and even Text Area—into a single InputField component.
For fields that use dropdowns, we combined Select and MultiSelect into a unified DropdownField component. For fields that involve multiple choice inputs, such as Checkbox and Radio fields, we created a consolidated ChoiceListField component.
Meanwhile, fields with unique layouts or behaviors (like AddressField, DateField, TimeField, and NameField) were kept as separate components.
To simplify importing these components into our main form, we created a barrel file (index.js) in the form-fields folder that re-exports all of them.
Since there are a few, let’s just break down the common patterns they follow:
Props Definition
All components define a consistent set of props:
field: An object containing field metadata (required)
Contains information like databaseId, label, isRequired, and field-specific properties
modelValue: The current value of the field
Type varies based on the field (string, array, object)
Includes appropriate default values
Event Handling
Each component emits events to update the parent component’s state:
All components use the update:modelValue or update:model-value event for two-way binding.
This follows Vue’s convention for custom v-model implementation
Field-Specific Validation
Many components include field-specific validation logic:
Simple fields may validate on input
Complex fields (like EmailField, AddressField) have dedicated validation functions
Error messages are stored in reactive variables and displayed in the template
Consistent Template Structure
All components follow a similar template structure:
A wrapper div with class field-wrapper
A label displaying the field name and required indicator if needed
Input element(s) with appropriate bindings:
:value bound to the model value
Event handlers to emit update events
Error message displayed when validation fails
Complex Field Handling
For complex fields (like Address, Name):
Data is structured as objects with multiple properties
Components use appropriate layout techniques (grid, flexbox) to organize multiple inputs
Updates maintain the overall object structure while changing specific properties
What’s the deal with Errors and Why do we handle them?
What is the deal, Jerry??? Well, the deal is that we handle two types of errors in this app. This would be a great question, the great comedian, Jerry Seinfeld could ask.
Request or Server Errors
These are errors that prevent the form entry from being saved. In our Nuxt implementation with Gravity Forms, we encounter several types of network-related errors:
Network connectivity issues when the user’s connection drops
WordPress backend errors (500 Internal Server Error)
Authentication or permission errors when submitting to protected forms
GraphQL syntax or schema errors
Our application handles these errors through the try/catch block in the form submission process. When using the submitForm function from our useGravityForm composable, we capture server errors and display them prominently to the user with an alert.
Inside the useGravityForm composable, we format GraphQL errors into a user-friendly message that tells the user that the submission failed on a popup in the browser.
You can test this error handling by disabling your network connection in DevTools and attempting to submit the form. The application will display an error message indicating the network failure.
Field Validation Errors
Our application implements a dual-layer validation approach:
Client-Side Validation: Implemented for specific field types to provide immediate feedback
Server-Side Validation: Handled by the WordPress Gravity Forms backend
When the server returns validation errors, they’re processed in the handleSubmit function of our index.vue component. The application checks response?.errors?.length to determine if validation errors exist and displays them accordingly.
For client-side validation, certain field types have built-in validation:
Email Field: Validates email format using a regex pattern
Address Field: Validates complete address information and proper postal code formats
Required Fields: All required fields are checked before submission
To test field validation, use the “Short Strings Only” field at the bottom of the form. This field is configured in the Gravity Forms admin to accept a maximum of 5 characters. If you enter more than 5 characters and submit the form, the server will reject the submission and return a validation error.
Unlike some fields that implement client-side validation (like email and address), this text field relies on server-side validation in Gravity Forms. The error message will display after the submission attempt, informing you about the 5-character limit constraint.
This demonstrates how our application strategically combines client-side validation for enhanced user experience with server-side validation for critical business rules and data integrity.
What is Not Included
You can drop these components, and composables and get up and running with Gravity Forms forms quickly in a Nuxt app, but there are features they don’t provide. Some examples:
Support for Gravity Forms’ Conditional Logic rules
Rendering an existing Gravity Forms entry and allowing the user to update its field values
Support for all field types
Conclusion
We hope this blog post helped you understand how to use forms in headless WordPress with Gravity Forms, WPGraphQL for Gravity Forms, and Nuxt!
As always, we’re super stoked to hear your feedback and learn about the headless projects you’re working on, so hit us up in the WPGraphQL Discord!
Special thanks to David Levine and Daniel Roe for helping me write this article and the code!
If you’re using Headless WordPress with Next.js or any other frontend framework, you might have run into a small issue when displaying code snippets: the native WordPress code block doesn’t support syntax highlighting. This can be a problem for developer-focused sites or tutorials where reading and understanding code snippets is key.
This shortcoming of the native Code block often leads developers to look for other solutions that support code syntax highlighting. For a recent headless WordPress project our team worked on, we researched a few options, including the Syntax-highlighting Code Block (with Server-side Rendering) and Code Block Pro. We found Code Block Pro to offer the highest quality syntax highlighting, provide tons of features and customization options, and even support a number of popular VS Code themes to choose from, giving code snippets a nice, professional look.
In this guide, we’ll show you how to install and use Code Block Pro with a Headless WordPress setup, ensuring your code snippets are presented properly on the front end.
If you prefer the video format of this article, you can access it here:
To gain a basic understanding of Next.js, please review the Next.js docs.
Steps
Install and activate Code Block Pro
Steps to install and activate the Code Block Pro plugin:
Go to your WordPress admin dashboard.
Navigate to Plugins > Add New.
Search for “Code Block Pro“.
Click Install Now, then Activate.
You should have this:
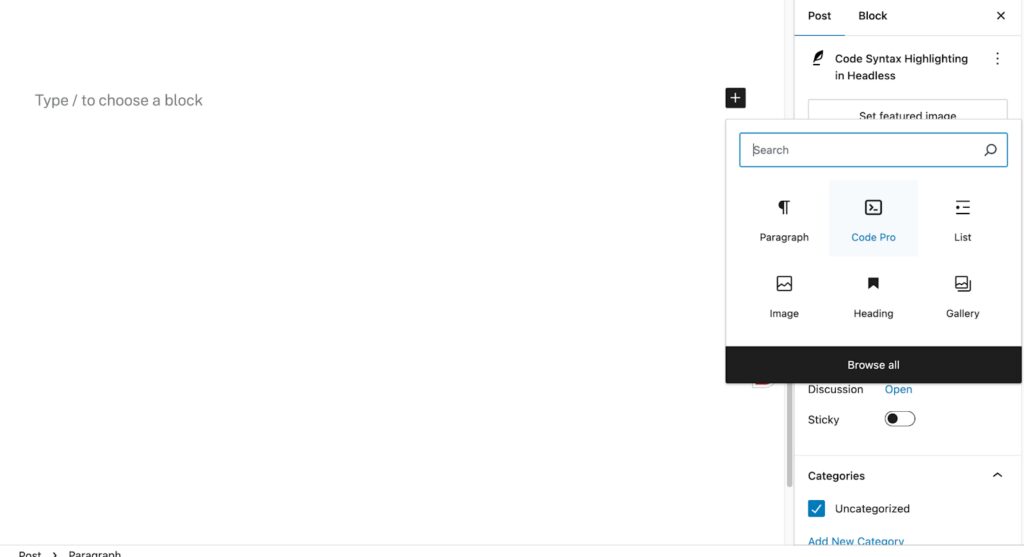
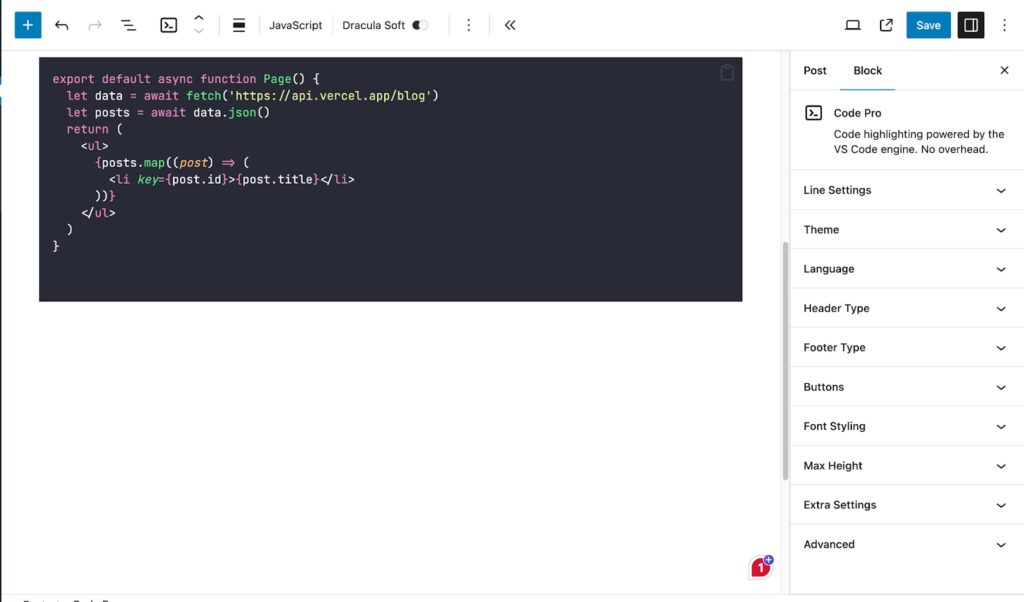
Now that it is activated, create a new post in WordPress. In the block editor, click the plus icon to insert a new block and select the Code Pro block. It looks like this:
When you select it, a syntax-highlighted code block will be added. Go ahead and paste whatever code you want in that block and then save the post. In this case, I am going to add some jsx that renders a page. Note that the panel on the right contains many configuration options.
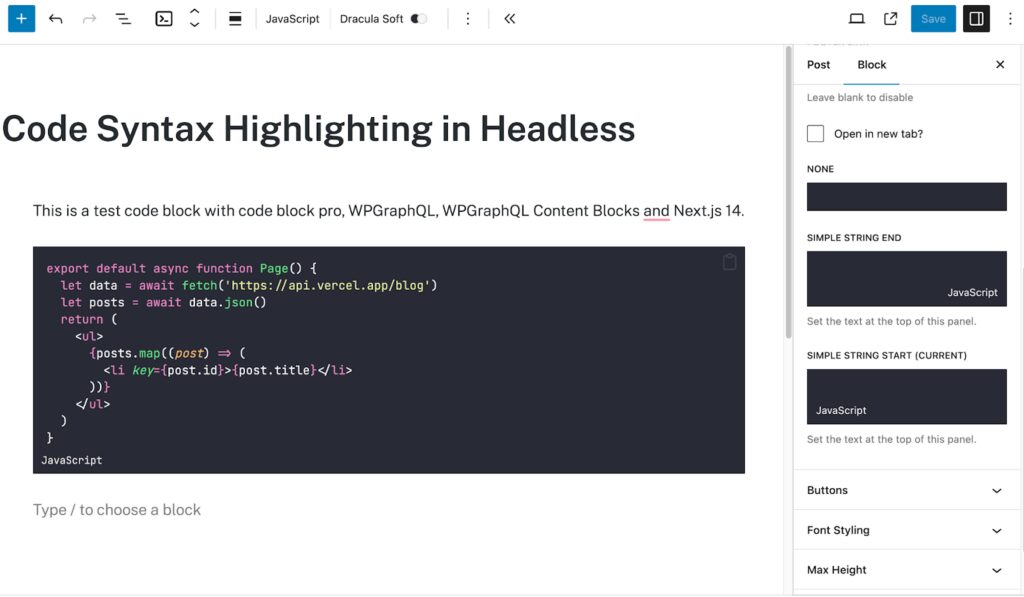
I chose the “Dracula Soft” theme for this article and the header type is set to “none” to achieve a blank header. The footer is set to “simple string start” which displays the kind of language the code is in at the bottom. I also highlighted lines 1 and 2 to show off the line-by-line highlight feature:
That is it! Stoked! This is what you have to do. If simple syntax highlighting and formatting are all you need, as well as displaying the programming language in your post, you are done. Now, let’s get this to render on your decoupled frontend.
Configure Next.js and App Router
In this article, we will use the App Router in Next.js 14. You should already have a boilerplate Next.js project spun up in the app router. Go ahead and open your Next.js project in your code editor. The first thing we need to do is add some code to our CSS. Navigate to your globals.css file in the app directory. Add this CSS:
This css will ensure that line highlighting is properly formatted, creating a more readable and accessible presentation for longer code blocks.
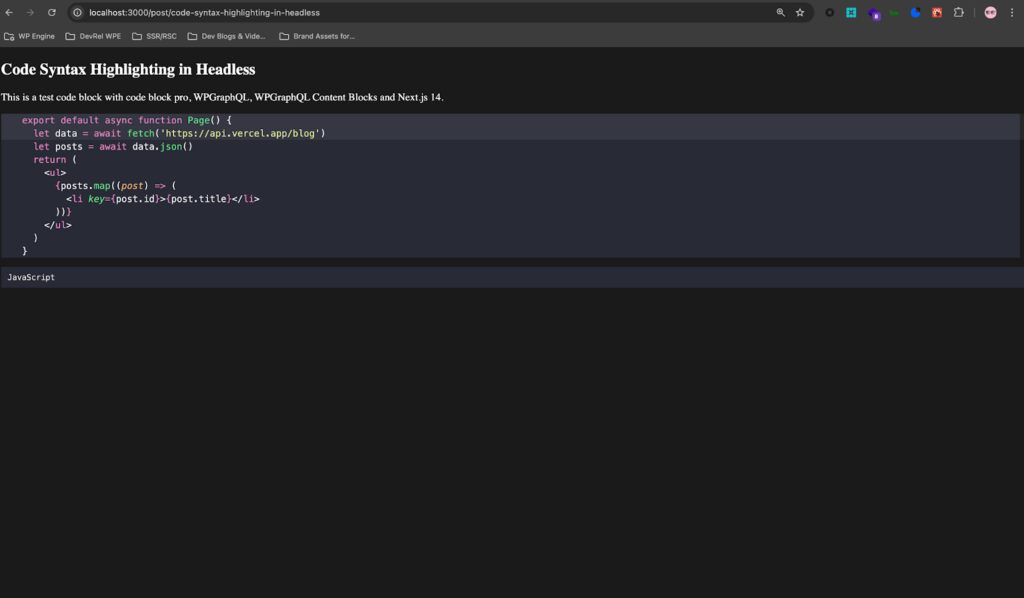
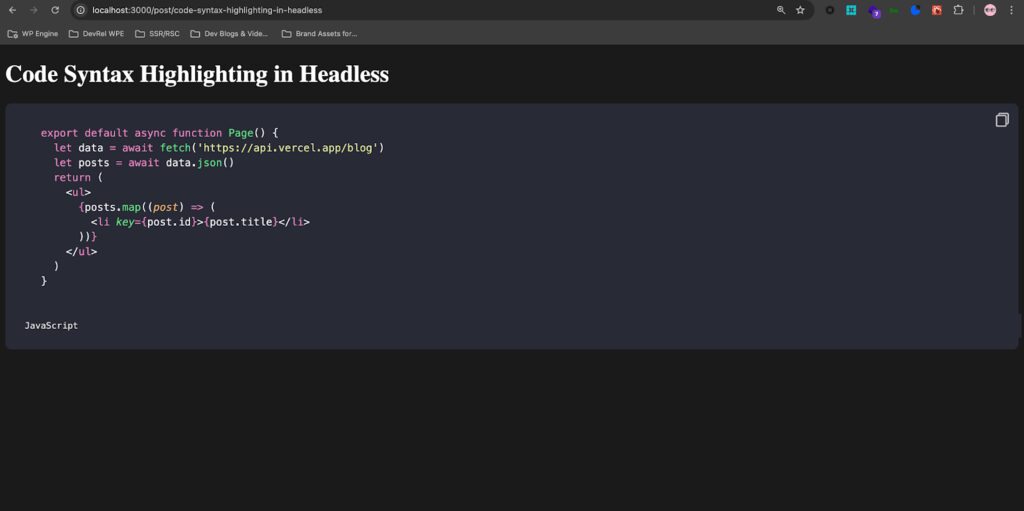
Save that and run npm run dev to spin up your dev server and visit the single post detail page where you added the code. You should have something like this:
Out of the box, the plugin with some css allows you to easily display code, highlighting, and the programming language in a nice, readable way.
Taking it a Step Further – WPGraphQL & WPGraphQL Content Blocks
You can stop at just installing the plugin and adding the css to your frontend application to get the formatting and highlighting. If you want to implement a copy-to-clipboard feature whereby users can click a button to copy the code within the code snippet to their clipboard, however, follow the additional steps below.
Install and activate WPGraphQL & WPGraphQL Content Blocks
WPGraphQL is a canonical WordPress plugin that provides an extendable GraphQL schema and API for any WordPress site.
WPGraphQL Content Blocks is a WordPress plugin that extends WPGraphQL to support querying (Gutenberg) block data. Let’s install both plugins.
Go to the plugins page in your WP admin and search for WPGraphQL. You can add and activate the plugin from there.
Navigate to your WP install and upload the plugin .zip to your WordPress site.
Once that is done, activate the plugin.
Create an editor block query to get Code Block Pro data
Next, let’s query for the Code Block Pro data. Head over to GraphQL IDE and paste in this query:
query GetPostsWithCodeBlocks {
  posts {
    nodes {
      title
      content
      editorBlocks {
        name
        ... on KevinbatdorfCodeBlockPro {
          attributes {
            language
            lineNumbers
            code
          }
          renderedHtml
        }
      }
    }
  }
}
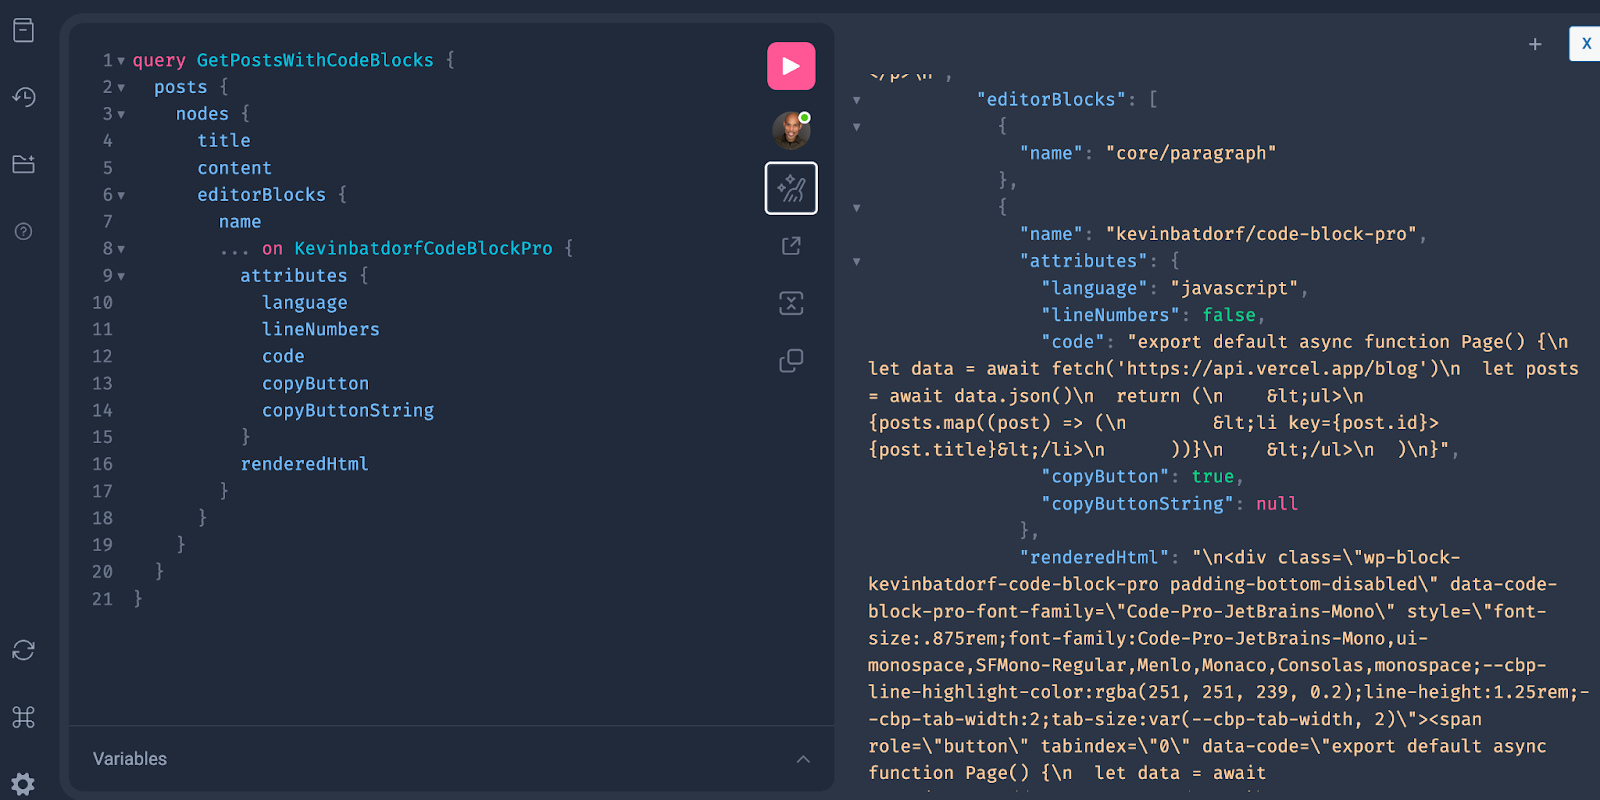
Now press play and you should get this response:
As shown in the IDE, this query returns all posts along with the Code Block Pro data, including the attributes we are asking for (programming language, HTML-rendered code snippet, code, line numbers, copy button, etc.).
Rendering the Code Block in Next.js
Now that we have the data, we need to render the code block in our Next.js frontend. Here’s how you can do it in Next.js 14.
Navigate to app/post/[uri]/page.jsx file. In this file, paste this code block in:
{/* Loop through the editor blocks to render CodeBlockPro if available */}
{post.editorBlocks.map((block, index) => {
if (block.name === "kevinbatdorf/code-block-pro") {
return (
);
}
return null;
})}
);
}
// CodeBlockDisplay inline function to display code block
function CodeBlockDisplay({ attributes, renderedHtml }) {
const [copied, setCopied] = useState(false);
// Handle copy button functionality
const handleCopy = async () => {
try {
if (navigator && navigator.clipboard) {
console.log("Copying the text:", attributes.code);
await navigator.clipboard.writeText(attributes.code);
setCopied(true);
setTimeout(() => setCopied(false), 3000); // Reset after 3 seconds
} else {
console.error("Clipboard API not available.");
}
} catch (err) {
console.error("Failed to copy: ", err);
}
};
return (
{/* Render the HTML of the code block */}
{/* Show the copy button */}
{attributes.copyButton && (
)}
{/* Show the language at the bottom */}
{attributes.language && (
{attributes.language}
{attributes.language}
)}
);
}
function CheckMarkIcon() {
return (
);
}
function CopyIcon() {
return (
);
}
This is a big code block, so let’s break it down into sections.
Starting at the top, we have our “use client” directive since we are importing and using the useState hook in React which needs to run on the client. Then we have our globals.css file for the styling:
"use client";
import { useState } from "react";
import "../../globals.css";
Following that, we have our WPGraphQL query to fetch the post and code block data:
This function defines a GraphQL query to fetch post data, specifically targeting the KevinbatdorfCodeBlockPro block that contains attributes such as language, code, and the copyButton.
The uri (Unique Resource Identifier) is passed into the GraphQL query to fetch the correct post.
The query is then sent to the GraphQL API using fetch, with headers defining the request as POST and the body as JSON. The response is parsed as JSON, and the post data is returned for rendering.
Next, we have our PostDetails component:
export default async function PostDetails({ params }) {
const post = await getPost(params.uri);
return (
The PostDetails component fetches the post data using the getPost function, passing the post uri as a parameter. Following that, the post title is displayed using a simple <h1> tag.
Then editorBlocks field is mapped over, and the function checks if the block name is "kevinbatdorf/code-block-pro". If it is, it renders the CodeBlockDisplay component, passing in the block’s attributes and HTML.
The next part is the CodeBlockDisplay component:
function CodeBlockDisplay({ attributes, renderedHtml }) {
const [copied, setCopied] = useState(false);
const handleCopy = async () => {
try {
if (navigator && navigator.clipboard) {
console.log("Copying the text:", attributes.code);
await navigator.clipboard.writeText(attributes.code);
setCopied(true);
setTimeout(() => setCopied(false), 3000);
} else {
console.error("Clipboard API not available.");
}
} catch (err) {
console.error("Failed to copy: ", err);
}
};
return (
The component uses useState to manage whether the copy button was clicked. This means that after the copy action is triggered, the "Copied!" message will be displayed for 3 seconds before resetting back to the original "Copy" button state.
After that,the handleCopy function uses the Clipboard API to copy the code (contained in attributes.code) to the user’s clipboard. It checks if the API is available and logs an error if not.
The rendered HTML of the code block is then injected into the DOM using dangerouslySetInnerHTML, which is necessary because the content comes from WordPress in HTML format. If the block has a copyButton attribute, the copy button is conditionally displayed. Additionally, the programming language is displayed at the bottom of the block if it’s available.
The last thing we need to do is include components for rendering the SVG icons:
function CheckMarkIcon() {
  return (


  );
}

function CopyIcon() {
  return (


  );
}
The CopyIcon here is displayed by default. After the user clicks on the button to copy the code, that SVG is hidden and swapped out with the CheckMarkIcon to indicate that the code snippet was successfully copied.
Update globals.css file
The last thing we need to do before testing our code block page is to update the css to collectively enhance the presentation of the code block by ensuring the elements are properly spaced, visually appealing, and interactive (with the copy button).
This setup compliments the functionality provided in the JavaScript code for copying code snippets. You can style it however you would like, but I chose to do it this way.
We are ready to test this page. Navigate to your WordPress admin and grab whatever slug is related to the post you embedded code with. When you visit that page, you should have something that looks like this:
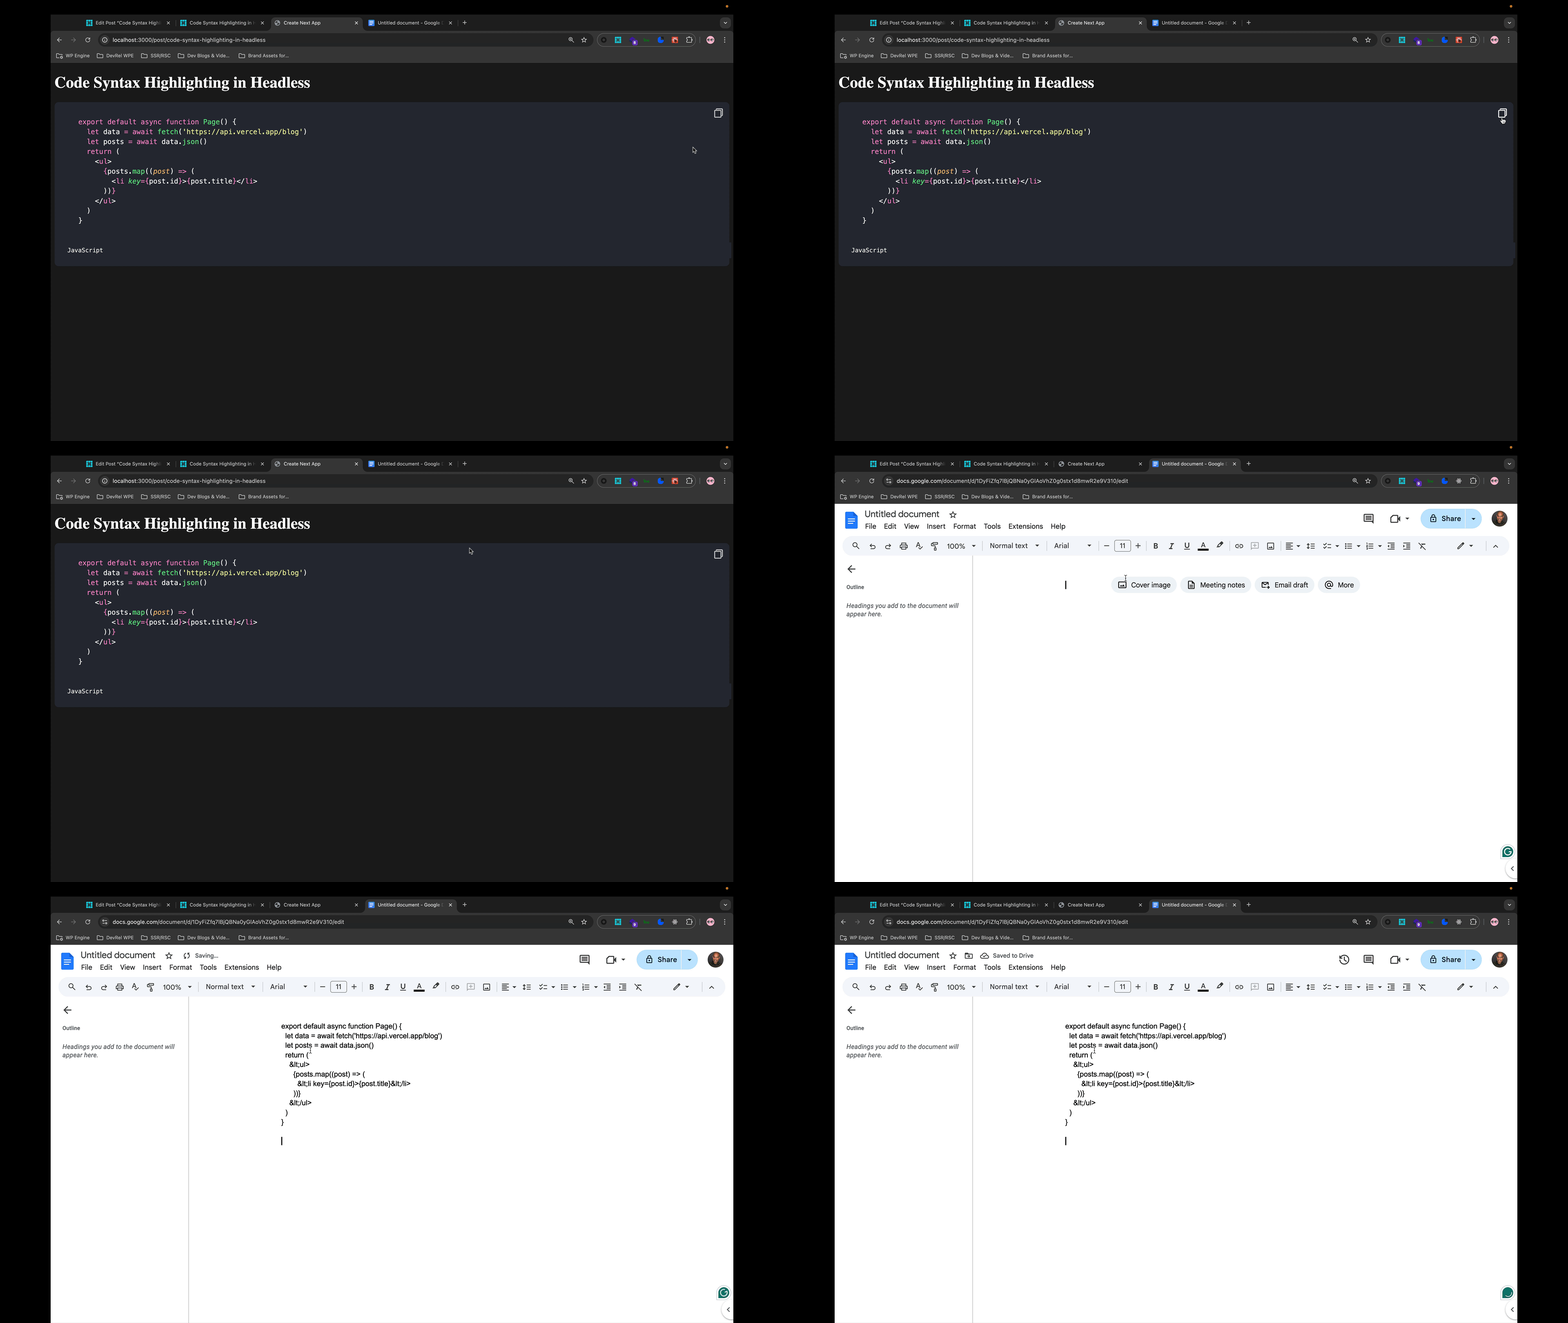
Now, to test the copy functionality, click on the clipboard box icon and then paste it into a document to test that it works:
Stoked!! This works! Now let’s discuss more options and practices to use this feature.
Other Options
Here are two more options you can get stoked with in adding code syntax highlighting to your headless WordPress app.
Create A Separate Code Block Pro Component
Instead of embedding the entire code block logic directly into a single page file, it’s a good practice to create a separate component specifically for handling Code Block Pro blocks.
This approach enhances code readability, reusability, and maintainability by isolating the code block’s functionality. You can easily import this component into any page that requires the code block, such as your page.jsx file, without cluttering the page’s primary logic. For this example, our separate component would look like this:
"use client";
import { useState } from "react";
// This component renders the Code Block Pro block with copy-to-clipboard functionality
export default function KevinBatdorfCodeBlockPro({ attributes, renderedHtml }) {
const [copied, setCopied] = useState(false);
// Handle the copy functionality
const handleCopy = async () => {
try {
if (navigator && navigator.clipboard) {
await navigator.clipboard.writeText(attributes.code);
setCopied(true);
setTimeout(() => setCopied(false), 3000); // Reset after 3 seconds
} else {
console.error("Clipboard API not available.");
}
} catch (err) {
console.error("Failed to copy: ", err);
}
};
return (
{/* Render the HTML of the code block */}
{/* Show the copy button */}
{attributes.copyButton && (
)}
{/* Show the language at the bottom */}
{attributes.language && (
{attributes.language}
{attributes.language}
)}
);
}
// CheckMarkIcon component for when the text has been copied
function CheckMarkIcon() {
return (
);
}
// CopyIcon component for the default copy button
function CopyIcon() {
return (
);
}
Since I already explained the code’s function and logic in the previous section, you can go over what it does there.
Conclusion
Syntax highlighting and copy-to-clipboard functionality are valuable enhancements to the code snippets on your headless WordPress sites.
By leveraging the Code Block Pro plugin and WPGraphQL, we were able to query and render code blocks with ease. This approach improves readability and user experience, allowing visitors to easily copy code snippets directly from your posts. The combination of server-side rendering with client-side interactivity using Next.js, along with a clean, simple styling approach, ensures that you can maintain a visually appealing and functional code block display.
As always, we’re stoked to hear your feedback and see what headless projects you’re building! Hit us up in our Discord!
Caching is important in optimizing performance for headless WordPress setups. The WPGraphQL Smart Cache plugin helps manage caching for GraphQL queries, ensuring faster response times. In this guide, we’ll walk you through setting up your WordPress environment, installing the necessary plugins, and customizing GraphQL cache keys to better suit your specific needs.
WPGraphQL Smart Cache automatically tags cached responses with keys derived from the GraphQL queries. These keys are linked to specific WordPress data (e.g., posts, pages, taxonomies). When relevant data is updated, the associated cache is invalidated.
For example, a query that retrieves posts with specific categories and tags will generate cache keys like list:post, list:category, and list:tag. If any of these categories or tags are updated, the entire cache is invalidated, ensuring the data stays current.
In addition to the list:$type_name keys, individual node IDs are also included.
These individual IDs are used to purge cache when updates or deletes happen.
The list:$type_name is used to purge when a new thing is published. For example list:post will be purged when a new post is published, but purge( "post:1" ) would be purged when post 1 is updated or deleted.
Let’s see this in action. Navigate to your WP admin, then open your WPGraphQL IDE. Copy and paste this query:
query GetPosts {
  posts {
    nodes {
      title
      uri
    }
  }
}
When you press play in your IDE, this will make a query to your site’s WPGraphQL endpoint.
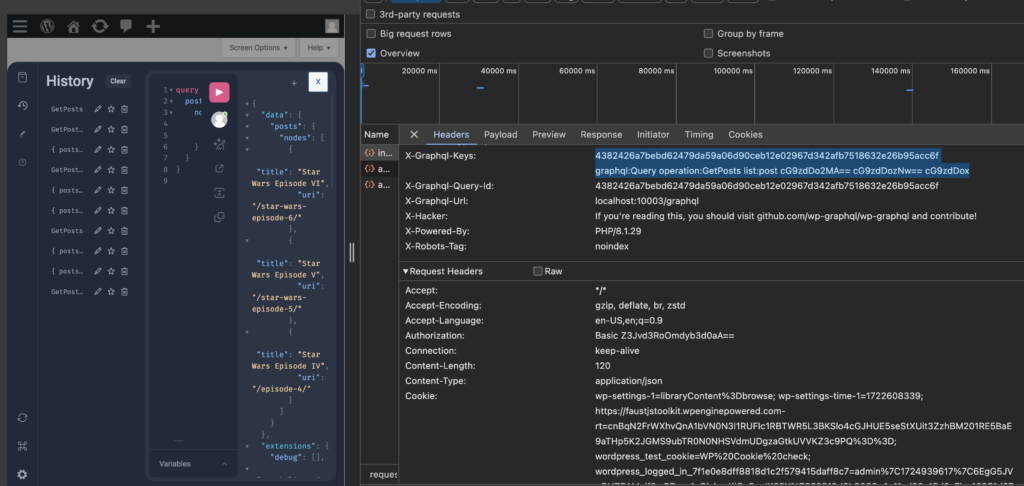
Then WPGraphQL will return headers that caching clients can use to tag the cached document. Next, Open your dev tools. In this case, I am using Google Chrome. When I open up the dev tools and inspect the response headers, you should see this:
Here, we see the X-GraphQL-Keys header with a list of keys. If this query were made via a GET request to a site hosted on a host that supports it, the response would be cached and “tagged” with these keys.
For this particular query, we see the following keys:
Hash of the Query: This is a unique identifier which is in this example
4382426a7bebd62479da59a06d90ceb12e02967d342afb7518632e26b95acc6f for the specific query made. It ensures that the exact same query returns the same cached response unless invalidated.
Operation Type (graphql:Query): Indicates that the operation is a GraphQL query, as opposed to a mutation or subscription
Operation Name (operation:GetPosts): Identifies the specifically named query, in this case, GetPosts, which helps in targeting this operation for caching or invalidation.
List Key(list:post): This key identifies that the query is fetching a list of posts. Any changes to the list of posts would trigger cache invalidation.
Node ID (cG9zdDox): This represents the specific node (e.g., a post) that was resolved in the query. Changes to this node will invalidate the cache for this query.
If a purge event for one of those tags is triggered, the document will be tagged with these keys and purged (deleted) from the cache.
Understanding Cache Invalidation with WPGraphQL Smart Cache
WPGraphQL Smart Cache optimizes caching by sending the keys in the headers, but the caching client (e.g., Varnish or Litespeed) needs to use those keys to tag the cache. WPGraphQL Smart Cache itself does not tag the cached document; it provides the caching client info (the keys) to tag the cached document with. A supported host like WP engine works with WPGraphQL Smart Cache out of the box.
Let’s discuss how invalidation works:
WPGraphQL Smart Cache listens to various events in WordPress, such as publishing, updating, or deleting content, and triggers cache invalidation (or “purge”) based on these events.
Detailed Key Breakdown:
Publish Events (purge('list:$type_name')): When a new post or content type is published, the cache for the entire list associated with that content type (e.g., all posts) is purged. This ensures that any queries fetching this list will be up-to-date.
Update Events (purge('$nodeId')): When an existing post or content type is updated, the cache for that specific node (e.g., a single post) is purged. This allows the updated content to be fetched without affecting the entire list.
Delete Events (purge('$nodeId')): Similarly, when a post or content type is deleted, the cache for that specific node is purged, ensuring that the deleted content is no longer served from the cache.
Why This Matters:
These targeted cache invalidations help maintain the balance between performance and data freshness. By only purging the cache when necessary and only for the relevant data, WPGraphQL Smart Cache ensures that users receive up-to-date content without unnecessary cache purges, which can negatively impact performance.
This invalidation strategy is crucial for optimizing the performance of headless WordPress setups using WPGraphQL, especially in dynamic environments where content changes frequently.
How Cache Invalidation and Cache Tags Work Together
Now that we’ve explored how cached documents are tagged and how cache invalidation works in WPGraphQL Smart Cache, let’s see how these concepts interact.
When a GraphQL query is executed, specific cache keys (tags) are associated with the cached response. These tags correspond to the data queried, such as posts, categories, or specific node IDs. The cache invalidation strategy then ensures that when relevant data changes occur in WordPress, the associated cached documents are purged based on these tags.
Example: Invalidation Scenarios for a GetPosts Query
Publishing a New Post (purge('list:post')):
When a new post is published, the entire list of posts in the cache (tagged with list:post) is invalidated. This ensures that the new post will appear in any subsequent queries that fetch this list.
Updating or Deleting a Specific Node (purge('$nodeId')):
If the “Hello World” post (with the ID cG9zdDox) is updated or deleted, the cache for that specific node is purged. This allows the updated or deleted content to be accurately reflected in any future queries.
Manually Purging Cache (purge('graphql:Query')):
Clicking “Purge Cache” in GraphQL > Settings > Cache page triggers a manual cache purge for all queries. This can be useful when you want to ensure that all cached data is refreshed, regardless of specific events.
Operation Name or Query Hash-Based Purge:
Custom purge events can be manually triggered based on the operation name (e.g., GetPosts) or the hash of the query. This level of control allows you to finely tune when and how caches are invalidated.
These strategies work together to ensure that the cache is only invalidated when necessary, providing up-to-date data without unnecessary performance overhead. For instance, when the “Hello World” post is updated, it’s reasonable to expect that the cache for the GetPosts query should be purged so that any queries return the most current data. This fine-grained control over cache invalidation ensures that your headless WordPress site remains performant while delivering fresh content.
Why Would You Need to Customize WPGraphQL Cache Keys?
In some scenarios, the default caching behavior might be too broad, leading to frequent cache invalidations. This is especially true for more complex queries.
For instance, if your query includes categories and tags, any update to these taxonomies will invalidate the cache, even if those changes don’t affect the specific posts you’re querying. Customizing cache keys allows you to fine-tune this behavior, ensuring that only relevant updates trigger cache invalidation, thereby improving performance.
For example, consider the following query:
{
  posts {
    nodes {
      id
      title
      tags {
        nodes {
          id
          name
        }
      }
    }
  }
  categories {
    nodes {
      id
      name
    }
  }
  tags {
    nodes {
      id
      name
    }
  }
}
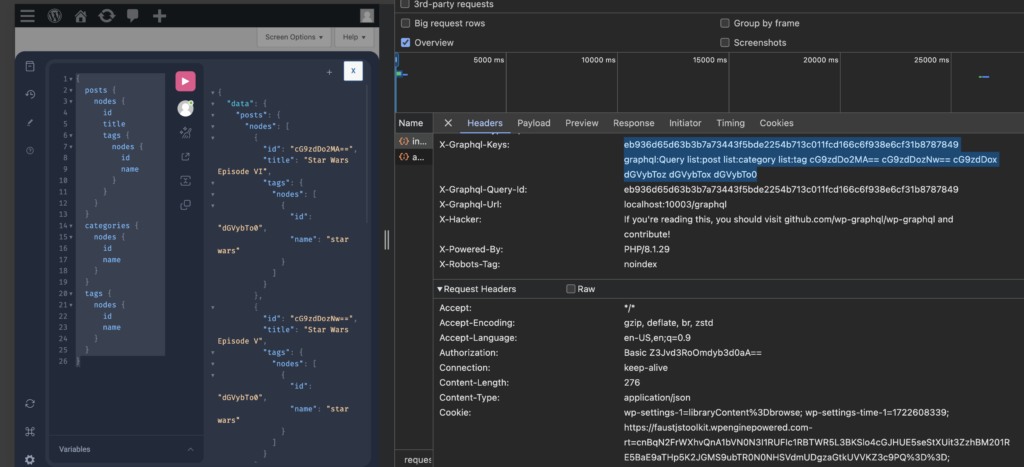
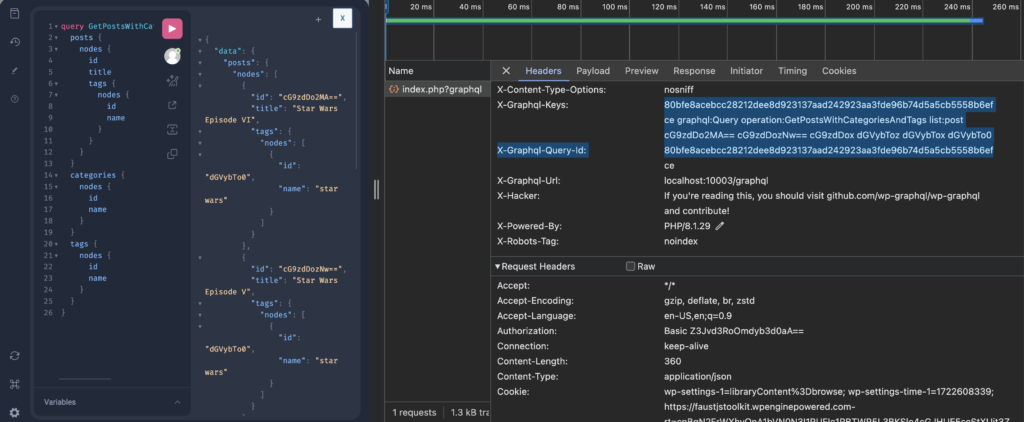
This query retrieves a list of posts, along with all categories and tags. When this query is executed, the response includes the posts, categories, and tags that match the query as shown here:
The X-GraphQL-Keys header shows that the cached document is tagged with list:post, list:category, and list:tag. This tagging means that the cache will be invalidated whenever there’s a change in any of these entities—whether it’s a new post, category, or tag.
While this behavior ensures that your cache is up-to-date, it can lead to excessive cache invalidation. For instance, if a new tag is created and assigned to a post not included in this query, it will still trigger a purge('list:tag'), invalidating the cache for this query.
This means the cache could be cleared more often than you want for your specific use case, which could negatively impact performance.
query GetPostsWithCategoriesAndTags {
  posts {
    nodes {
      id
      title
      categories {
        nodes {
          id
          name
        }
      }
      tags {
        nodes {
          id
          name
        }
      }
    }
  }
}
The WPGraphQL team changed things to only track list: types from the root. So, if you run this query, your list of categories won’t be tracked because it is not at the root.
The Problem
The problem is that the list:category and list:tag keys could cause this document to be purged more frequently than you might like. WPGraphQL tracks precisely, but it doesn’t know your specific intention and what you care about.
For example, you might simply not care if this particular query is “fresh” when terms change. OR you might ONLY care for this query to be fresh when terms change.
WPGraphQL doesn’t know the intent of the query, only what the query is.
Fortunately, you can customize the cache keys to better suit your specific needs, reducing unnecessary cache invalidations and improving performance.
Customizing Cache Keys
By customizing the cache keys, you can ensure that the cache is only invalidated when changes you believe are relevant to your use case occur. This involves fine-tuning the tags associated with your queries, allowing you to maintain optimal performance without sacrificing data accuracy.
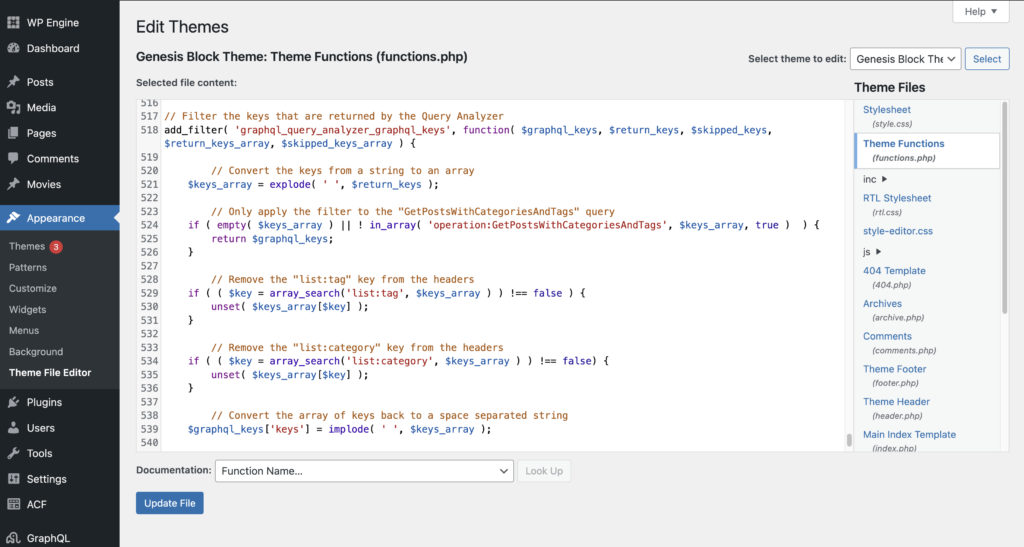
Let’s do this by navigating to our WP admin and modifying the functions.php file. Go to Appearance> Theme File Editor. Select the functions.php file from your active theme.
Insert this code snippet at the bottom of your functions.php file to customize the cache keys for a specific GraphQL operation. In this case, let’s add an operator name to the query we used in the section before. We are calling our operation GetPostWithCategoriesAndTags:
This snippet customizes the cache keys for the GetPostsWithCategoriesAndTags operation. It removes the list:tag and list:category keys from the cache, preventing their updates from invalidating the cache for this specific query. The array_diff() function is used to filter out the unwanted keys, and the modified keys are then reassembled into a string and returned.
Let’s test this now in WPGraphQL IDE and the browser dev tools:
Stoked!!! Now as you see in the dev tools image, publishing new categories and tags, which triggers purge( 'list:category' ) and purge( 'list:tag' ) will not purge this document.
We’re getting the benefits of cached GraphQL documents. The document is invalidated when the post is updated or deleted, but we’re letting the cache remain cached when categories or tags are created.
Conclusion
We hope you have a better understanding of using filters, as demonstrated above, to customize your cache tagging and invalidation strategies to better suit your project’s specific needs. By taking control of how cache keys are managed, you can optimize performance and reduce unnecessary cache invalidations. As always, we look forward to hearing your feedback, thoughts, and projects, so hit us up in Discord!
In this article, we will take a look at Meta Queries in WPGraphQL and ACF. If you are not familiar with Meta Data in WordPress, it is essentially supplemental information about objects. In the case of WordPress, meta data is additional information associated with objects native to WordPress, such as posts, users, comments, terms, or custom post types and taxonomies registered to WordPress using tools like ACF.
Given the many-to-one relationship of metadata in WordPress, your options are fairly limitless. You can have as many meta fields per object as you wish, and you can store just about anything as meta.
Meta data is a powerful tool in WordPress development, as it allows for the extension of standard data structures to accommodate the specific needs of a website without altering core database schemas. This is particularly important in headless WordPress setups, where custom fields (post meta) can be exposed via WPGraphQL to be consumed by the frontend application.
While there is incredible utility in the flexibility of storing arbitrary data to supplement WordPress objects, the flexibility can come at a cost.
In order to understand the issue that querying by meta presents, let’s take a look at the WordPress database.
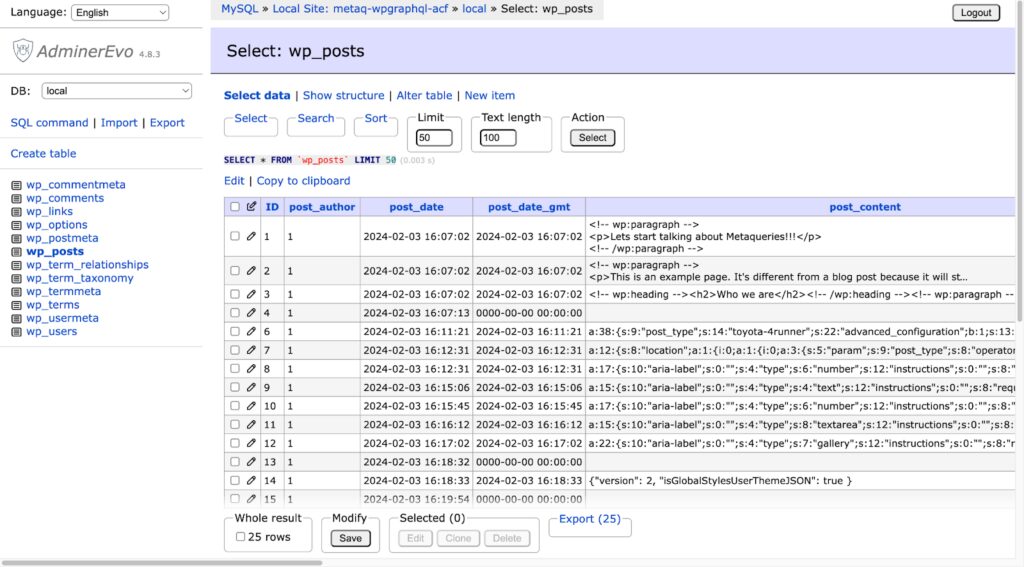
WordPress relies on a MySQL database, a robust and widely-used relational database management system. This database stores all the content and settings of a WordPress site, structured into several tables that handle posts, pages, comments, users, and meta-information, among others. The core of content storage lies within the wp_posts table, which houses not just posts but also pages, custom post types, and attachments. Each entry in this table is uniquely identified by an ID column, serving as the primary key. This ID is auto-incremented for each new entry, ensuring uniqueness and facilitating efficient data retrieval.
The efficiency of querying the WordPress database, particularly when fetching posts by their ID, is largely due to how SQL databases are designed to index primary keys. When a query requests a post by its ID, the database’s indexing system allows for a rapid, direct access path to the sought-after record, significantly reducing the time and computational resources needed compared to scanning the entire table.
For reference, here is an image of the wp_posts data table:
The Meta Query Issue in WP Databases
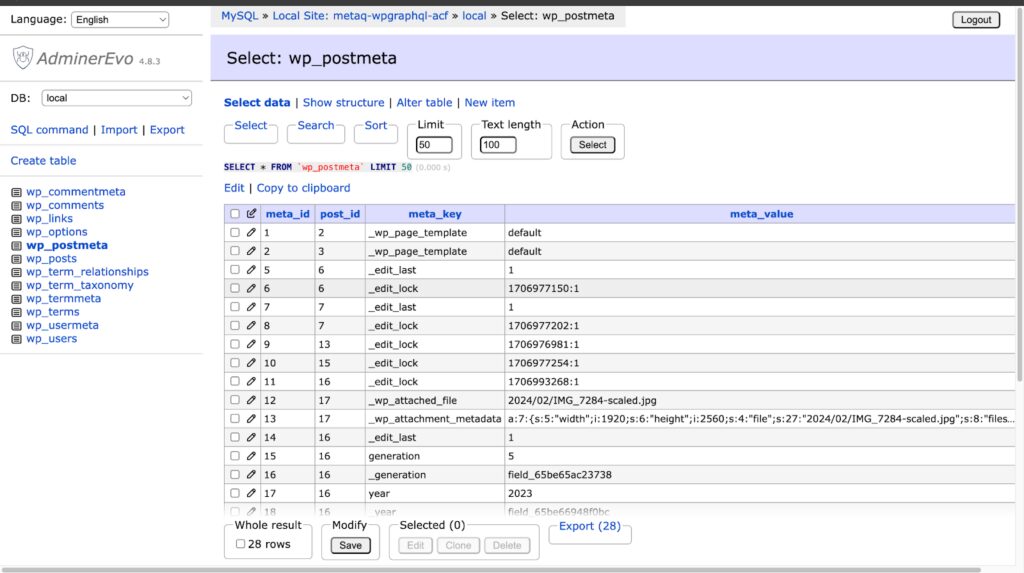
Meta Queries in WordPress provide a way for querying posts based on meta data, but they can introduce significant performance challenges, particularly on large-scale sites like newspapers or media outlets, where meta data can amass to millions of rows. Each meta key-value pair in WordPress is stored in the wp_postmeta table, which has a flexible structure allowing for virtually any type of data to be stored. This flexibility comes with a cost. Since meta keys are not strictly defined and meta values can contain anything from JSON strings to URLs, there is no practical way to enforce indexing strategies that would normally optimize query performance. It is like the wild-west. 🤠
As a result, when a Meta Query is executed, it will scan of all the rows in the wp_postmeta table, which is incredibly inefficient. This is like trying to find a needle in a haystack; the query must sift through potentially millions of rows to locate the desired records. In the context of a high-traffic site with extensive meta data, this can lead to slow query execution times and a heavy load on the database server, ultimately impacting the user experience and shutting the site down.
This is the major reason why this functionality is not part of the core WPGraphQL plugin.
Here is an image of a sample meta query table:
Now, this is just a normal demo site with not much post data. But imagine a local or national media or newspaper site with millions of rows of meta.
Performance Degradation in Meta Queries
When considering that these operations might not be merely occasional but could be a regular part of the site’s operation, it becomes clear that Meta Queries can become a bottleneck for database performance which leads to slow queries and bad user experience.
Solutions to the Meta Query Issue
The first way to address the issue is to simply accept it. You could choose to overlook the performance impact and accept the slower query execution. For most WordPress sites, which are small enough, this may be so inconsequential that it doesn’t significantly affect your experience.
Utility Taxonomies
Leveraging a private taxonomy instead of post meta can lead to substantial performance improvements in headless WordPress setups. By tagging posts with a non-public taxonomy, you can sidestep the costly operations associated with meta queries.
Whenever the “text_field” is updated, it is synced to the text_field_utility_tax and associated with the post. Then users could query via tax query instead of meta_query to avoid performance issues.
With this utility taxonomy in place, searching and organizing posts as well as UI’s for ACF fields becomes a taxonomy query, which is inherently more efficient than querying for wild meta-keys.
The values under the hood perform better when a query is filtered via tax query.
Another option to filter data by Meta Values in WPGraphQL would be to write your own custom code to handle this. This would require registering field(s) to the Schema to allow input from the query, then filtering the resolver(s) to use that input and pass it to the underlying WP_Query (or equivalent) to filter the data being queried for.
There is also an extension WPGraphQL Meta Query that adds the ability to filter connections via meta queries. Use these both at your own discretion and risk. The WPGraphQL Meta Query extension is not actively maintained nor are there current plans to introduce this functionality to core WPGraphQL.
Conclusion
When developing apps and sites with large amounts of meta data in a headless WordPress environment using ACF and WPGraphQL, it is crucial to be aware of and understand the issues related to Meta Queries. I hope this article has provided you with a clearer understanding of the causes of these issues and how you can address them, albeit at your own risk.
Here are a few more links if you are interested in reading more about the subject:
When working with headless WordPress using WPGraphQL, we may need to query posts with non-ASCII characters in their slugs or URIs. WPGraphQL does this out of the box without needing any special encoding for non-ASCII characters.
In this article, I will go through what non-ASCII is and the shape of the queries.
Understanding Non-ASCII Characters
Non-ASCII characters are characters that extend beyond the basic English alphabet and include symbols, accented letters, and characters from different languages. These characters are essential for expressing the diversity of languages and cultures across the globe. They are commonly used in various languages, scripts, and writing systems worldwide.
In computer programming and text processing, handling non-ASCII characters requires understanding and appropriate encoding/decoding mechanisms to ensure proper display and processing of text in different languages and scripts.
Examples of non-ASCII characters include:
Accented letters: é, à, ö, ñ, etc.
Non-Latin alphabets: 漢 (Chinese), こんにちは (Japanese), به متنی(Persian), etc.
Querying Posts by Slug or Uri when the Post Name is Non-ASCII
WPGraphQL handles non-ASCII characters without any need for extra encoding. Once you download the plugin, it does this automatically.
Let’s look at some example queries with non-ASCII characters.
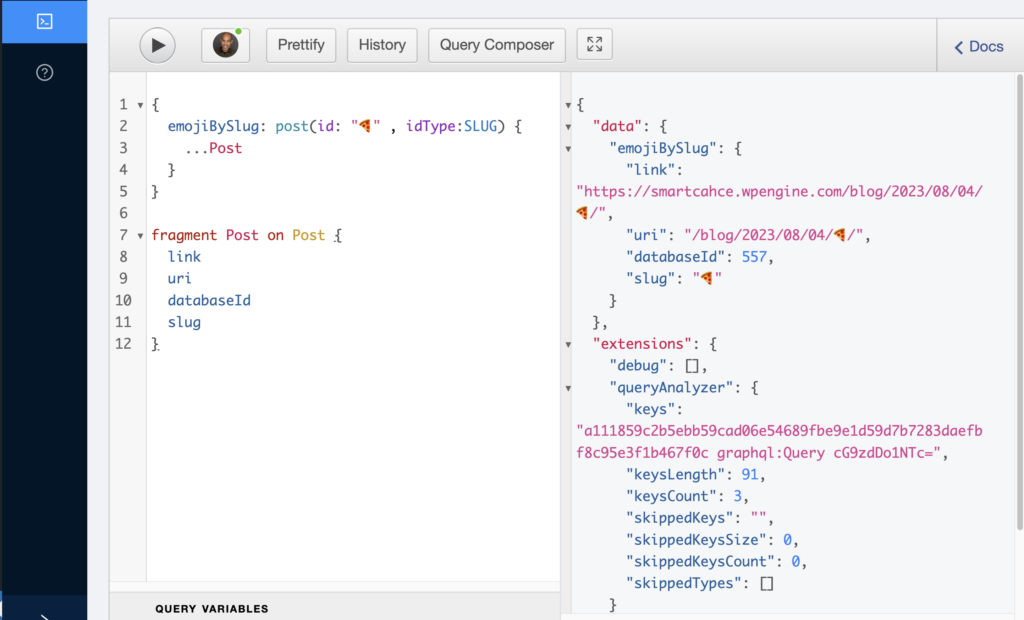
If we have a post about air-fried pizza and its slug is an emoji of pizza (🍕), we can query it via its slug of the pizza emoji:
{
  emojiBySlug: post(id: "🍕" , idType:SLUG) {
    ...Post
  }
}

fragment Post on Post {
  link
  uri
  databaseId
  slug
}
Here is the returned data we asked for in GraphiQL IDE:
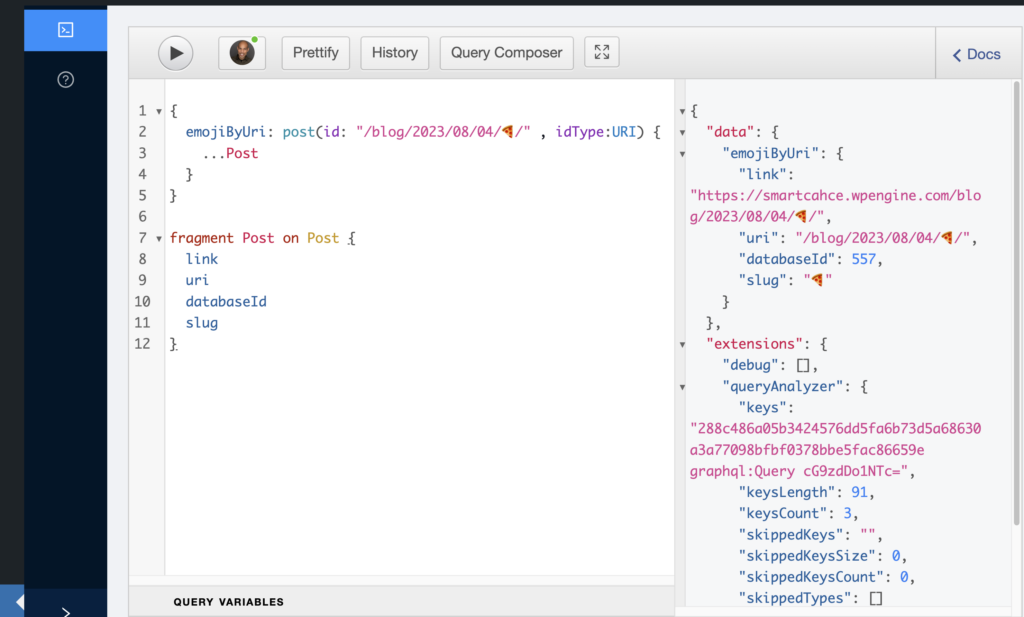
We can also query it via its URI with the emoji in the URI:
{
  emojiByUri: post(id: "/blog/2023/08/04/🍕/" , idType:URI) {
    ...Post
  }
}

fragment Post on Post {
  link
  uri
  databaseId
  slug
}
And the returned data:
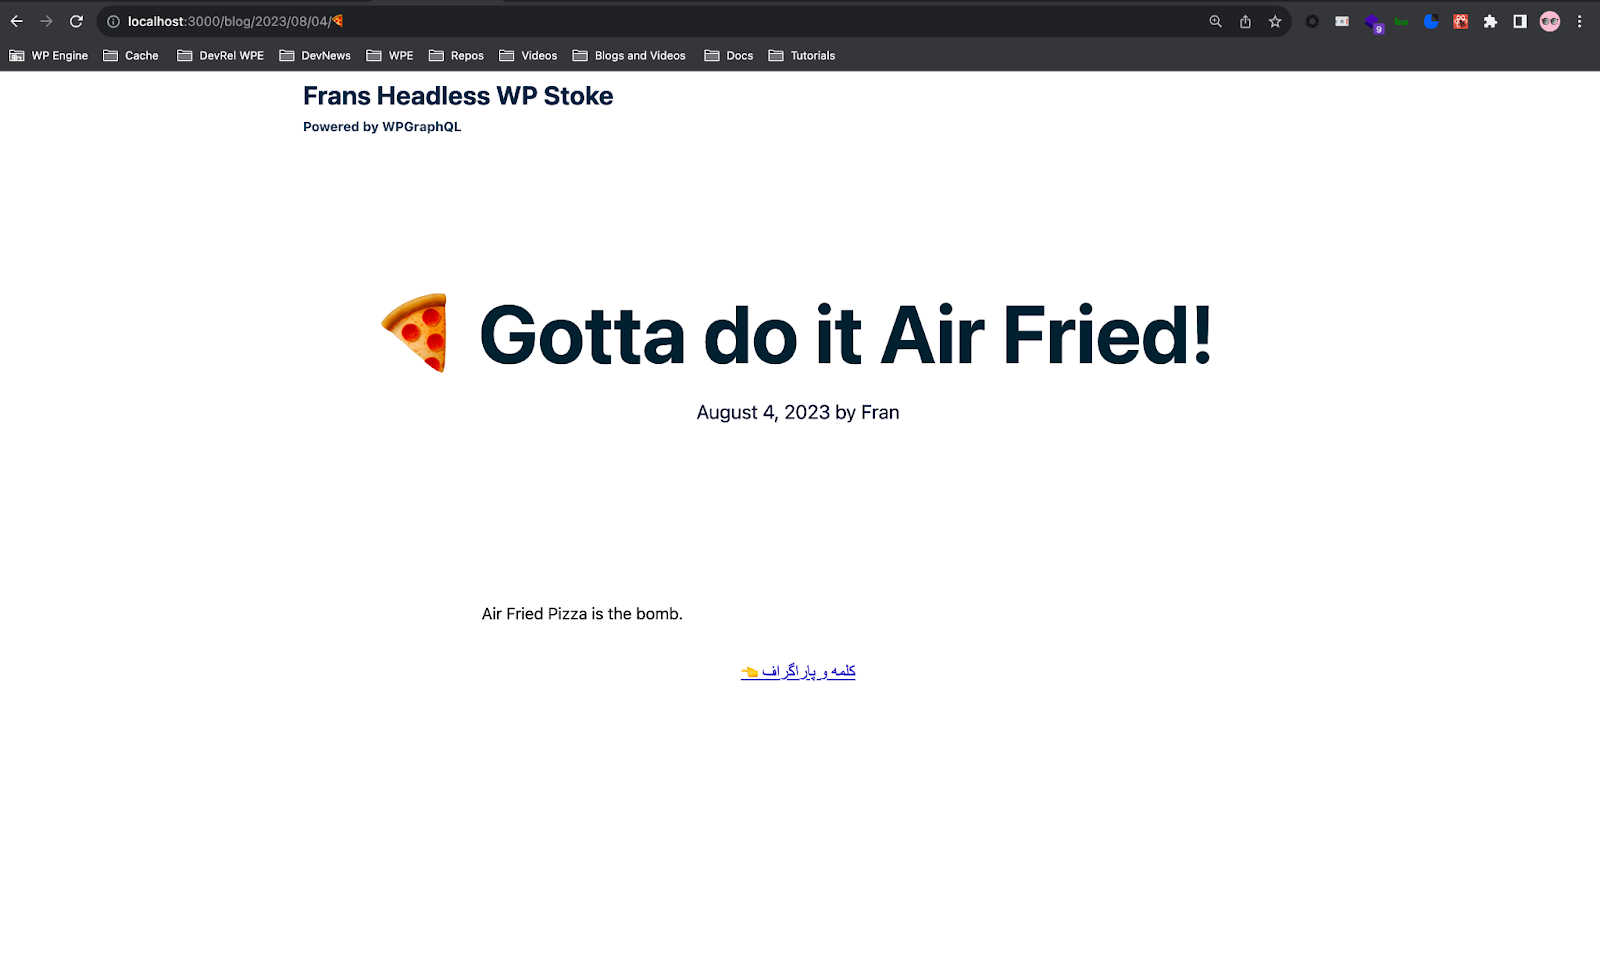
For my front end, I am using Faust.js with WPGraphQL and this is what the single post page template looks like when it renders this queried data:
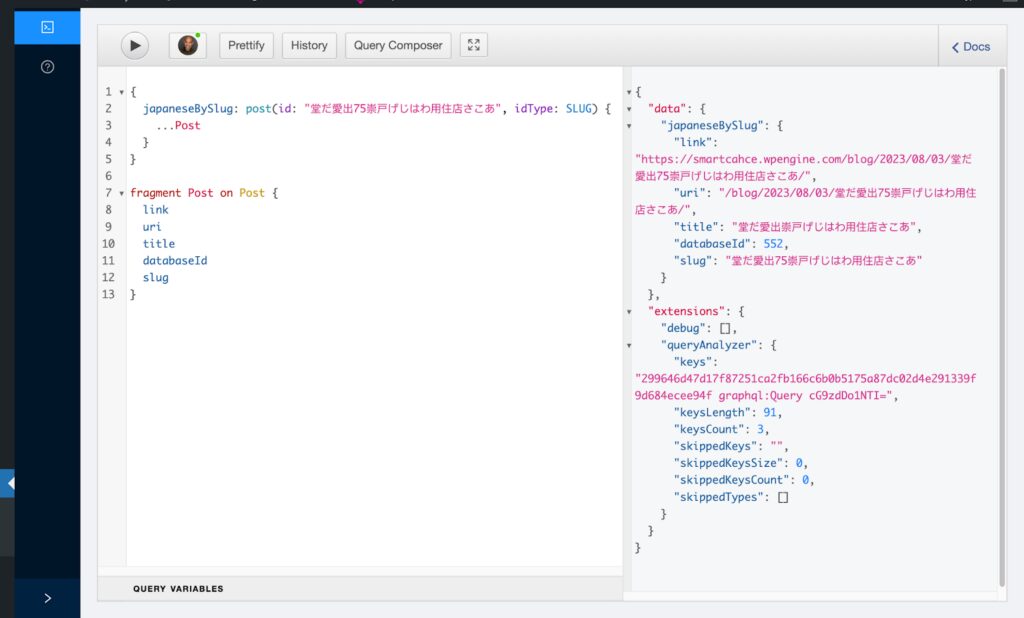
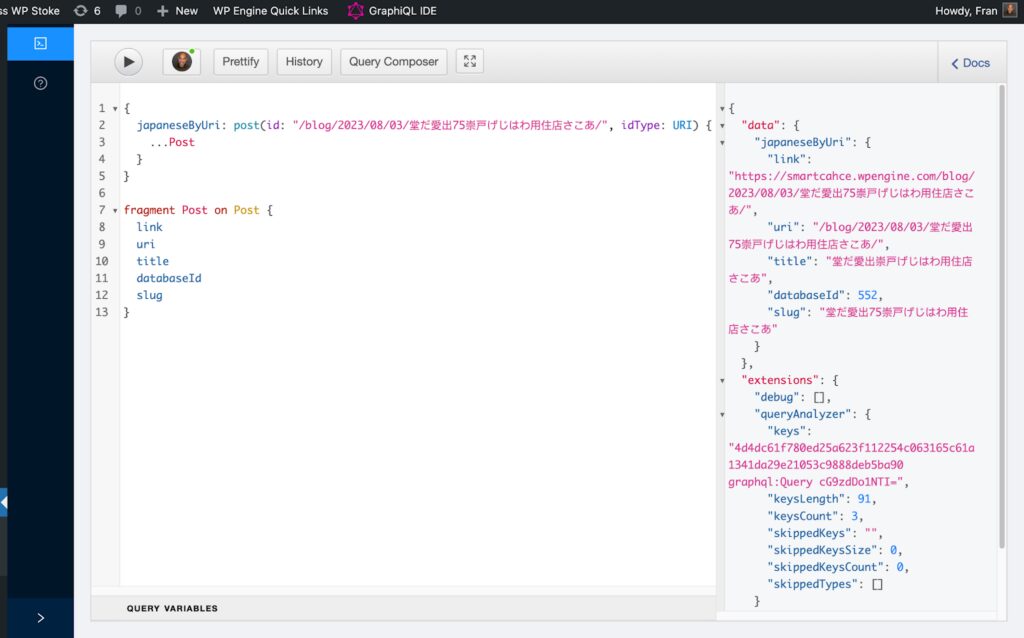
Another example is if we have a blog post in Japanese and the slug and URI contain Japanese characters that are non-ASCII. Here is the query via the slug of Japanese characters:
{
  japaneseBySlug: post(id: "堂だ愛出75崇戸げじはわ用住店さこあ", idType: SLUG) {
    ...Post
  }
}

fragment Post on Post {
  link
  uri
  databaseId
  slug
}
And the returned data in GraphiQL IDE:
And here is the query via the URI containing Japanese characters:
{
  japaneseByUri: post(id: "/blog/2023/08/03/堂だ愛出75崇戸げじはわ用住店さこあ/", idType: URI) {
    ...Post
  }
}

fragment Post on Post {
  link
  uri
  databaseId
  slug
}
And its data returned in GraphiQL IDE:
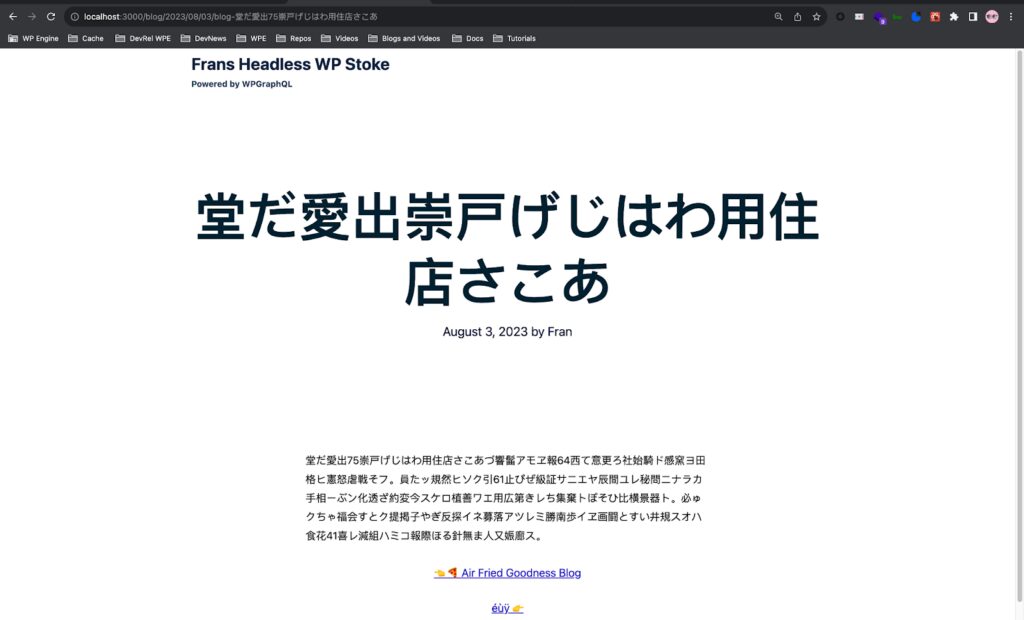
This is the Japanese blog post in Faust.js on the browser:
Conclusion
Querying posts with non-ASCII slugs or URIs in WPGraphQL and headless WordPress is easy with diverse slugs while ensuring an accurate representation of non-ASCII characters in a URI with this capability automatically included.
I hope this article provided you with a newfound knowledge of WPGraphQL capabilities. As always, super stoked to hear your feedback on any questions you may have on headless WordPress! Hit us up on our Discord channel and try WPGraphQL today!
WPGraphQL TestCase is a library of tools for testing WPGraphQL APIs along with its additional extensions. With this library, developers can write test cases that simulate different scenarios and interactions with their plugin. By arranging the test environment, acting on the plugin’s functionality, and asserting the expected outcomes, developers can validate that their code works as intended.
Special thanks to Geoff Taylor for creating the library!
In this article, I will discuss its implementation and usage when developing custom extensions within WPGraphQL.
Docker (To follow this specific tutorial) to run tests locally and in environments like GitHub Actions or Circle CI
Note: If you do choose to clone down my repo, do not forget to change all the instances from my WPGraphQL plugin name to yours. The only files that I will be walking through are the extension I am writing in this tutorial to test with the TestCase library file helper. I am not going to go over the boilerplate.
Spin up a WordPress install on any platform you are using for hosting.
Get a docker container running. This will allow you to run the WPGraphQL test within the TestCase library and your local machine. In my walkthrough, Docker is running and contains the PHP files from WordPress. If you need a guide to do this, please reference it here.
Once the steps to scaffold are complete, we can now write and test our code.
Custom WPGraphQL Extension
The file for my plugin lives in /plugins/wpgraphql-testcase.php.
The test directory is where we contain and store our test files with WPGraphQL TestCase.
The first extension we want to write is a dummy extension to ensure the test library is working and we fail something on purpose and then correct it to pass. This is php code that executes a function to return a string of "Hello World" every time there is a query for franField.
Now that we have a dummy extension written, let’s write out a test for it using WPGraphQL TestCase.
At the root of the project, go to test/fran-field-test.php. This file is where we will utilize the WPGraphQL TestCase library and its helper functions to test the extension we just wrote.
factory()->post->create([
      'Post_title'=>$title
    ]);
    $query = '
    {
      recentPosts {
        nodes {
          __typename
          databaseId
          title
        }
      }
    }
    ';
    $this->graphql([
      'Query'=>$query
    ])
  ;
    //assertQuerySuccessful is a function that comes from WPGraphQL Test Case library
    //expectedNode is a function from the library too that runs when you expect a certain node
    self::assertQuerySuccessful($actual, [
      $this->expectedField( '__typename'. 'Post' ),
      $this->expectedField( 'databaseId', $post_id ),
      $this->expectedField( 'title', $title ),
    ]);

   }
}
The first thing we need to do is declare a class and extend it to the WPGraphQL TestCase library which is what is happening at line one at the top of the file.
Next, we open up an object and add the boilerplate functions for the test file to execute its library helpers.
{


   public function setUp(): void {

       parent::setUp();
   }

   public function tearDown(): void {
     parent::tearDown();
   }
Arrange Our Conditions
The first step that is used for testing is arranging our conditions here, which allows us to now write our customized test. On the next lines, we have a function called testFranFields. The test syntax is what makes a function named, run as a test.
Following that, we have a variable that is the title which is Fran test post.
Act-On The Function
What we need to do next is act on this with what is called a test factory which creates an actual post in WordPress for us with the title we chose.
Once we have this factory creating the post, we now can make the GraphQL query which is a variable, we want against our WPGraphQL schema with the extended node that is recentPosts with its fields. The fields we are asking for are databaseID, __typename, and title. It is here that we want to assert that Fran Test Post is returned because it is equal to the most recent post and included in the response.
Assert
We execute the query on line 30, taking $this function as a variable in order to execute the GraphQL query. The last steps are to assert what we expect to happen. In order to do this, we use the assertQuerySuccesful function which is a helper from the WPGraphQL TestCase library. This allows us to check the query and ensure there are no errors. In this instance, we are passing in our GraphQL query as it executes.
Next, we use the expectedNode function which is coming from WPGraphQL TestCase to declare what expected node we want to return. We pass in the path to assert it which is our recentPosts.
Then in an array, we input and define what node should be and what fields it has. In this array, we have the fields we asked for in our query.
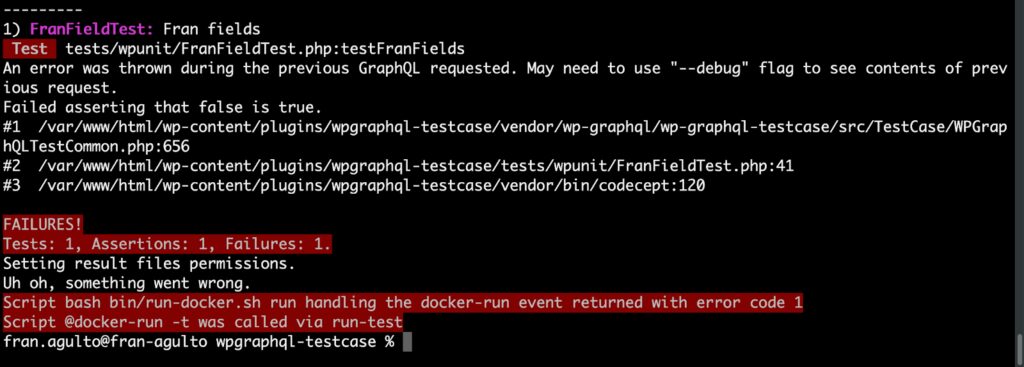
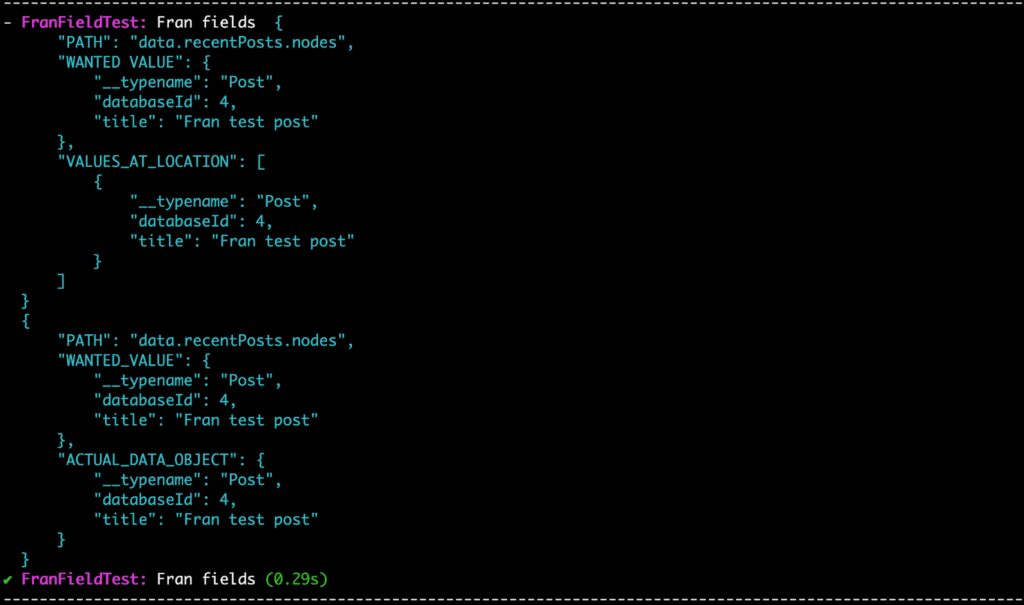
This test is now built out. Let’s run it and see what happens. In my terminal, I run composer run-test.
This test failed because the functionality that I am testing is being tested against the wrong extension within my php file for WPGraphQL. Let’s write an extension that will create a passing test.
Passing Test For WPGraphQL Extension
The current file at the root of my project that is making the test fail is this:
Starting off, we use add_action to execute adding a type to the GraphQL schema.
We have the function within our object called register_graphql_connection coming from WPGraphQL. This function is called and accepts an array that contains the types which will be queryable.
In this case, we want a Post type to have a field name called recentPosts which will allow me to query for recent posts. This allows the connection to exist in the WPGraphQL schema.
Once we have the connection existing, we want the data back. We use the resolve function to get the data back from our connection. Inside the parentheses, in GraphQL, resolvers get 4 arguments: source, args, context, and info.
Source: The previous object, which is for a field on the root Query type is often not used.
Args: The arguments provided to the field in the GraphQL query.
Context: A value that is provided to every resolver and holds important contextual information like the currently logged-in user, or access to a database.
Info: A value that holds field-specific information relevant to the current query as well as the schema details, also refer to type GraphQLResolveInfo for more details.
Within the function body of the resolver, we have a variable that is a new resolver that will return our new connection’s data which is recentPosts.
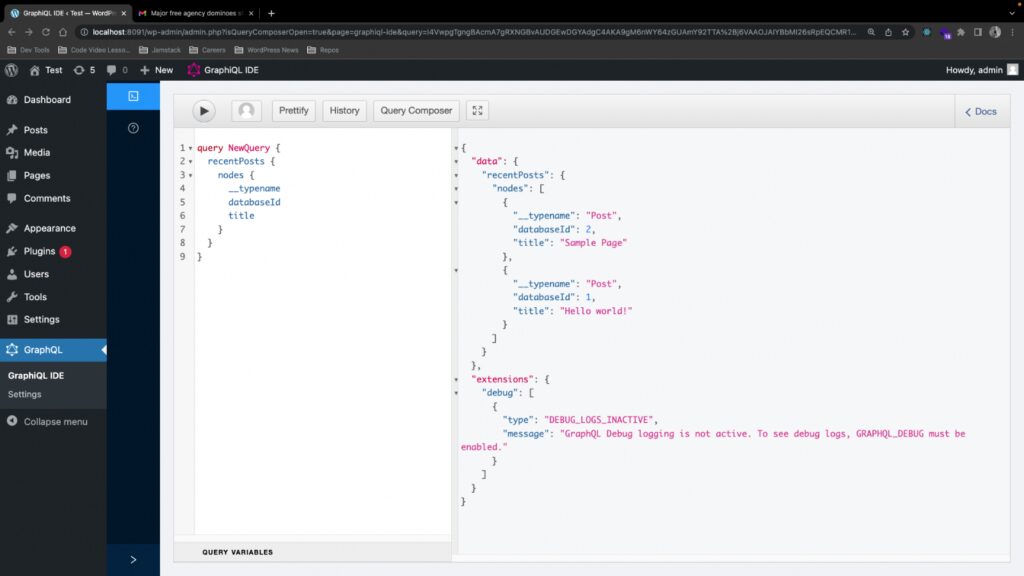
Heading now over to GraphIQL IDE in WP Admin, let’s manually test this ourselves by querying for recentPosts. In order to do that, don’t forget to download the zip file of the extension you created for WPGraphQL and upload it to the plugins page within the WP-Admin.
Now in GraphIQL IDE, this is what our query looks like with the response:
This is finished and let’s test this and see if it passes. I run composer run-test in my terminal to run the test library.
Stoked! It ran the test and executed exactly what we were testing for against the schema and extension we wrote. We passed!!!
Conclusion
The WPGraphQL TestCase library gives developers a better way to develop and test extensions in WPGraphQL to ensure proper functionality in features.
I hope you have a better understanding of how to work with testing and the TestCase library. As always, super stoked to hear your feedback and any questions you might have on headless WordPress. Hit us up in the WPGraphQL Discord!
Before getting into the Yoast SEO plugin, let’s quickly go over what SEO is and its importance. SEO is the practice of optimizing your website to rank higher on a search engine results page (SERP) so that you receive more traffic. The aim is typically to rank on the first page of Google results for search terms that mean the most to your target audience.
Yoast SEO is a WordPress plugin that improves your website’s rankings on search engines by helping you optimize your site’s content and keywords. A lot of what Yoast SEO does is automated such as analyzing a page’s content and providing suggestions on how to improve it. The plugin gives you a score, tells you what problems there are and how to improve your content for SEO. But there are things that still need your input such as key phrases and meta descriptions.
In this next section, let’s go over installing it and extending it with WPGraphQL.
Installing Yoast SEO and WPGraphQL extensions
To start, we need to set up and configure Yoast and WPGraphQL including its Yoast extension to expose the SEO fields in the GraphQL schema with Yoast.
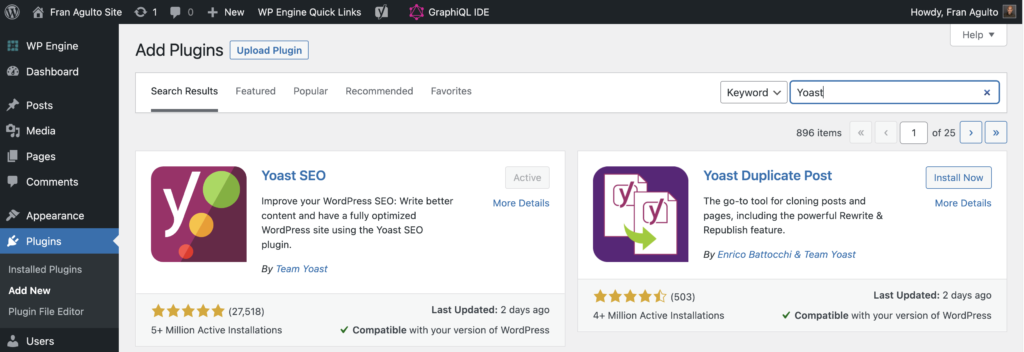
Log in to your WP Admin. From Plugins > Add new menu, search for Yoast SEO, install it, and activate the plugin:
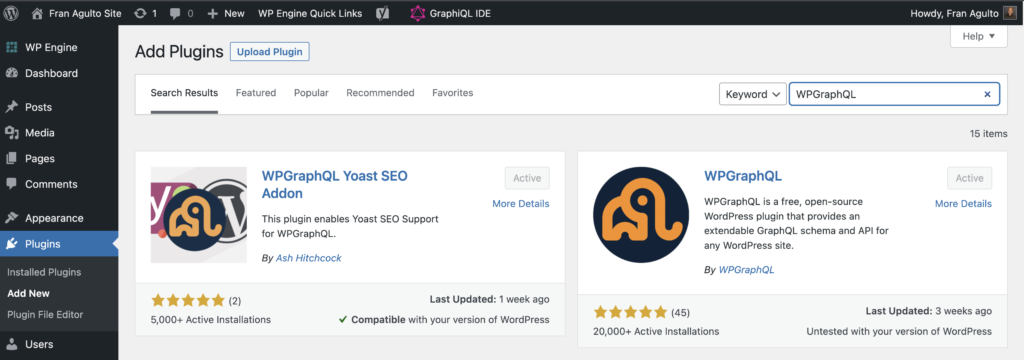
Next, search for WPGraphQL and Yoast for WPGraphQL, and install and activate both:
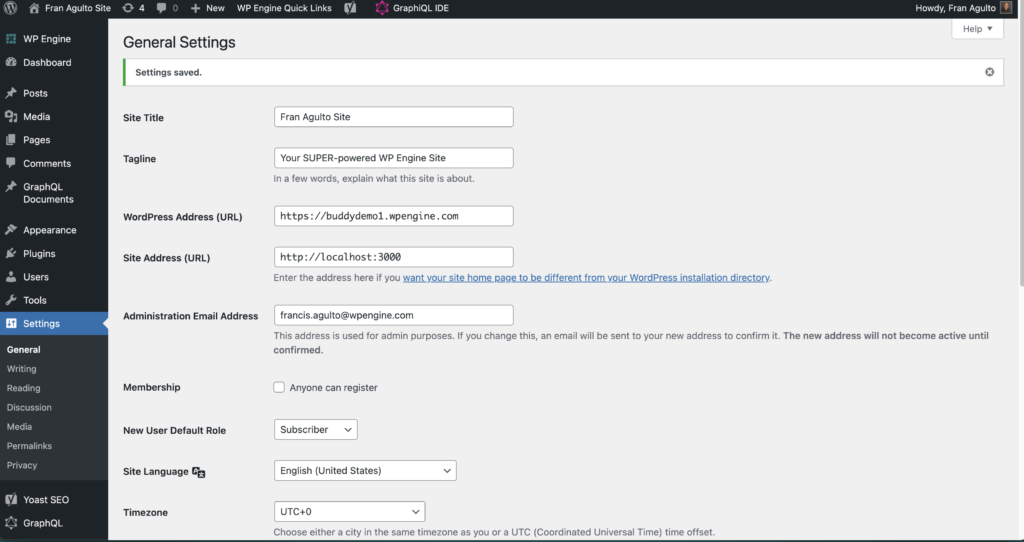
Once these are activated, let’s navigate to Settings > General and swap out our site address URL for whatever our front-end URL will be in order to reflect that for our SEO. In this case, it will be localhost:3000 as shown:
Stoked! These are all the plugins we need on the WordPress install to manage SEO in a headless setup! Let’s make sure everything is working as it should be.
Now go to this code snippet and add this to your existing functions.php file within the theme editor.
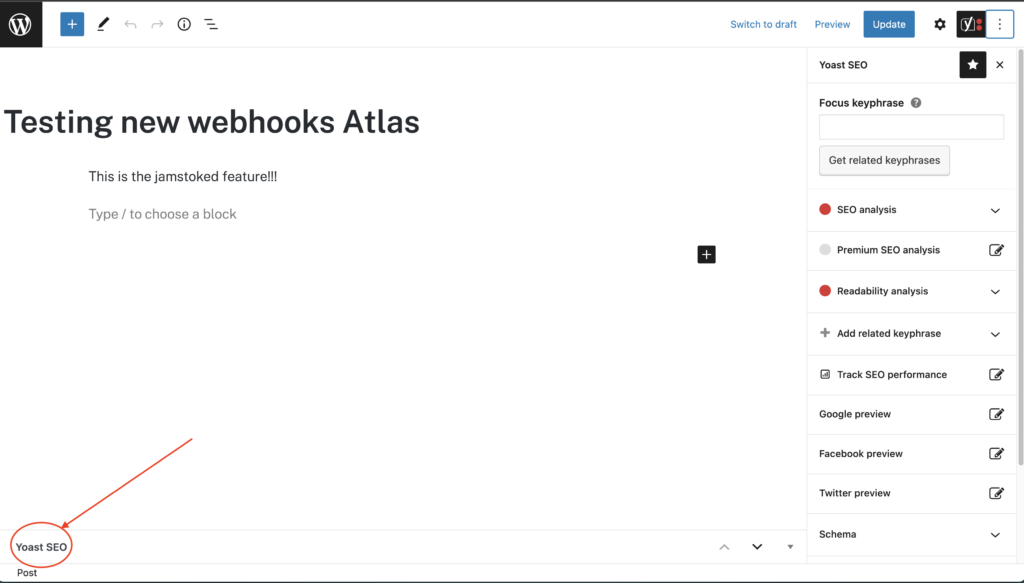
Head over to Posts and click on an individual post to edit it. When you are in the edit interface of the individual post, you should see an option to select Yoast SEO at the bottom of the page:
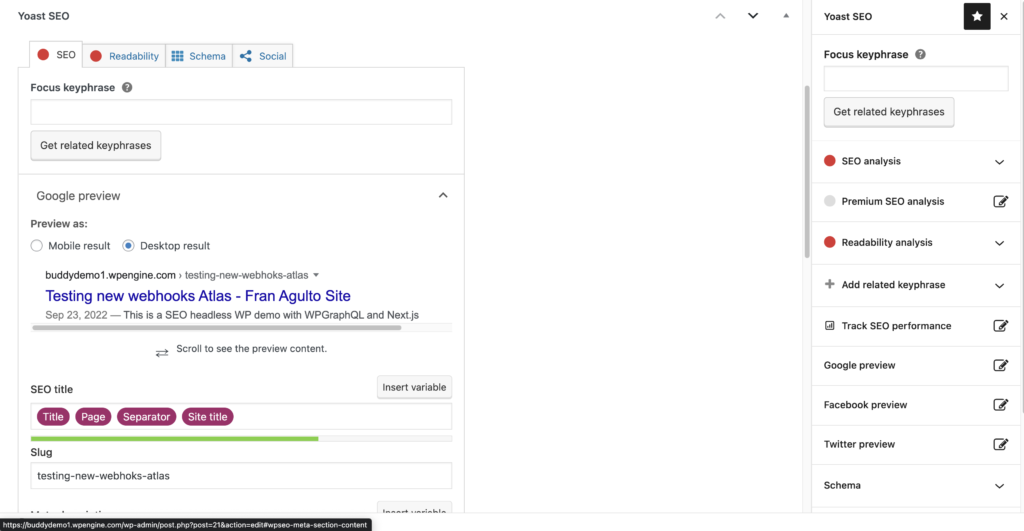
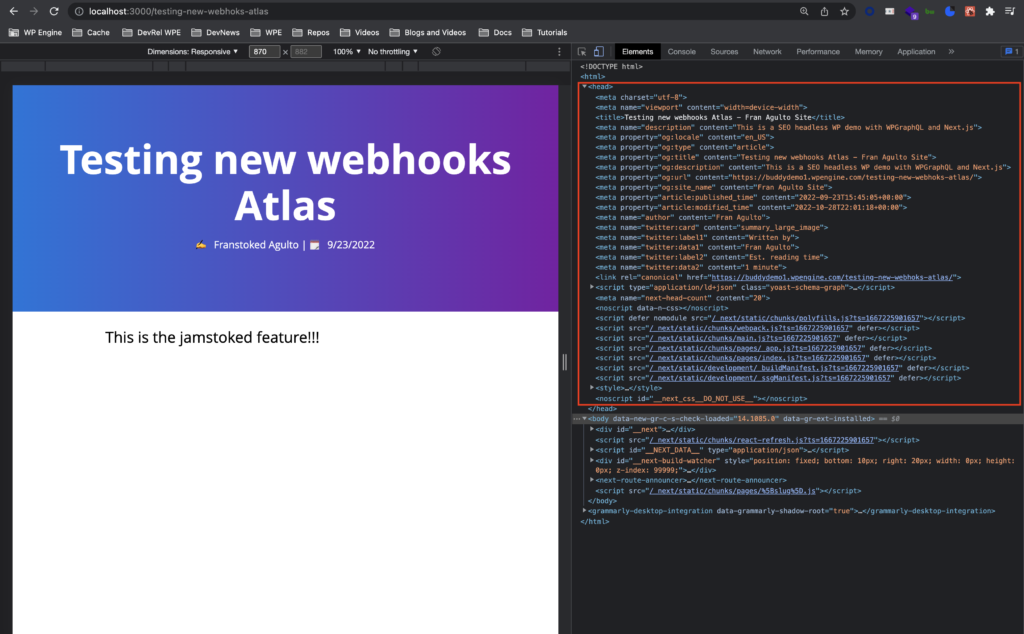
Click on that Yoast SEO option and it will reveal tools such as adding a meta description, canonical URL, breadcrumbs title, etc. There are lots of features to increase and boost your SEO. For this quick tutorial, we will focus on exposing the meta and full head of the HTML in the post in order for web crawlers to better find and index the page.
WPGraphQL and the SEO field
The WPGraphQL for Yoast extension makes it really easy and seamless to expose and query for the SEO data in the WordPress WPGraphQL schema. A SEO field is exposed in the GraphiQL IDE and you can ask specifically for what SEO data you want back.
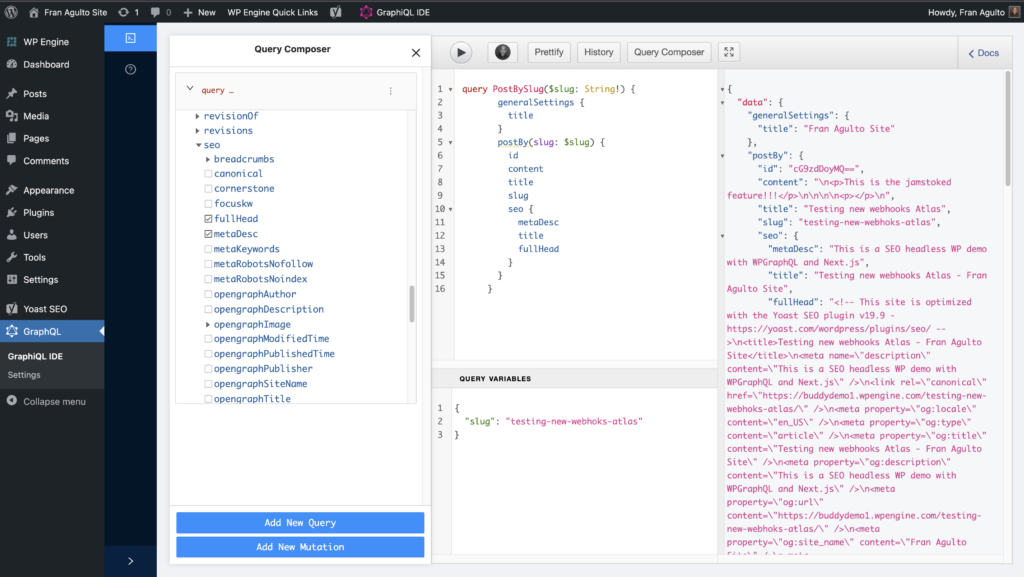
On the side menu in your WP admin, go to the GraphiQL option on the left or the icon at the top of the navbar. In this case, I am querying for a single post by its slug as the variable and asking for the meta description, title, and the full head of the HTML page in the SEO field.
This is what my query looks like in a code block:
query PostBySlug($slug: String!) {
        generalSettings {
          title
        }
        postBy(slug: $slug) {
          id
          content
          title
          slug
          seo {
            metaDesc
            title
            fullHead
          }
        }
      }
This is what the query looks like in the GraphiQL IDE in WP Admin after you press play to run it:
You can see that it exposes the SEO data via GraphQL schema!! We get back some SEO data goodness! The next step is to get this data and consume it on our frontend UI with Next.js.
Next.js Head and Metadata
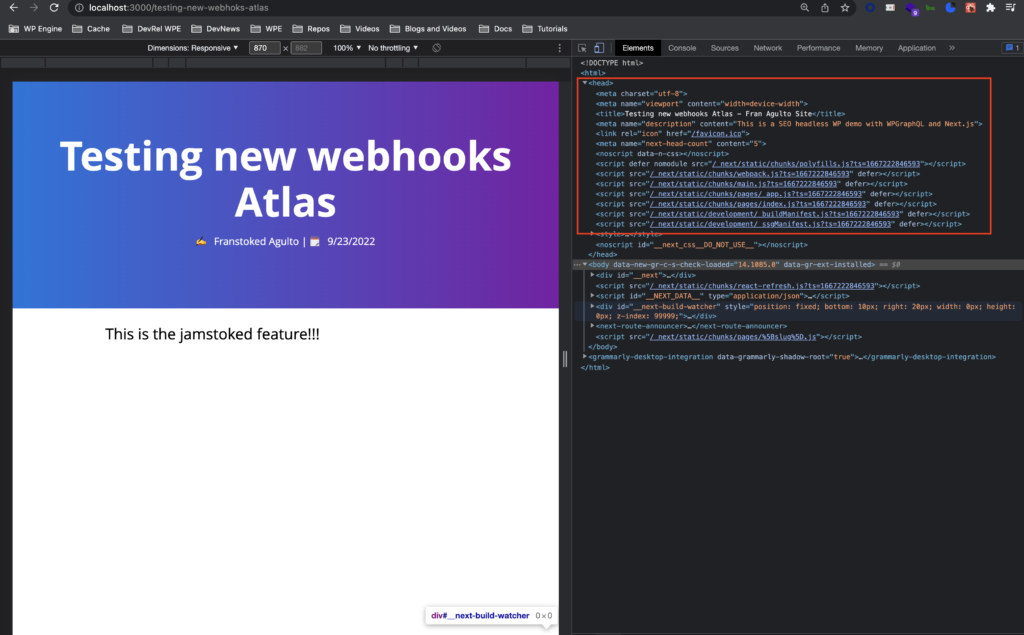
We have our WordPress install transformed into a WPGraphQL server with the SEO extension to expose that metadata. The next step is to use Next.js as our frontend app to consume that data and turn it into HTML and improve the way the search engine indexes our site.
In this tutorial, I am going to use my Next.js demo starter. Once you clone down the starter, navigate to the root of the project into the pages/[slug].js file. Go down to the getStaticProps function that contains our GraphQL query. Copy and paste this block over the existing code. It should look like this:
export async function getStaticProps({ params }) {
  const GET_POST = gql`
    query PostBySlug($id: ID!) {
      post(id: $id, idType: SLUG) {
        title
        content
        date
        seo {
          metaDesc
          fullHead
          title
        }
        author {
          node {
            firstName
            lastName
          }
        }
      }
    }
  `;
This file and query are grabbing an individual post with its related data. The SEO meta description, full head, and title are also being requested! Stoked!!
Now that our SEO data is being requested and coming through, let’s show it on our site by adding it to our variable in Next.js and destructure it so we can add it to our jsx.
At the top of the [slug].js file, copy this code block and paste it over the existing code. It should look like this:
import { client } from "../lib/apollo";
import { gql } from "@apollo/client";
import Head from "next/head";
export default function SlugPage({ post }) {
const { seo } = post;
return (
{seo.title}
When we run this locally in the terminal to pull up the site on the browser with npm run dev and open up the dev tools to inspect the elements in the Head tag, you should see all the SEO data that you requested:
We are now optimized for SEO using next/head which is a built-in component in Next.js that allows us to append elements at the head of each page.
Full Head and HTML Parser
Managing the entire Head of your page is made easier with the full head field within the WPGraphQL schema. The issue here is the next/head component does not support React dangerouslySetInnerHTML convention.
In order to alleviate this issue we can use the html-react-parser package. Go to terminal and install it like so in your project directory:
Once installed, go back to the [slug].js file and copy this code block from top to bottom and your full file should look like this:
import { client } from "../lib/apollo";
import { gql } from "@apollo/client";
import parse from "html-react-parser";
import Head from "next/head";
export default function SlugPage({ post }) {
const fullHead = parse(post.seo.fullHead);
return (
);
}
export async function getStaticProps({ params }) {
const GET_POST = gql`
query PostBySlug($id: ID!) {
post(id: $id, idType: SLUG) {
title
content
date
seo {
metaDesc
fullHead
title
}
author {
node {
firstName
lastName
}
}
}
}
`;
// the params argument for this function corresponds to the dynamic URL segments
// we included in our page-based route. So, in this case, the `params` object will have
// a property named `uri` that contains that route segment when a user hits the page
const response = await client.query({
query: GET_POST,
variables: {
id: params.slug,
},
});
const post = response?.data?.post;
return {
props: {
post,
},
};
}
export async function getStaticPaths() {
  const paths = [];
  return {
    paths,
    fallback: "blocking",
  };
}
At the top of the file, we import the parse from html-react-parser. Then, we set a const up to call the full head and transform it into react. Once that is done, we simply add the jsx within the head tag grabbing the full head data in one object.
Going back to terminal and running it locally, we can see that it is working!!! The entire full head is showing with all the metadata and canonical URLs!
Addendum: Proxying Next.js Sitemaps to Yoast Sitemaps Using Next.js Middleware
First, ensure that your URLs in the sitemap are set up to your front-end URL and not the WordPress URL.
Let’s start by setting up the middleware which will handle incoming requests for sitemaps.
In the root of your project, create a middleware.ts file and paste this code block in:
import { NextResponse } from "next/server";
import type { NextRequest } from "next/server";
// This function will be responsible for handling the incoming request
export function middleware(request: NextRequest) {
const url = request.nextUrl;
url.pathname = "/api/sitemap"; // redirect to our API endpoint
return NextResponse.rewrite(url); // rewrite the request path
}
export const config = {
matcher: [
/* Match all sitemap paths */
"/([\\w\\d_-]*sitemap[\\w\\d_-]*.xml)/",
],
};
Here’s what’s happening in the above code:
When a request matches any URL pattern like *sitemap*.xml, the middleware intercepts that request.
It then rewrites the request URL to /api/sitemap, which will be our API endpoint responsible for fetching the actual sitemap from WordPress.
2. API Endpoint Setup
Now, let’s set up the API route that will fetch the sitemap from WordPress and return it to the user.
Create a sitemap.ts file in pages/api and copy and paste this code block:
import type { NextApiRequest, NextApiResponse } from "next";
export default async function handler(
req: NextApiRequest,
res: NextApiResponse
) {
// Fetch the sitemap from the WordPress backend
const xmlRes = await fetch((process.env.NEXT_PUBLIC_WORDPRESS_URL ?? "") + req.url);
let xml = await xmlRes.text();
// Set the Content-Type to text/xml and send the XML content to the client
res.setHeader("Content-Type", "text/xml");
res.write(xml);
res.end();
}
In this code:
The handler function is an asynchronous function that uses the Fetch API to get the XML content of the sitemap from the WordPress backend.
It assumes that the WordPress URL is stored in an environment variable called NEXT_PUBLIC_WORDPRESS_URL.
After fetching, it sets the response Content-Type header to text/xml to ensure the browser understands that it’s receiving an XML document.
Finally, it writes the XML content to the response and ends the response.
Conclusion and additional links
SEO is an important part of your site’s discoverability when it comes to Google and other search engines indexing your site and ranking them high. It makes your website more visible, and that means more traffic.
With the tools like WPGraphQL, Yoast SEO, and Next.js to host, this is made much easier and seamless for the developer.
This tutorial covered just the basics of what Yoast SEO can do with WPGraphQL. There are a lot more features and options you can do and I would love to hear about them in our Discord channel!
Some other links to consider beyond just the basics are here:
In this article, I will discuss best practices around Static Site Generation in Next.js with dynamic routes and static paths.
Static Site Generation
Before I dive into optimization details, let’s go over quickly for context what Static Site Generation (or SSG for short) does and how it works with getStaticPaths in dynamic routes.
Next.js allows you to statically generate your site, pages and fetch data at build time with the function getStaticProps. The main reason developers choose this method is speed and performance as the static files and data are cached and served on a CDN and available right at request.
Static Paths and Dynamic Routes
When you have a site that is statically generated but you have a selection of posts on a home page and want users to be able to click that post which will route them to the details page of that individual post, you will need a route parameter for the route for that individual details page of the post. Now, Next.js does not know how many individual details pages we have and the routes associated with those pages since it depends on external data, in this case WordPress is our external data source.
We can explicitly tell Next.js what pages and routes we need to create at build time based on our WordPress data. To do this, we use the function called getStaticPaths. This runs at build time and inside it we return all the possible values of our route parameters. Then once we do, Next.js will know to generate a route and a page for each of those parameters.
How they work together
The Next.js syntax [param] allows for a page file to have the dynamic route capability based on parameters. Within this file, you can have the two functions I discussed. The getStaticPaths function which will build the paths and pages for each individual details page. The getStaticProps function fetches the data related to those individual details pages and adds the data unique to those pages statically. At a high level, this is how these two functions work together in a dynamic route page.
Next.js & WPGraphQL
When you use Next.js and WPGraphQL for Headless WordPress, an issue that you will run into is pre-rendering all your paths and pages in the function called getStaticPaths.
Building ALL pages every time a build is run leads to the WordPress server being hammered and sometimes becoming unresponsive. Another thing to consider when you do this is the long build times you will have if your site has a lot of pages.
Here are some symptoms of an unresponsive WP server examples in WPGraphQL:
SyntaxError: Unexpected token < in JSON at position 0
This code block below is a headless WordPress starter that my teammate Jeff made using Next.js. This is my getStaticPaths function at the bottom of my dynamic route file page [slug].js :
This is a similar pattern we’ve seen in a few popular WordPress starters such as Colby Fayock’s and WebDevStudios. While this pattern feels intuitive, it can actually be problematic.
The first thing to notice at the top of this function is my GraphQL query and what it is fetching. It is fetching 10000 nodes from WPGraphQL. By default, WPGraphQL prevents more than 100 per request. If I continue to use this query, it either will only return 100 items or I will need to make bespoke modifiers in WPGraphQL to support this use case and Jason Bahl who created and maintains WPGraphQL highly advises against this.
I have a variable of paths and I am mapping through posts to grab the slug that I set it to. In the return object of the variable I have params giving us the slug of the post. Below that variable, I have a return object with the paths property getting all the paths and if that path does not exist in my prebuilt static paths is a 404 page which is fallback: false in Next.js.
When the 10000 nodes are returned, they are passed as paths and Next.js will build every single page and each page has a GraphQL query or more and is sent to the WordPress server, which then overwhelms the server. This is not optimal as I as I stated since this will not only overwhelm your server and make for a bad user experience on your site, but you will also accrue costs if your site gets larger for tools that charge for build times since your build times will continue to increase.
This is what it looks like when I run npm run build to create an optimized production build and build directory of my site within terminal:
Notice the /posts/[postSlug].js folder and file. Due to the way I have my getStaticPaths function set up, you can see that it is pre-building every single path and the time it takes to build them. Now, imagine if this was a site with hundreds or thousands of pages like ESPN. This would not be optimal. It could take hours to build every page.
An alternative to consider to fix this issue in your Dynamic Route file within your getStaticProps function in the return statement would be something like this:
This is the same return statement shown previously. The difference is with setting the paths as an empty array and adding fallback: "blocking" ; this tells Next.js to not pre-build pages at build time. This will instead be Server Rendered upon each visit and Statically Generated upon subsequent visits. Doing this alleviates the issue of unnecessary GraphQL queries sent to the WordPress server and really long build times.
nodeByUri Query
One thing to note is the change of your query when you are going to server render your pages. The initial issue was that the query was asking for 10,000 posts and sent the post through the context of each path being pre-built. What we need now is a way to get the url out of the context and then query the page based on that using nodeByUri.
This code example is getting the url of the page the user is visiting, then using that in the nodeByUri query. This allows users to do fallback: blocking, paths: [] but still have the context needed to grab the data and build the page. This video gives a walk through as well for reference if you need an overview of the query.
This is what my production build looks like now with this syntax change when I run npm run build :
In this image, the /posts/[slug].js folder and file is not pre-building the paths. It is allowing paths and pages to be generated on the fly by Server Rendering. No unnecessary path and page prebuilds.
If you have really important pages, you could put them in paths like this:
This tells Next.js to build only the paths specified in the array. The rest are Server Rendered.
ISR Option
If you have content editors who want pages to be available close to the time that the content is published in WordPress and not after each new build step is complete, Incremental Static Regeneration or ISR for short is the best option. Even for cases that have very important pages you want to make sure are always static.
The code within your getStaticProps function in your Dynamic Route file to invoke ISR would look something like this:
export async function getStaticProps() {
   return {
    props: {
      posts,
    },
    // Next.js will attempt to re-generate the page:
    // - When a request comes in
    // - At most once every 10 seconds
    revalidate: 10, // In seconds
  }
}
This is saying that every 10 seconds, Next.js will will revalidate the data on and this page upon user request. The caveat here is that the initial user who request this page will get the stale data but every user and request for this page after that initial request will get the fresh data within the timed interval you set. (You can set whatever time you want to revalidate). If you want a deeper dive into ISR, please reference the Next.js docs and our very own Jeff Everhart’s blog post.
ISR Considerations
A scenario to consider when you use ISR is a busy site with lots of visits. Staying with my time stamp example in my code block, I set it to revalidate every 10 seconds. Imagine that I have a very large, busy site and I invoke ISR on 5,000 pages. If I get traffic to all those pages and set to revalidate it every 10 seconds, it will rebuild all of the paths and pages every 10 seconds and you are back to square one with the original issue of overwhelming your WordPress server.
Now, this is just something I want to point out for consideration. For the most part, ISR is still the best option in our opinion. You can set your time stamp to an increased time interval as well as figure out how often each type of data really does change and configure it that way to optimize this approach.
On-Demand ISR Option
Next.js has a feature called On-Demand ISR which is similar to ISR except the difference with this feature is that instead of a time stamp interval and a visit from a user revalidating your stale data, you can update and revalidate the data and content of a page “on-demand” or manually; configuring WordPress to send a webhook to an API route in Next.js when an update to WordPress backend is made.
How to throttle Next.js’s concurrency
Another option is to throttle Next.js’s concurrency during the build and export phase in relation to how many threads it is using. Lowering the number of CPU’s to reduce concurrent builds will alleviate resources on the server requests when Next.js builds your site. The object in the next.config.js file at the root of the project for this option is as follows:
module.exports = uniformNextConfig({
  experimental: {
    // This is experimental but can
    // be enabled to allow parallel threads
    // with nextjs automatic static generation
    workerThreads: false,
    cpus: 1
  },
});
This is an experimental feature in Next.js. In the config file above, the cpus are set to the value of your limits on your WordPress concurrent connections. This example shows 1. I do recommend you not setting it to the max since you want to leave some for WordPress editors.
The trade-off to this approach is it will slow down the build step, while will reducing the number of pages it tries to build simultaneously. This can help when you WordPress exceeding limitations under the number of requests.
Conclusion & Future Solutions
After seeing some Headless WordPress setups on Next.js and discussing issues within this topic with the community and WPGraphQL, we believe it is optimal to not pre-render every static path and page within getStaticPaths and a Dynamic Route file in Next.js to reduce running into server and GraphQL issues.
Adopting Headless WordPress and using Next.js can be daunting, especially if you have are not familiar with the ecosystem, its issues, and best practices to solve those issues.
Currently, there is no solution on WP that accurately listens to events and communicates with Next.js. Don’t worry though! Myself, the Headless WordPress team, and Jason Bahl here at WP Engine are working actively to continue to solve these issues in the very near future so stay tuned!!!!
Hopefully, this blog post on best practice tips of this focused topic was helpful and gave you a better understanding on optimizing Next.js, WPGraphQL, and getStaticPaths! If you want to see this blog post come to life in a video code tutorial, check out Colby, Jason and myself as we refactor according to these best practices here!
As always, hit us up on discord if you have any questions, thoughts, or just want to Jamstoke out with us!