I recently published a video walking through how End to End tests are set up for WPGraphQL, but I thought it would be good to publish a more direct step-to-step tutorial to help WordPress plugin developers set up End 2 End tests for their own WordPress plugins.
Setting up End to End tests for WordPress plugins can be done in a number of ways (Codeception, Cypress, Ghost Inspector, etc), but lately, the easiest way I’ve found to do this is to use the @wordpress/env and @wordpress/scripts packages, distributed by the team working on the WordPress Block Editor (a.k.a. Gutenberg), along with GitHub Actions.
If you want to skip the article and jump straight to the code, you can find the repo here: https://github.com/wp-graphql/wp-graphql-e2e-tests-example
What are End to End tests?
Before we get too far, let’s cover what end to end tests even are.
When it comes to testing code, there are three common testing approaches.
- Unit Tests: Testing individual functions
- Integration Tests: Testing various units when integrated with each other.
- End to End Tests (often called Acceptance Tests): Testing that tests the application as an end user would interact with it. For WordPress, this typically means the test will open a browser and interact with the web page, click buttons, submit forms, etc.
For WPGraphQL, the majority of the existing tests are Integration Tests, as it allows us to test the execution of GraphQL queries and mutations, which requires many function calls to execute in the WPGraphQL codebase and in WordPress core, but doesn’t require a browser to be loaded in the testing environment.
The End to End tests in WPGraphQL are for the GraphiQL IDE tools that WPGraphQL adds to the WordPress dashboard.
What’s needed for End to End Tests with WordPress?
In order to set up End to End tests for WordPress, we need a way for the test suite to visit pages of a WordPress site and interact with the web page that WordPress is serving. We also need a way to write programs that can interact with the Web Page, and we need to be able to make assertions that specific behaviors are or are not happening when the web page(s) are interacted with. We also need a way for this to run automatically when our code changes.
Let’s break down how we’ll tackle this:
- @wordpress/env: Sets up a WordPress environment (site) for the test suites to interact with
- @wordpress/scripts: Runs the tests using Puppeteer and Jest. This lets our tests open the WordPress site in a Chrome browser and interact with the page.
- Puppeteer: A Node library which provides a high-level API to control Chrome or Chromium over the DevTools Protocol. Puppeteer has APIs that we will use to write tests that interact with the pages.
- Jest: JavaScript Testing Framework with a focus on simplicity
- GitHub Actions: We’ll be using GitHub actions for our Continuous Integration. You should be able to apply what is covered in this post to other CI tools, such as CircleCI.
Setting up our dependencies
I’m going to assume that you already have a WordPress plugin that you want to add tests to. But, if this is your first time building a WordPress plugin, you can see this commit to the example plugin to see what’s needed to get a basic WordPress plugin set up, with zero functionality.
If you do not have a package.json already, you’ll need to create a new package.json file, with the following:
{
  "name": "wp-graphql-e2e-tests-example",
  "version": "0.0.1",
  "description": "An example plugin showing how to set up End to End tests using @wordpress/env and @wordpress/scripts",
  "devDependencies": {},
  "scripts": {},
}
npm “devDependencies”
???? If you don’t already have node and npm installed on your machine, you will need to do that now.
We need the following “dev dependencies” for our test suite:
- @wordpress/e2e-test-utils
- @wordpress/env
- @wordpress/jest-console
- @wordpress/jest-puppeteer-axe
- @wordpress/scripts
- expect-puppeteer
- puppeteer-testing-library
The difference between “dependencies” and “devDependencies” is that if you are bundling a JavaScript application for production, the “dedpendencies” will be included in the bundles for use at runtime, but “devDependencies” are only used during development for things like testing, linting, etc and are not included in the built application for use at runtime. We don’t need Jest or Puppeteer, etc in our runtime application, just while developing.
We can install these via the command line:
npm install @wordpress/e2e-test-utils @wordpress/env @wordpress/jest-console @wordpress/jest-puppeteer-axe @wordpress/scripts expect-puppeteer puppeteer-testing-library --dOr you can paste the devDependencies in the package.json and run npm install.
Whether you install via the command line or pasting into package.json, the resulting devDependencies block in your package.json should look like the following:
"devDependencies": {
  "@wordpress/e2e-test-utils": "^6.0.0",
  "@wordpress/env": "^4.2.0",
  "@wordpress/jest-console": "^5.0.0",
  "@wordpress/jest-puppeteer-axe": "^4.0.0",
  "@wordpress/scripts": "^20.0.2",
  "expect-puppeteer": "^6.1.0",
  "puppeteer-testing-library": "^0.6.0"
}
Adding a .gitignore
It’s also a good idea to add a .gitignore file to ensure we don’t version the node_modules directory. These dependencies are only needed when developing, so they can be installed on the machine that needs them, when needed. They don’t need to be versioned in the project. I’ve also included an ignore for .idea which are files generated by PHPStorm. If your IDE or operating system includes hidden files that are not needed for the project, you can ignore them here as well.
# Ignore the node_modules, we don't want to version this directory
node_modules

# This ignores files generated by JetBrains IDEs (I'm using PHPStorm)
.idea
At this point, we have our package.json and our .gitignore setup. You can see this update in this commit.
Setting up the WordPress Environment
Now that we’ve got the initial setup out of the way, let’s move on to getting the WordPress environment set up.
The @wordpress/env package is awesome! It’s one, of many, packages that have been produced as part of the efforts to build the WordPress block editor (a.k.a. Gutenberg). It’s a great package, even if you’re not using the block editor for your projects. We’re going to use it here to quickly spin up a WordPress environment with our custom plugin active.
Adding the wp-env script
The command we want to run to start our WordPress environment, is npm run wp-env start, but we don’t have a script defined for this in our `package.json`.
Let’s add the following script:
...
"scripts": {
  "wp-env": "wp-env"
}
You can see the commit making this change here.
Start the WordPress environment
With this in place, we can now run the command: npm run wp-env start
You should see output pretty similar to the following:
> wp-graphql-e2e-tests-example@0.0.1 wp-env
> wp-env "start"

WordPress development site started at http://localhost:8888/
WordPress test site started at http://localhost:8889/
MySQL is listening on port 61812
MySQL for automated testing is listening on port 61840
Two WordPress environments are now running. You can click the links to open them in a browser.
And just like that, you have a WordPress site up and running!
Stopping the WordPress environment
If you want to stop the environment, you can run npm run wp-env stop.
This will generate output like the following:
> wp-graphql-e2e-tests-example@0.0.1 wp-env
> wp-env "stop"

✔ Stopped WordPress. (in 1s 987ms)
And visiting the url in a browser will now 404, as there is no longer a WordPress site running on that port.
Configuring wp-env
At this point, we’re able to start a WordPress environment pretty quickly, but, if we want to be able to test functionality of our plugin, we’ll want the WordPress environment to start with our plugin active, so we can test it.
We can do this by adding a .wp-env.json file to the root of our plugin, and configuring the environment to have our plugin active when the environment starts.
Set our plugin to be active in WordPress
At the root of the plugin, add a file named .wp-env.json with the following contents:
{
  "plugins": [ "." ]
}
We can use this config file to tell WordPress which plugins and themes to have active by default, and we can configure WordPress in other ways as well.
In this case, we’ve told WordPress we want the current directory to be activated as a plugin.
You can see this change in this commit.
Login and verify
Now, if you start the environment again (by running npm run wp-env start), you can login to the WordPress dashboard to see the plugin is active.
You can login at: http://localhost:8888/wp-admin using the credentials:
- username: admin
- password: password
Then visit the plugins page at: http://localhost:8888/wp-admin/plugins.php
You should see our plugin active:
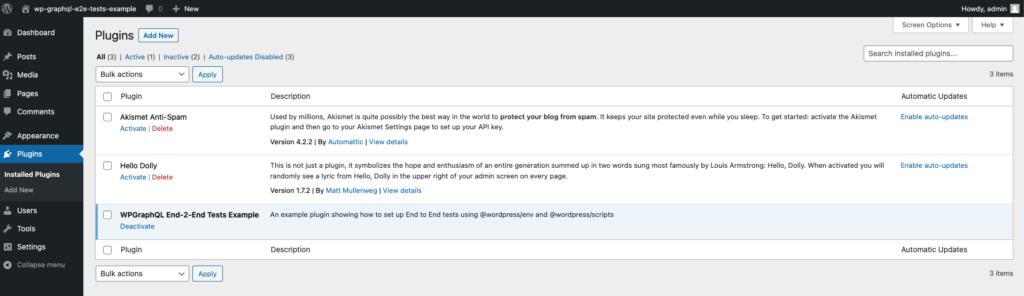
Running tests
Now that we’re able to get a WordPress site running with our plugin active, we’re ready to start testing!
At this point, there are 2 more things we need to do before we can run some tests.
- write some tests
- define scripts to run the tests
Writing our first test
Since our plugin doesn’t have any functionality to test, we can write a simple test that just makes an assertion that we will know is always true, just so we can make sure our test suites are running as expected.
Let’s add a new file under /tests/e2e/example.spec.js.
The naming convention *.spec.js is the default naming convention for wp-scripts to be able to run the tests. We can override this pattern if needed, but we won’t be looking at overriding that in this post.
Within that file, add the following:
describe( 'example test', () => {

    it( 'works', () => {
        expect( true ).toBeTruthy()
    })

})
This code is using two global methods from Jest:
- describe: Creates a block of related tests
- it: A function used to run a test (this function is an alias of the “test” function)
Adding scripts to run the tests
In order to run the test we just wrote, we’ll need to add some test scripts to the package.json file.
Right above where we added the wp-env script, paste the following scripts:
"test": "echo \"Error: no test specified\" && exit 1",
"test-e2e": "wp-scripts test-e2e",
"test-e2e:debug": "wp-scripts --inspect-brk test-e2e --puppeteer-devtools",
"test-e2e:watch": "npm run test-e2e -- --watch",
These scripts work as follows:
npm run test: This will return an error that a specific test should be specifiednpm run test-e2e: This will run any tests that live under the tests/e2e directory, within files named *.spec.jsnpm run test-e2e:debug: This will run the e2e tests, but with Puppeteer devtools, which means a Chrome browser will open and we can watch the tests run. This is super handy, and a lot of fun to watch.npm run test-e2e:watch: This will watch as files change and will re-run the tests automatically when changes are made.
Run the tests
Now that we have a basic test in place, and our scripts configured, let’s run the test command so we can see how it works.
In your command line, run the command npm run test-e2e.
This will run our test suite, and we should see output like the following:
> wp-graphql-e2e-tests-example@0.0.1 test-e2e
> wp-scripts test-e2e

Chromium is already in /Users/jason.bahl/Sites/libs/wp-graphql-e2e-tests-example/node_modules/puppeteer-core/.local-chromium/mac-961656; skipping download.
 PASS  tests/e2e/example.spec.js
  example test
    ✓ works (2 ms)

Test Suites: 1 passed, 1 total
Tests:       1 passed, 1 total
Snapshots:   0 total
Time:        0.434 s, estimated 1 s
Ran all test suites.
Amazing! Our first test that checks if true is indeed truthy, worked! Great!
Just to make sure things are working as expected, we can also add a test that we expect to fail.
Under our first test, we can add:
  it ( 'fails', () => {
    expect( false ).toBeTruthy()
  })
This test should fail.
If we run the script again, we should see the following output:
> wp-graphql-e2e-tests-example@0.0.1 test-e2e
> wp-scripts test-e2e

Chromium is already in /Users/jason.bahl/Sites/libs/wp-graphql-e2e-tests-example/node_modules/puppeteer-core/.local-chromium/mac-961656; skipping download.
 FAIL  tests/e2e/example.spec.js
  example test
    ✓ works (1 ms)
    ✕ fails (73 ms)

  ● example test › fails

    expect(received).toBeTruthy()

    Received: false

       6 |
       7 |     it ( 'fails', () => {
    >  8 |         expect( false ).toBeTruthy()
         |                         ^
       9 |     })
      10 |
      11 | })

      at Object. (tests/e2e/example.spec.js:8:25)

Test Suites: 1 failed, 1 total
Tests:       1 failed, 1 passed, 2 total
Snapshots:   0 total
Time:        0.519 s, estimated 1 s
Ran all test suites.
We can delete that 2nd test now that we’re sure the tests are running properly.
You can see the state of the plugin at this commit.
Testing that our plugin is active
Right now, testing that true is truthy isn’t a very valuable test. It shows that the tests are running, but it’s not ensuring that our plugin is working properly.
Since our plugin doesn’t have any functionality yet, we don’t have much to test.
One thing we can do to get familiar with some of the test utilities, is testing that the plugin is active in the Admin.
To do this we will need to:
- Login to WordPress as an admin user
- Visit the plugins page
- Check to see if our plugin is active.
- As a human, we can see a plugin is active because it’s highlighted different than inactive plugins. A machine (our tests) can see if a plugin is active by inspecting the HTML and seeing if the plugin has certain attributes.
Writing the test
In our example.spec.js file, we can add a new test. Go ahead and paste the following below the first test.
it ( 'verifies the plugin is active', async () => {
  // Steps:
  // login as admin
  // visit the plugins page
  // assert that our plugin is active by checking the HTML
});
Right now, these steps are just comments to remind us what this test needs to do. Now, we need to tell the test to do these things.
Login as Admin
One of the dependencies we added in our package.json, was @wordpress/e2e-test-utils. This package has several helpful functions that we can use while writing e2e tests.
One of the helpful functions is a loginUser function, that opens the login page of the WordPress site, enters a username and password, then clicks login.
The loginUser function accepts a username and password as arguments, but if we don’t pass any arguments, the default behavior is to login as the admin user.
In our /tests/e2e/example.spec.js file, let’s import the loginUser function at the top of the file:
import { loginUser } from '@wordpress/e2e-test-utils'Then, let’s add this function to our test:
it ( 'verifies the plugin is active', async () => {

  // login as admin
  await loginUser();

  // visit the plugins page
  // assert that our plugin is active by checking the HTML

});
Visit the Plugins Page
Next, we want to visit the plugins page. And we can do this with another function from the @wordpress/e2e-test-utils package: visitAdminPage().
Let’s import this function:
import { loginUser, visitAdminPage } from '@wordpress/e2e-test-utils'And add it to our test:
it ( 'verifies the plugin is active', async () => {

  // login as admin
  await loginUser();

  // visit the plugins page
  await visitAdminPage( 'plugins.php' );

  // assert that our plugin is active by checking the HTML

});
At this point, you should now be able to run the test suite in debug mode and watch the test script login to WordPress and visit the admin page.
Run the command npm run test-e2e:debug.
You should see the tests run, open Chrome, login as an admin that navigate away from the dashboard to the plugins page, then we should see the tests marked as passing in the terminal.
NOTE: If you’re in PHP Storm or another JetBrains IDE, the debugger will kick in for you automatically. If you’re in VSCode, you might need to add a .vscode/launch.json file, like this.
Asserting that the plugin is active
Now that we’ve successfully logged into the admin and navigated to the Plugins page, we can now write our assertion that the plugin is active.
If we wanted to inspect the HTML of the plugins page to see if the plugin is active, we could open up our browser dev tools and inspect the element. We would see that the row for our active plugin looks like so:
<tr class="active" data-slug="wpgraphql-end-2-end-tests-example" data-plugin="wp-graphql-e2e-tests-example/wp-graphql-e2e-tests-example.php">
We want to make an assertion that the plugins page contains a <tr> element, that has a class with the value of active, and a data-slug attribute with the value of wpgraphql-end-2-end-tests-example (or whatever your plugin name is).
We can use XPath expressions for this.
I’m not going to go deep into XPath here, but I will show you how to test this in your browser dev tools.
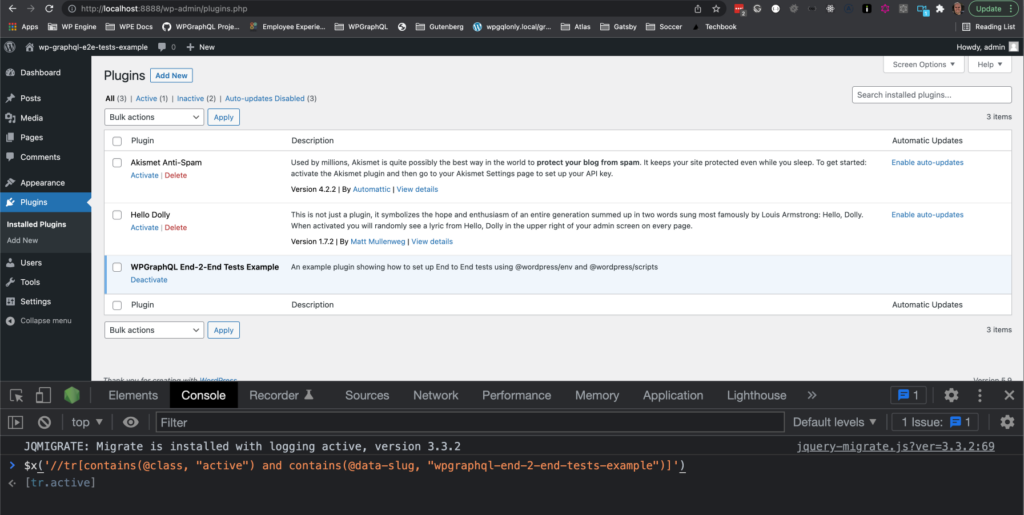
You can open up the plugins page in your WordPress install (that you started from the npm run wp-env command). Then in the console, paste the following line:
$x('//tr[contains(@class, "active") and contains(@data-slug, "wpgraphql-end-2-end-tests-example")]')You should see that it found exactly one element, as shown in the screenshot below.
We can take this code that works in the browser dev tools, and convert it to use the page.$x method from Puppeteer.
NOTE: the page object from Puppeteer is a global object in the test environment, so we don’t need to import it like we imported the other utils functions.
// Select the plugin based on slug and active class
        const activePlugin = await page.$x('//tr[contains(@class, "active") and contains(@data-slug, "wpgraphql-end-2-end-tests-example")]');
Then, we can use the (also global) expect method from jest, to make an assertion that the plugin is active:
// assert that our plugin is active by checking the HTML
expect( activePlugin?.length ).toBe( 1 );
The full test should look like so:
  it ( 'verifies the plugin is active', async () => {

  // login as admin
  await loginUser();

  // visit the plugins page
  await visitAdminPage( 'plugins.php' );

  // Select the plugin based on slug and active class
  const activePlugin = await page.$x('//tr[contains(@class, "active") and contains(@data-slug, "wpgraphql-end-2-end-tests-example")]');

  // assert that our plugin is active by checking the HTML
  expect( activePlugin?.length ).toBe( 1 );

});
Running the test should pass. We can verify that the test is actually working and not providing a false pass, by changing the name of the slug in our expect statement. If we changed the slug to “non-existent-plugin” but still assert that there would be 1 active plugin with that slug, we would have a failing test!
Continuous Integration
Right now, we can run the tests on our own machine. And contributors could run the tests if they cloned the code to their machine.
But, one thing that is nice to set up for tests like this, is to have the tests run when code changes. That will give us the confidence that new features and bugfixes don’t break old features and functionality.
Setting up a GitHub Workflow
We’re going to set up a GitHub Workflow (aka GitHub Action) that will run the tests when a Pull Request is opened against the repository, or when code is pushed directly to the master branch.
To create a GitHub workflow, we can create a file at .github/workflows/e2e-tests.yml.
Then, we can add the following:
name: End-to-End Tests

on:
  pull_request:
  push:
    branches:
      - master

jobs:
  admin:
    name: E2E Tests
    runs-on: ubuntu-latest
    strategy:
      fail-fast: false
      matrix:
        node: ['14']

    steps:
      - uses: actions/checkout@5a4ac9002d0be2fb38bd78e4b4dbde5606d7042f # v2.3.4

      - name: Setup environment to use the desired version of NodeJS
        uses: actions/setup-node@38d90ce44d5275ad62cc48384b3d8a58c500bb5f # v2.2.2
        with:
          node-version: ${{ matrix.node }}
          cache: npm

      - name: Installing NPM dependencies
        run: |
          npm install

      - name: Starting the WordPress Environment
        run: |
          npm run wp-env start

      - name: Running the tests
        run: |
          npm run test-e2e
If you’ve never setup a GitHub workflow, this might look intimidating, but if you slow down to read it carefully, it’s pretty self-descriptive.
The file gives the Worfklow a name “End-to-End Tests”.
name: End-to-End TestsThen, it configures what GitHub actions the Workflow should be triggered by. We configure it to run “on” the “pull_request” and the “push” actions, if the push is to the “master” branch.
on:
  pull_request:
  push:
    branches:
      - master
Then, we define what jobs to run and set up the environment to us ubuntu-latest and node 14.
jobs:
  admin:
    name: E2E Tests
    runs-on: ubuntu-latest
    strategy:
      fail-fast: false
      matrix:
        node: ['14']
Then, we define the steps for the job.
The first step is to “checkout” the codebase.
- uses: actions/checkout@5a4ac9002d0be2fb38bd78e4b4dbde5606d7042f # v2.3.4Then, we setup Node JS using the specified version.
      - name: Setup environment to use the desired version of NodeJS
        uses: actions/setup-node@38d90ce44d5275ad62cc48384b3d8a58c500bb5f # v2.2.2
        with:
          node-version: ${{ matrix.node }}
          cache: npm
Then, we install our NPM dependencies.
      - name: Installing NPM dependencies
        run: |
          npm install
Then, we start the WordPress environment.
      - name: Starting the WordPress Environment
        run: |
          npm run wp-env start
And last, we run the tests.
      - name: Running the tests
        run: |
          npm run test-e2e
And now, with this in place, our tests will run (and pass!) in GitHub!
You can see the passing test run here.
Conclusion
I hope this post helps you understand how to use the @wordpress/scripts and @wordpress/env packages, Jest, Puppeteer, and GitHub actions to test your WordPress plugins and themes.
If you’re interested in content like this, please subscribe to the WPGraphQL YouTube Channel and follow WPGraphQL on Twitter!
If you’ve never tried using GraphQL with WordPress, be sure to install and activate WPGraphQL as well!
Leave a Reply